Owner's Manual
Page 6
...Pack Operation . 10 Types of Discs Playable on this Player ... 11 Using These Operating Instructions 14 BEFORE USING Checking the Accessories 15 Remote Control Unit and Main Unit Preparations 16 Part Names and Functions 19 Connecting the Player to Other Components 29 Connecting to a TV ... Dolby Pro-Logic decoder/stereo device 32 Connecting to active speaker systems .. 33 Connecting headphones 34 Connecting to a video component, etc. (PDV-LC10 only 35 Using the Battery 36 Recharging the battery pack 36 Attaching the battery pack and player .... 38 Removing the player and battery pack ...
...Pack Operation . 10 Types of Discs Playable on this Player ... 11 Using These Operating Instructions 14 BEFORE USING Checking the Accessories 15 Remote Control Unit and Main Unit Preparations 16 Part Names and Functions 19 Connecting the Player to Other Components 29 Connecting to a TV ... Dolby Pro-Logic decoder/stereo device 32 Connecting to active speaker systems .. 33 Connecting headphones 34 Connecting to a video component, etc. (PDV-LC10 only 35 Using the Battery 36 Recharging the battery pack 36 Attaching the battery pack and player .... 38 Removing the player and battery pack ...
Owner's Manual
Page 15
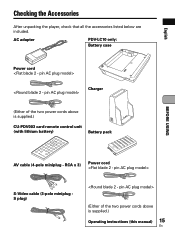
English Checking the Accessories After unpacking the player, check that all the accessories listed below are included. RCA x 3) Power cord S-Video cable (3-pole miniplug S plug) (Either of the two power cords above is supplied.) CU-PDV003 card remote control unit (with lithium battery) Battery pack BEFORE USING AV cable (4-pole miniplug - AC adapter PDV-LC10 only: Battery case Power cord Charger (Either of the two power cords above is supplied.) Operating instructions (this manual) 15 En
English Checking the Accessories After unpacking the player, check that all the accessories listed below are included. RCA x 3) Power cord S-Video cable (3-pole miniplug S plug) (Either of the two power cords above is supplied.) CU-PDV003 card remote control unit (with lithium battery) Battery pack BEFORE USING AV cable (4-pole miniplug - AC adapter PDV-LC10 only: Battery case Power cord Charger (Either of the two power cords above is supplied.) Operating instructions (this manual) 15 En
Owner's Manual
Page 16
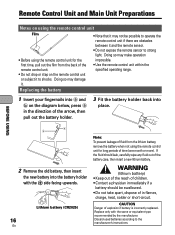
...then pull out the battery holder. 3 Fit the battery holder back into a and b on the remote control unit or subject it and the remote sensor. • Do not expose the remote sensor to strong light. Doing so may damage it. • Note that it may make operation impossible... heat, solder or short-circuit. Replacing the battery 1 Insert your fingernails into place. If the fluid should be possible to operate the remote control unit if there are obstacles between it to the manufacturer's instructions. Discard used batteries according to shocks. CR2025 Lithium battery (CR2025) ...
...then pull out the battery holder. 3 Fit the battery holder back into a and b on the remote control unit or subject it and the remote sensor. • Do not expose the remote sensor to strong light. Doing so may damage it. • Note that it may make operation impossible... heat, solder or short-circuit. Replacing the battery 1 Insert your fingernails into place. If the fluid should be possible to operate the remote control unit if there are obstacles between it to the manufacturer's instructions. Discard used batteries according to shocks. CR2025 Lithium battery (CR2025) ...

Owner's Manual
Page 17
... the lid to open it . 17 En Some operations, however, can be performed from the remote control unit. Removing the player's shipping spacer Remove the shipping spacer before turning on the player's power. 1 For the PDV-LC10, gently lift the liquid crystal display in the direction of approximately 4 meters. Also, do not force...
... the lid to open it . 17 En Some operations, however, can be performed from the remote control unit. Removing the player's shipping spacer Remove the shipping spacer before turning on the player's power. 1 For the PDV-LC10, gently lift the liquid crystal display in the direction of approximately 4 meters. Also, do not force...
Owner's Manual
Page 18
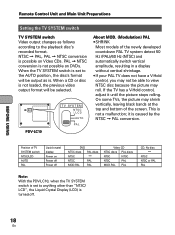
... Video CDs. NTSC = PAL, PAL = NTSC conversion is not loaded, the previous video output format will be able to the playback disc's recorded format. PDV-LC10 TV SYSTEM NTSC / LCD AUTO PAL About MOD. (Modulation) PAL • SHRINK Most models of the screen. On some TVs, the picture may shrink ...the picture may roll. Position of TV SYSTEM switch NTSC/LCD AUTO PAL Liquid crystal display Power on Power off Power off . This is . Remote Control Unit and Main Unit Preparations Setting the TV SYSTEM switch TV SYSTEM switch Video output changes as is not a malfunction; When the TV ...
... Video CDs. NTSC = PAL, PAL = NTSC conversion is not loaded, the previous video output format will be able to the playback disc's recorded format. PDV-LC10 TV SYSTEM NTSC / LCD AUTO PAL About MOD. (Modulation) PAL • SHRINK Most models of the screen. On some TVs, the picture may shrink ...the picture may roll. Position of TV SYSTEM switch NTSC/LCD AUTO PAL Liquid crystal display Power on Power off Power off . This is . Remote Control Unit and Main Unit Preparations Setting the TV SYSTEM switch TV SYSTEM switch Video output changes as is not a malfunction; When the TV ...
Owner's Manual
Page 21
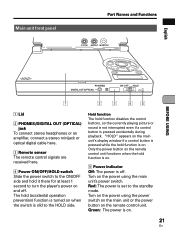
...Turn on . 5 Power indicator Off: The power is on . 21 En Only the power button on the remote control unit functions when the hold function is turned on the remote control unit. English Main unit front panel Part Names and Functions COLOR BRIGHT MONITOR BEFORE USING PHONES DIGITAL OUT (...2 3 45 1 Lid 2 PHONES/DIGITAL OUT (OPTICAL) jack To connect stereo headphones or an amplifier, connect a stereo minijack or optical digital cable here. 3 Remote sensor The remote control signals are received here. 4 Power ON/OFF/HOLD switch Slide the power switch to the ON/OFF side and hold it there for...
...Turn on . 5 Power indicator Off: The power is on . 21 En Only the power button on the remote control unit functions when the hold function is turned on the remote control unit. English Main unit front panel Part Names and Functions COLOR BRIGHT MONITOR BEFORE USING PHONES DIGITAL OUT (...2 3 45 1 Lid 2 PHONES/DIGITAL OUT (OPTICAL) jack To connect stereo headphones or an amplifier, connect a stereo minijack or optical digital cable here. 3 Remote sensor The remote control signals are received here. 4 Power ON/OFF/HOLD switch Slide the power switch to the ON/OFF side and hold it there for...
Owner's Manual
Page 25
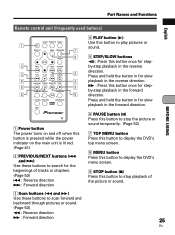
... stepby-step playback in the reverse direction. E : Press this button once for slow playback in the forward direction. Part Names and Functions English BEFORE USING Remote control unit (frequently used buttons) 1 2 3 4 5 6 AUDIO SUBTITLE ANGLE DISPLAY MENU TOP MENU ENTER SETUP PREV 4 NEXT RETURN ¢ REV PLAY FWD CLEAR 1 3 ¡C 1 2 3 STEP/SLOW...
... stepby-step playback in the reverse direction. E : Press this button once for slow playback in the forward direction. Part Names and Functions English BEFORE USING Remote control unit (frequently used buttons) 1 2 3 4 5 6 AUDIO SUBTITLE ANGLE DISPLAY MENU TOP MENU ENTER SETUP PREV 4 NEXT RETURN ¢ REV PLAY FWD CLEAR 1 3 ¡C 1 2 3 STEP/SLOW...
Owner's Manual
Page 26
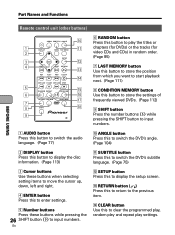
... setting items to move the cursor up, down, left and right. 4 ENTER button Press this to the previous item. Part Names and Functions BEFORE USING Remote control unit (other buttons) 1 2 3 4 5 6 7 8 9 AUDIO SUBTITLE ANGLE DISPLAY MENU TOP MENU ENTER SETUP PREV 4 NEXT RETURN ¢ REV PLAY FWD CLEAR 1 3 ¡C 1 2 3 STEP/SLOW PAUSE...
... setting items to move the cursor up, down, left and right. 4 ENTER button Press this to the previous item. Part Names and Functions BEFORE USING Remote control unit (other buttons) 1 2 3 4 5 6 7 8 9 AUDIO SUBTITLE ANGLE DISPLAY MENU TOP MENU ENTER SETUP PREV 4 NEXT RETURN ¢ REV PLAY FWD CLEAR 1 3 ¡C 1 2 3 STEP/SLOW PAUSE...
Owner's Manual
Page 41
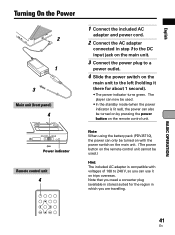
English Turning On the Power DC IN 9V 2 1 3 Main unit (front panel) 4 ON/OFF HOLD Power indicator Remote control unit 4 1 Connect the included AC adapter and power cord. 2 Connect the AC adapter connected in which you ...power switch on trips overseas. Note: When using the battery pack (PDV-BT10), the power can only be turned on with the power switch on the main unit. (The power button on the remote control unit cannot be used.) Hint: The included AC adapter is lit... OPERATION 4 ¢ 41 En The player can now be turned on by pressing the power button on the remote control unit.
English Turning On the Power DC IN 9V 2 1 3 Main unit (front panel) 4 ON/OFF HOLD Power indicator Remote control unit 4 1 Connect the included AC adapter and power cord. 2 Connect the AC adapter connected in which you ...power switch on trips overseas. Note: When using the battery pack (PDV-BT10), the power can only be turned on with the power switch on the main unit. (The power button on the remote control unit cannot be used.) Hint: The included AC adapter is lit... OPERATION 4 ¢ 41 En The player can now be turned on by pressing the power button on the remote control unit.
Owner's Manual
Page 42
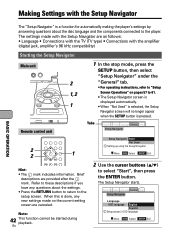
... "Setup Navigator" is pressed. The Setup Navigator starts. Making Settings with the amplifier (digital jack, amplifier's 96 kHz compatibility) Starting the Setup Navigator Main unit Remote control unit 1 In the stop mode, press the SETUP button, then select "Setup Navigator" under the 2 "General" tab. • For operating instructions, refer to the...
... "Setup Navigator" is pressed. The Setup Navigator starts. Making Settings with the amplifier (digital jack, amplifier's 96 kHz compatibility) Starting the Setup Navigator Main unit Remote control unit 1 In the stop mode, press the SETUP button, then select "Setup Navigator" under the 2 "General" tab. • For operating instructions, refer to the...
Owner's Manual
Page 43
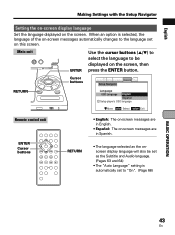
... 2 Video Language General Other Setup Navigator RETURN Language OSD Language Efrnagnlçisahis Español i Setup player's OSD language Move ENTER Select SETUP Exit Remote control unit ENTER Cursor buttons 4 ¢ 13¡ e 8 E7 RETURN • English: The on-screen messages are in English. • Español: The on...
... 2 Video Language General Other Setup Navigator RETURN Language OSD Language Efrnagnlçisahis Español i Setup player's OSD language Move ENTER Select SETUP Exit Remote control unit ENTER Cursor buttons 4 ¢ 13¡ e 8 E7 RETURN • English: The on-screen messages are in English. • Español: The on...
Owner's Manual
Page 44
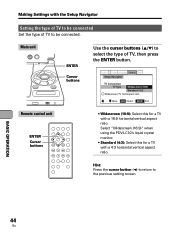
...ENTER Cursor buttons Use the cursor buttons (5/∞) to select the type of TV to be connected. Select "Widescreen (16:9)" when using the PDV-LC10's liquid crystal monitor. • Standard (4:3): Select this for a TV with a 4:3 horizontal:vertical aspect ratio. Audio1 2 Video Language General... Other Setup Navigator TV Connection TV Type Widescreen (16:9) Standard (4:3) i Widescreen TV 16:9 aspect ratio Move ENTER Select SETUP Exit Remote control unit ENTER Cursor buttons 4 ¢ 13¡ e 8 E7 • Widescreen (16:9): Select this for a TV with a 16:9 ...
...ENTER Cursor buttons Use the cursor buttons (5/∞) to select the type of TV to be connected. Select "Widescreen (16:9)" when using the PDV-LC10's liquid crystal monitor. • Standard (4:3): Select this for a TV with a 4:3 horizontal:vertical aspect ratio. Audio1 2 Video Language General... Other Setup Navigator TV Connection TV Type Widescreen (16:9) Standard (4:3) i Widescreen TV 16:9 aspect ratio Move ENTER Select SETUP Exit Remote control unit ENTER Cursor buttons 4 ¢ 13¡ e 8 E7 • Widescreen (16:9): Select this for a TV with a 16:9 ...
Owner's Manual
Page 45
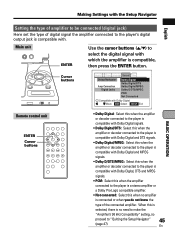
... Digital Jacks Dolby Digital Dolby Digital/DTS Dolby Digital/MPEG Dolby D/DTS/MPEG PCM Not Connected i Compatible with Dolby Digital Move ENTER Select SETUP Exit Remote control unit ENTER Cursor buttons 4 ¢ 13¡ e 8 E7 • Dolby Digital: Select this when the amplifier or decoder connected to the player is compatible...
... Digital Jacks Dolby Digital Dolby Digital/DTS Dolby Digital/MPEG Dolby D/DTS/MPEG PCM Not Connected i Compatible with Dolby Digital Move ENTER Select SETUP Exit Remote control unit ENTER Cursor buttons 4 ¢ 13¡ e 8 E7 • Dolby Digital: Select this when the amplifier or decoder connected to the player is compatible...
Owner's Manual
Page 46
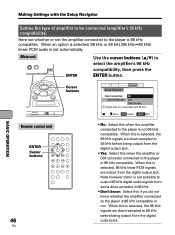
... amplifier or D/A converter connected to 48 kHz before being output from the digital output jack. Making Settings with 96 kHz Move ENTER Select SETUP Exit Remote control unit ENTER Cursor buttons 4 ¢ 13¡ e 8 E7 46 En • No: Select this when the amplifier connected to the player is 96 kHz...
... amplifier or D/A converter connected to 48 kHz before being output from the digital output jack. Making Settings with 96 kHz Move ENTER Select SETUP Exit Remote control unit ENTER Cursor buttons 4 ¢ 13¡ e 8 E7 46 En • No: Select this when the amplifier connected to the player is 96 kHz...
Owner's Manual
Page 47
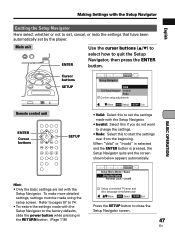
Cursor buttons SETUP Remote control unit ENTER Cursor buttons 4 ¢ 13¡ e 8 E7 SETUP Audio1 2 Video Language General Other Setup Navigator Valid Exit Setup Navigator Invalid Redo i Confirm setup ...
Cursor buttons SETUP Remote control unit ENTER Cursor buttons 4 ¢ 13¡ e 8 E7 SETUP Audio1 2 Video Language General Other Setup Navigator Valid Exit Setup Navigator Invalid Redo i Confirm setup ...
Owner's Manual
Page 49
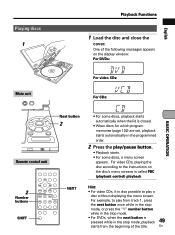
... Hint: • For video CDs, it is also possible to the instructions on the display window: For DVDs: For video CDs: For CDs: BASIC OPERATION Remote control unit Next button 2 • For some discs, a menu screen appears. En English Playing discs 1 ◊ÛN¿ÇΩ,?
... Hint: • For video CDs, it is also possible to the instructions on the display window: For DVDs: For video CDs: For CDs: BASIC OPERATION Remote control unit Next button 2 • For some discs, a menu screen appears. En English Playing discs 1 ◊ÛN¿ÇΩ,?
Owner's Manual
Page 50
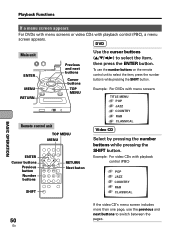
... 2 JAZZ 3 COUNTRY 4 R&B 5 CLASSICAL BASIC OPERATION If the video CD's menu screen includes more than one page, use the number buttons on the remote control unit to select the item, press the number buttons while pressing the SHIFT button. To use the previous and next buttons to select the... item, then press the ENTER button. DVD Main unit ENTER MENU RETURN Previous and next buttons Cursor buttons TOP MENU Remote control unit TOP MENU MENU ENTER Cursor buttons Previous button Number buttons 4 ¢ 13¡ e 8 E7 RETURN Next buton SHIFT Use ...
... 2 JAZZ 3 COUNTRY 4 R&B 5 CLASSICAL BASIC OPERATION If the video CD's menu screen includes more than one page, use the number buttons on the remote control unit to select the item, press the number buttons while pressing the SHIFT button. To use the previous and next buttons to select the... item, then press the ENTER button. DVD Main unit ENTER MENU RETURN Previous and next buttons Cursor buttons TOP MENU Remote control unit TOP MENU MENU ENTER Cursor buttons Previous button Number buttons 4 ¢ 13¡ e 8 E7 RETURN Next buton SHIFT Use ...
Owner's Manual
Page 52
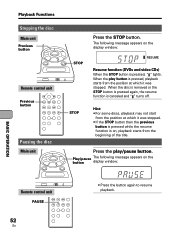
Playback Functions Stopping the disc Main unit Previous button Remote control unit Previous button 4 ¢ 13¡ e 8 E7 Pausing the disc Main unit STOP Press the STOP button. When the play /pause button. STOP Hint: &#... message appears on the display window: RESUME Resume function (DVDs and video CDs) When the STOP button is on the button display window: BASIC OPERATION Remote control unit PAUSE 13¡ e 8 E7 52 En • Press the button again to resume playback. When the disc is removed or the STOP button...
Playback Functions Stopping the disc Main unit Previous button Remote control unit Previous button 4 ¢ 13¡ e 8 E7 Pausing the disc Main unit STOP Press the STOP button. When the play /pause button. STOP Hint: &#... message appears on the display window: RESUME Resume function (DVDs and video CDs) When the STOP button is on the button display window: BASIC OPERATION Remote control unit PAUSE 13¡ e 8 E7 52 En • Press the button again to resume playback. When the disc is removed or the STOP button...
Owner's Manual
Page 53
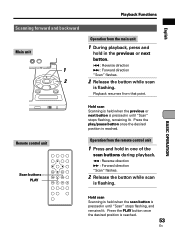
...53 En Press the PLAY button once the desired position is reached. English Playback Functions Scanning forward and backward Main unit 1 2 Operation from the remote control unit 1 Press and hold in the previous or next button. 4 : Reverse direction ¢ : Forward direction "Scan" flashes. 2 ...Release the button while scan is flashing. Playback resumes from that point. Remote control unit Scan buttons PLAY 4 ¢ 13¡ e 8 E7 Hold scan Scanning is held when the scan button is pressed in until "Scan...
...53 En Press the PLAY button once the desired position is reached. English Playback Functions Scanning forward and backward Main unit 1 2 Operation from the remote control unit 1 Press and hold in the previous or next button. 4 : Reverse direction ¢ : Forward direction "Scan" flashes. 2 ...Release the button while scan is flashing. Playback resumes from that point. Remote control unit Scan buttons PLAY 4 ¢ 13¡ e 8 E7 Hold scan Scanning is held when the scan button is pressed in until "Scan...
Owner's Manual
Page 54
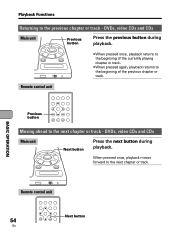
DVDs, video CDs and CDs Main unit Previous button Press the previous button during playback. Remote control unit Previous button 4 ¢ 13¡ Moving ahead to the next chapter or track. DVDs, video CDs and CDs Main unit Next button Press ...; When pressed again, playback returns to the previous chapter or track - When pressed once, playback moves forward to the next chapter or track - BASIC OPERATION Remote control unit Next button 54 4 ¢ En Playback Functions Returning to the beginning of the previous chapter or track.
DVDs, video CDs and CDs Main unit Previous button Press the previous button during playback. Remote control unit Previous button 4 ¢ 13¡ Moving ahead to the next chapter or track. DVDs, video CDs and CDs Main unit Next button Press ...; When pressed again, playback returns to the previous chapter or track - When pressed once, playback moves forward to the next chapter or track - BASIC OPERATION Remote control unit Next button 54 4 ¢ En Playback Functions Returning to the beginning of the previous chapter or track.


