Owner's Manual
Page 2
... of audio adjustments 15 Using balance adjustment 16 Using the equalizer 16 • Recalling equalizer curves 16 • Adjusting equalizer curves 17 Adjusting loudness 17 Front image enhancer (FIE) 18 Adjusting source levels 18 Initial Settings Adjusting initial settings 19 Setting the time 19 Switching the auxiliary setting 20 Additional Information Setting the time display on 6 Selecting a source 6 Turning the unit off 20 Using the AUX source 20 • Selecting AUX as the source 20 Cassette tapes 21 Cleaning the playback head 21 Music search and repeat functions 21 Specifications...
... of audio adjustments 15 Using balance adjustment 16 Using the equalizer 16 • Recalling equalizer curves 16 • Adjusting equalizer curves 17 Adjusting loudness 17 Front image enhancer (FIE) 18 Adjusting source levels 18 Initial Settings Adjusting initial settings 19 Setting the time 19 Switching the auxiliary setting 20 Additional Information Setting the time display on 6 Selecting a source 6 Turning the unit off 20 Using the AUX source 20 • Selecting AUX as the source 20 Cassette tapes 21 Cleaning the playback head 21 Music search and repeat functions 21 Specifications...
Owner's Manual
Page 3
... 50 Light traffic, normal conversation, quiet office 60 Air conditioner at 20 feet, sewing machine 70 Vacuum cleaner, hair dryer, noisy restaurant 80 Average city traffic, garbage disposals, alarm clock at a safe level BEFORE your volume control at a safe level. En 2 Italiano Nederlands English Español Deutsch Français Selecting fine audio equipment such as the unit...
... 50 Light traffic, normal conversation, quiet office 60 Air conditioner at 20 feet, sewing machine 70 Vacuum cleaner, hair dryer, noisy restaurant 80 Average city traffic, garbage disposals, alarm clock at a safe level BEFORE your volume control at a safe level. En 2 Italiano Nederlands English Español Deutsch Français Selecting fine audio equipment such as the unit...
Owner's Manual
Page 4
...-sales service for Pioneer products Please contact the dealer or distributor from where you purchased this manual This unit features a number of the car. • Protect this unit. U.S.A. CUSTOMER SATISFACTION DEPARTMENT 300 Allstate Parkway Markham, Ontario L3R OP2 (905) 479-4411 1-877-283-5901 For warranty information please see the Limited Warranty sheet included with the functions and their operation...
...-sales service for Pioneer products Please contact the dealer or distributor from where you purchased this manual This unit features a number of the car. • Protect this unit. U.S.A. CUSTOMER SATISFACTION DEPARTMENT 300 Allstate Parkway Markham, Ontario L3R OP2 (905) 479-4411 1-877-283-5901 For warranty information please see the Limited Warranty sheet included with the functions and their operation...
Owner's Manual
Page 6
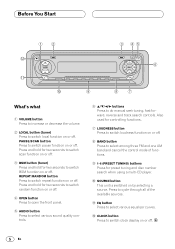
... equalizer curves. = CLOCK button Press to switch clock display on or off . Press to switch scan function on or off. 3 BSM button (tuner) Press and hold for preset tuning and disc number search when using a multi-CD player. 0 SOURCE button This unit is switched on by selecting a source. PAUSE/SCAN button Press to switch pause function on or off . 5 En Before You Start 12 3 45 = 6 - 0 9 87 What's what 1 VOLUME button Press to increase or decrease the volume. 2 LOCAL button (tuner...
... equalizer curves. = CLOCK button Press to switch clock display on or off . Press to switch scan function on or off. 3 BSM button (tuner) Press and hold for preset tuning and disc number search when using a multi-CD player. 0 SOURCE button This unit is switched on by selecting a source. PAUSE/SCAN button Press to switch pause function on or off . 5 En Before You Start 12 3 45 = 6 - 0 9 87 What's what 1 VOLUME button Press to increase or decrease the volume. 2 LOCAL button (tuner...
Owner's Manual
Page 7
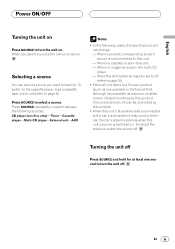
... set to off (refer to page 20). • External Unit refers to a Pioneer product (such as a source, enables control of basic functions by this product. • When this unit's blue/white lead is connected to the car's auto-antenna relay control terminal, the car's antenna extends when this unit. - Press SOURCE repeatedly to switch between the following cases, the sound source will not change: - English Español Power ON/OFF Turning the unit...
... set to off (refer to page 20). • External Unit refers to a Pioneer product (such as a source, enables control of basic functions by this product. • When this unit's blue/white lead is connected to the car's auto-antenna relay control terminal, the car's antenna extends when this unit. - Press SOURCE repeatedly to switch between the following cases, the sound source will not change: - English Español Power ON/OFF Turning the unit...
Owner's Manual
Page 8
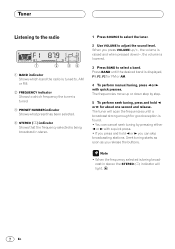
... frequency selected is being broadcast in stereo. 1 Press SOURCE to select the tuner. 2 Use VOLUME to select a band. Tuner Listening to the radio 1 2 34 1 BAND indicator Shows which band the radio is tuned to, AM or FM. 2 FREQUENCY indicator Shows to which frequency the tuner is tuned. 3 PRESET NUMBER indicator Shows what preset has been selected. 4 STEREO () indicator Shows that the frequency selected is being broadcast in stereo the STEREO () indicator will scan the frequencies...
... frequency selected is being broadcast in stereo. 1 Press SOURCE to select the tuner. 2 Use VOLUME to select a band. Tuner Listening to the radio 1 2 34 1 BAND indicator Shows which band the radio is tuned to, AM or FM. 2 FREQUENCY indicator Shows to which frequency the tuner is tuned. 3 PRESET NUMBER indicator Shows what preset has been selected. 4 STEREO () indicator Shows that the frequency selected is being broadcast in stereo the STEREO () indicator will scan the frequencies...
Owner's Manual
Page 9
... in memory press a PRESET TUNING button and hold BSM for later recall with BSM may replace broadcast frequencies you have pressed will be stored in memory. • You can also use 5 and ∞ to recall radio station frequencies assigned to turn local seek tuning off. When you find a frequency that you press the same PRESET TUNING button the radio station frequency is flashing the six strongest broadcast frequencies will flash in the PRESET NUMBER indicator...
... in memory press a PRESET TUNING button and hold BSM for later recall with BSM may replace broadcast frequencies you have pressed will be stored in memory. • You can also use 5 and ∞ to recall radio station frequencies assigned to turn local seek tuning off. When you find a frequency that you press the same PRESET TUNING button the radio station frequency is flashing the six strongest broadcast frequencies will flash in the PRESET NUMBER indicator...
Owner's Manual
Page 10
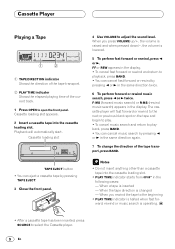
... panel. 4 Use VOLUME to select the Cassette player. 9 En When you press VOLUME up/+, the volume is raised and when pressed down/-, the volume is operating. • After a cassette tape has been inserted, press SOURCE to adjust the sound level. Cassette loading slot appears. 2 Insert a cassette tape into the cassette loading slot. • PLAY TIME indicator starts from 00'00" in the following cases: - FF or REW appears in the display...
... panel. 4 Use VOLUME to select the Cassette player. 9 En When you press VOLUME up/+, the volume is raised and when pressed down/-, the volume is operating. • After a cassette tape has been inserted, press SOURCE to adjust the sound level. Cassette loading slot appears. 2 Insert a cassette tape into the cassette loading slot. • PLAY TIME indicator starts from 00'00" in the following cases: - FF or REW appears in the display...
Owner's Manual
Page 11
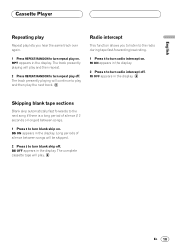
... Italiano Nederlands En 10 Radio intercept This function allows you hear the same track over again. 1 Press REPEAT/RANDOM to turn blank skip off . BS ON appears in the display. The track presently playing will continue to play and then play . English Español Cassette Player Repeating play Repeat play lets you to listen to the radio during tape fast-forwarding...
... Italiano Nederlands En 10 Radio intercept This function allows you hear the same track over again. 1 Press REPEAT/RANDOM to turn blank skip off . BS ON appears in the display. The track presently playing will continue to play and then play . English Español Cassette Player Repeating play Repeat play lets you to listen to the radio during tape fast-forwarding...
Owner's Manual
Page 12
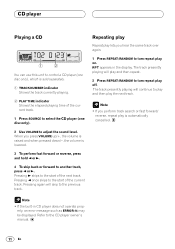
... reverse, press and hold 2 or 3. 4 To skip back or forward to adjust the sound level. CD player Playing a CD 1 2 You can use this unit to control a CD player (one disc only), which is sold separately. 1 TRACK NUMBER indicator Shows the track currently playing. 2 PLAY TIME indicator Shows the elapsed playing time of the current track. 1 Press SOURCE to select the CD player (one disc only). 2 Use VOLUME to another track, press 2 or 3.
... reverse, press and hold 2 or 3. 4 To skip back or forward to adjust the sound level. CD player Playing a CD 1 2 You can use this unit to control a CD player (one disc only), which is sold separately. 1 TRACK NUMBER indicator Shows the track currently playing. 2 PLAY TIME indicator Shows the elapsed playing time of the current track. 1 Press SOURCE to select the CD player (one disc only). 2 Use VOLUME to another track, press 2 or 3.
Owner's Manual
Page 14
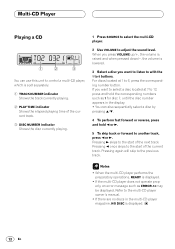
...-CD player owner's manual. • If there are no discs in the display. • You can use this unit to control a multi-CD player, which is displayed. 13 En Pressing again will skip to 6, press the corresponding number button. Pressing 2 once skips to the start of the current track. 3 DISC NUMBER indicator Shows the disc currently playing. 1 Press SOURCE to select the multi-CD player. 2 Use VOLUME to adjust the sound level. Multi-CD Player Playing...
...-CD player owner's manual. • If there are no discs in the display. • You can use this unit to control a multi-CD player, which is displayed. 13 En Pressing again will skip to 6, press the corresponding number button. Pressing 2 once skips to the start of the current track. 3 DISC NUMBER indicator Shows the disc currently playing. 1 Press SOURCE to select the multi-CD player. 2 Use VOLUME to adjust the sound level. Multi-CD Player Playing...
Owner's Manual
Page 17
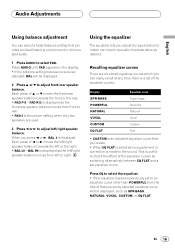
... environment in the display. • If the balance setting has been previously adjusted, BAL will be displayed. 2 Press 5 or ∞ to the sound. BAL R9 is displayed as SPR-BASS, NATURAL, VOCAL, CUSTOM, or EQ FLAT. Recalling equalizer curves There are used. 3 Press 2 or 3 to match car interior acoustic characteristics as the front/rear speaker balance moves from left /right speaker balance. Using the equalizer The equalizer lets you...
... environment in the display. • If the balance setting has been previously adjusted, BAL will be displayed. 2 Press 5 or ∞ to the sound. BAL R9 is displayed as SPR-BASS, NATURAL, VOCAL, CUSTOM, or EQ FLAT. Recalling equalizer curves There are used. 3 Press 2 or 3 to match car interior acoustic characteristics as the front/rear speaker balance moves from left /right speaker balance. Using the equalizer The equalizer lets you...
Owner's Manual
Page 18
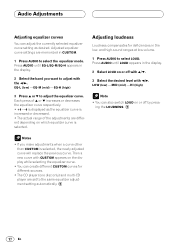
... the equalizer curve respectively. • +6 - -6 is displayed as desired. Audio Adjustments Adjusting equalizer curves You can create different CUSTOM curves for deficiencies in CUSTOM. 1 Press AUDIO to adjust with the 2/3. Adjusted equalizer curve settings are memorized in the low- and high-sound ranges at low volume. 1 Press AUDIO to the same equalizer adjustment setting automatically. 17 En Adjusting loudness Loudness compensates for different sources. • The CD player (one disc only...
... the equalizer curve respectively. • +6 - -6 is displayed as desired. Audio Adjustments Adjusting equalizer curves You can create different CUSTOM curves for deficiencies in CUSTOM. 1 Press AUDIO to adjust with the 2/3. Adjusted equalizer curve settings are memorized in the low- and high-sound ranges at low volume. 1 Press AUDIO to the same equalizer adjustment setting automatically. 17 En Adjusting loudness Loudness compensates for different sources. • The CD player (one disc only...
Owner's Manual
Page 19
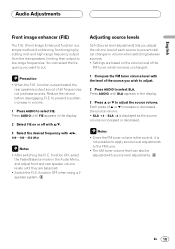
... AUDIO to select SLA. function ON, select the Fader/Balance mode in the display. 2 Select FIE on the volume level of the FM tuner, which remains unchanged. 1 Compare the FM tuner volume level with the level of all frequencies, not just bass sounds. Adjusting source levels SLA (Source level adjustment) lets you want to low-range frequencies. Each press of enhancing front imaging by cutting mid- Press AUDIO until FIE appears in the Audio Menu, and adjust front and rear speaker volume levels...
... AUDIO to select SLA. function ON, select the Fader/Balance mode in the display. 2 Select FIE on the volume level of the FM tuner, which remains unchanged. 1 Compare the FM tuner volume level with the level of all frequencies, not just bass sounds. Adjusting source levels SLA (Source level adjustment) lets you want to low-range frequencies. Each press of enhancing front imaging by cutting mid- Press AUDIO until FIE appears in the Audio Menu, and adjust front and rear speaker volume levels...

Owner's Manual
Page 20
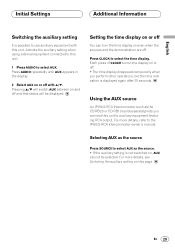
... SOURCE and hold until the unit turns off. 2 Press AUDIO and hold until the unit turns off. Initial Settings Adjusting initial settings Initial settings lets you perform initial set with 5/∞. Pressing 5 will blink. 3 Select the correct time with 2/3. Press AUDIO until the time appears in the display. Pressing ∞ will decrease the selected hour or minute. 19 En Press AUDIO repeatedly to switch between the following settings: TIME-AUX Use the following instructions...
... SOURCE and hold until the unit turns off. 2 Press AUDIO and hold until the unit turns off. Initial Settings Adjusting initial settings Initial settings lets you perform initial set with 5/∞. Pressing 5 will blink. 3 Select the correct time with 2/3. Press AUDIO until the time appears in the display. Pressing ∞ will decrease the selected hour or minute. 19 En Press AUDIO repeatedly to switch between the following settings: TIME-AUX Use the following instructions...
Owner's Manual
Page 21
... owner's manual. English Español Initial Settings Additional Information Switching the auxiliary setting It is possible to use auxiliary equipment with 5/∞. Press CLOCK to select AUX. Each press of CLOCK turns time display on this unit. Activate the auxiliary setting when using external equipment connected to this unit to auxiliary equipment featuring RCA output. Using the AUX source An IP-BUS-RCA Interconnector such as the source. • If the auxiliary setting is not switched on or off . • The time display...
... owner's manual. English Español Initial Settings Additional Information Switching the auxiliary setting It is possible to use auxiliary equipment with 5/∞. Press CLOCK to select AUX. Each press of CLOCK turns time display on this unit. Activate the auxiliary setting when using external equipment connected to this unit to auxiliary equipment featuring RCA output. Using the AUX source An IP-BUS-RCA Interconnector such as the source. • If the auxiliary setting is not switched on or off . • The time display...
Owner's Manual
Page 22
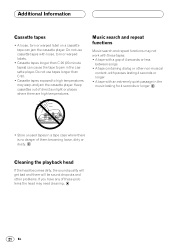
... may not work with these problems the head may need cleaning. 21 En Music search and repeat functions Music search and repeat functions may warp and jam the cassette player. Do not use cassette tapes with an extremely quiet passage in the music lasting for 4 seconds or longer • Store unused tapes in the cassette player. Cleaning the playback head If the head becomes dirty, the sound quality...
... may not work with these problems the head may need cleaning. 21 En Music search and repeat functions Music search and repeat functions may warp and jam the cassette player. Do not use cassette tapes with an extremely quiet passage in the music lasting for 4 seconds or longer • Store unused tapes in the cassette player. Cleaning the playback head If the head becomes dirty, the sound quality...
Owner's Manual
Page 23
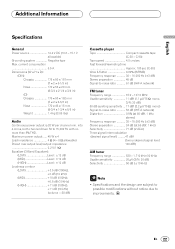
... power output ..... 45 W × 4 Load impedance 4 Ω (4 - 8 Ω allowable) Preout max output level/output impedance 2.2 V/1 kΩ Equalizer (3-Band Equalizer): (LOW Level : ±12 dB (MID Level : ±12 dB (HIGH Level : ±12 dB Loudness contour (LOW 3.5 dB (100Hz), +3 dB (10 kHz) (MID 10 dB (100Hz), +6.5 dB (10 kHz) (HIGH 11 dB (100Hz), +11 dB (10 kHz) (volume : -30 dB) Cassette player Tape Compact cassette...
... power output ..... 45 W × 4 Load impedance 4 Ω (4 - 8 Ω allowable) Preout max output level/output impedance 2.2 V/1 kΩ Equalizer (3-Band Equalizer): (LOW Level : ±12 dB (MID Level : ±12 dB (HIGH Level : ±12 dB Loudness contour (LOW 3.5 dB (100Hz), +3 dB (10 kHz) (MID 10 dB (100Hz), +6.5 dB (10 kHz) (HIGH 11 dB (100Hz), +11 dB (10 kHz) (volume : -30 dB) Cassette player Tape Compact cassette...
Other Manual
Page 1
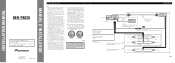
... feed power to other units, then make connections correctly. • Secure the wiring with ignition switch ON/OFF operations. Red To electric terminal controlled by cutting the insulation of the power supply lead of the unit and tapping into the engine compartment to connect to use only fuse of the power amp or Auto-antenna relay control terminal (max. 300 mA 12 V DC). System remote control + Front speaker ≠ Left + Rear speaker ≠...
... feed power to other units, then make connections correctly. • Secure the wiring with ignition switch ON/OFF operations. Red To electric terminal controlled by cutting the insulation of the power supply lead of the unit and tapping into the engine compartment to connect to use only fuse of the power amp or Auto-antenna relay control terminal (max. 300 mA 12 V DC). System remote control + Front speaker ≠ Left + Rear speaker ≠...
Other Manual
Page 4
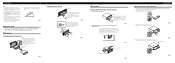
... the factory radio mounting bracket. (Fig. 8) (Fig. 9) Select a position where the screw holes of the bracket and the screw holes of the dashboard material and bend them. (Install as firmly as shown in the driver's way and cannot injure the passenger if there is all connected up properly, and the unit and the system work properly. • Use only the parts...
... the factory radio mounting bracket. (Fig. 8) (Fig. 9) Select a position where the screw holes of the bracket and the screw holes of the dashboard material and bend them. (Install as firmly as shown in the driver's way and cannot injure the passenger if there is all connected up properly, and the unit and the system work properly. • Use only the parts...


