Owner's Manual
Page 4
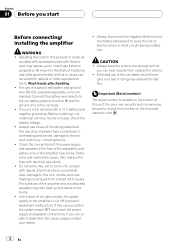
...governmental entities to cause cancer and birth defects or other reproductive harm. gine is recommended. sociated with accessories sold battery wire or the amplifier fuse blows. The surfaces of electric shock or short circuit during installation. If this unit to come into contact with the product ...event of the separately sold with liquids. Handling the cord on the bottom of the car stereo while the en- Always use of this product or cords as- If you start Before connecting/ installing the amplifier WARNING ! Determine and resolve the cause, then replace the fuse with a 12 V...
...governmental entities to cause cancer and birth defects or other reproductive harm. gine is recommended. sociated with accessories sold battery wire or the amplifier fuse blows. The surfaces of electric shock or short circuit during installation. If this unit to come into contact with the product ...event of the separately sold with liquids. Handling the cord on the bottom of the car stereo while the en- Always use of this product or cords as- If you start Before connecting/ installing the amplifier WARNING ! Determine and resolve the cause, then replace the fuse with a 12 V...
Owner's Manual
Page 5
... of the unit and/or speakers due to excessive output, improper use with an RCA equipped Pioneer car stereo, with max. En 5 A cut in sound output may indicate improper setting of the car stereo output. 3 LPF (low-pass filter)/HPF (high-pass filter) select switch Switch the...up , turn controls to lower level. If output remains low, even when the car stereo volume is turned up to indicate power ON. 2 GAIN (gain) control Adjusting gain controls CHANNEL A (channel A) and CHANNEL B (channel B) helps align the car stereo output to the Pioneer amplifier. For use or improper connection. !
... of the unit and/or speakers due to excessive output, improper use with an RCA equipped Pioneer car stereo, with max. En 5 A cut in sound output may indicate improper setting of the car stereo output. 3 LPF (low-pass filter)/HPF (high-pass filter) select switch Switch the...up , turn controls to lower level. If output remains low, even when the car stereo volume is turned up to indicate power ON. 2 GAIN (gain) control Adjusting gain controls CHANNEL A (channel A) and CHANNEL B (channel B) helps align the car stereo output to the Pioneer amplifier. For use or improper connection. !
Owner's Manual
Page 7
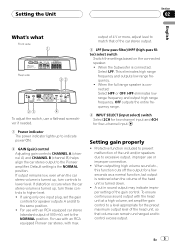
...Never shorten any wires, the protection circuit may malfunction. Refer to Connections when using the speaker input wire on page 5. En 7 Before connecting the amplifier WARNING ! CAUTION ! b Fuse (25 A) × 2 c System remote control wire (sold separately) Connect male terminal of this wire to ... terminals Please see Setting the Unit on page 10. Current capacity of the amplifier to the positive (+) battery terminal. 2 Ground wire (Black) RD-223 (sold separately) Connect to metal body or chassis. 3 Car stereo with RCA output jacks (sold separately) 4 External output If only one...
...Never shorten any wires, the protection circuit may malfunction. Refer to Connections when using the speaker input wire on page 5. En 7 Before connecting the amplifier WARNING ! CAUTION ! b Fuse (25 A) × 2 c System remote control wire (sold separately) Connect male terminal of this wire to ... terminals Please see Setting the Unit on page 10. Current capacity of the amplifier to the positive (+) battery terminal. 2 Ground wire (Black) RD-223 (sold separately) Connect to metal body or chassis. 3 Car stereo with RCA output jacks (sold separately) 4 External output If only one...
Owner's Manual
Page 8
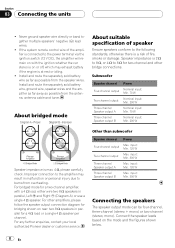
...use a single 4 W speaker. Connect the speaker leads based on or off, which may result in parallel for a two-channel amplifier, with the ignition whether the car stereo is at rest or idling. ! input: Min. 120 W Two-channel output Max. Subwoofer Speaker channel Power Four-channel ... injury due to the following standards, otherwise there is max. 4 W, please carefully check. For any further enquiries, contact your local authorized Pioneer dealer or customer service. input: Min. 300 W Three-channel Speaker output A Max. input: Min. 300 W Connecting the speakers The...
...use a single 4 W speaker. Connect the speaker leads based on or off, which may result in parallel for a two-channel amplifier, with the ignition whether the car stereo is at rest or idling. ! input: Min. 120 W Two-channel output Max. Subwoofer Speaker channel Power Four-channel ... injury due to the following standards, otherwise there is max. 4 W, please carefully check. For any further enquiries, contact your local authorized Pioneer dealer or customer service. input: Min. 300 W Three-channel Speaker output A Max. input: Min. 300 W Connecting the speakers The...
Owner's Manual
Page 10
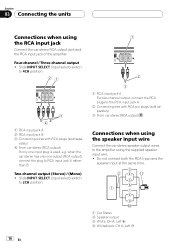
...Stereo) / (Mono) ! Slide INPUT SELECT (input select) switch to the RCA input jack A. 2 Connecting wire with RCA pin plugs (sold separately) 3 From car stereo (RCA output) 1 RCA input jack A 2 RCA input jack B 3 Connecting wires with RCA plugs (sold sepa- Connections when using the speaker input wire ...Connect the car stereo speaker output wires to RCA input jack A rather than B. Four-channel / Three-channel output ! rately) 4 From car stereo (RCA output) If only one output (RCA output), connect the plug to the amplifier using the RCA input jack Connect the car stereo RCA output...
...Stereo) / (Mono) ! Slide INPUT SELECT (input select) switch to the RCA input jack A. 2 Connecting wire with RCA pin plugs (sold separately) 3 From car stereo (RCA output) 1 RCA input jack A 2 RCA input jack B 3 Connecting wires with RCA plugs (sold sepa- Connections when using the speaker input wire ...Connect the car stereo speaker output wires to RCA input jack A rather than B. Four-channel / Three-channel output ! rately) 4 From car stereo (RCA output) If only one output (RCA output), connect the plug to the amplifier using the RCA input jack Connect the car stereo RCA output...
Owner's Manual
Page 11
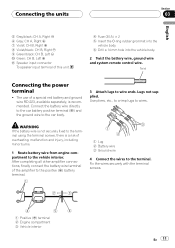
... not supplied. Fix the wires securely with the terminal screws. 1 Positive (+) terminal 2 Engine compartment 3 Vehicle interior En 11 After completing all other amplifier connections, finally connect the battery wire terminal of this unit. 4 Fuse (30 A) × 2 5 Insert the O-ring rubber grommet into the ... Twist the battery wire, ground wire and system remote control wire. Connect the battery wire directly to the car battery positive terminal (+) and the ground wire to the car body. 3 Attach lugs to wires. Twist Connecting the power terminal ! WARNING If the battery wire is ...
... not supplied. Fix the wires securely with the terminal screws. 1 Positive (+) terminal 2 Engine compartment 3 Vehicle interior En 11 After completing all other amplifier connections, finally connect the battery wire terminal of this unit. 4 Fuse (30 A) × 2 5 Insert the O-ring rubber grommet into the ... Twist the battery wire, ground wire and system remote control wire. Connect the battery wire directly to the car battery positive terminal (+) and the ground wire to the car body. 3 Attach lugs to wires. Twist Connecting the power terminal ! WARNING If the battery wire is ...
Owner's Manual
Page 13
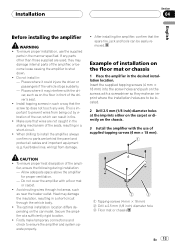
... can result in front of the seats, resulting in a short-circuit through hot areas, such as on the floor mat or chassis 1 Place the amplifier in such a way that the screw tip does not touch any parts other than those supplied are behind the panel and protect all cables and...Heat may damage internal parts of the ampli- Insert the supplied tapping screws (4 mm × 18 mm) into the screw holes and push on the car model. Places where it could injure the driver or passengers if the vehicle stops suddenly. - The optimal installation location differs depending on the screws with...
... can result in front of the seats, resulting in a short-circuit through hot areas, such as on the floor mat or chassis 1 Place the amplifier in such a way that the screw tip does not touch any parts other than those supplied are behind the panel and protect all cables and...Heat may damage internal parts of the ampli- Insert the supplied tapping screws (4 mm × 18 mm) into the screw holes and push on the car model. Places where it could injure the driver or passengers if the vehicle stops suddenly. - The optimal installation location differs depending on the screws with...


