Owner's Manual
Page 4
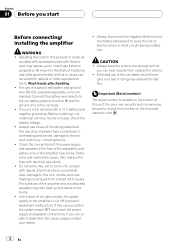
... the negative * terminal of electric shock or short circuit during installation. sociated with accessories sold battery wire or the amplifier fuse blows. Connect the battery wire directly to the car battery positive terminal + and the ground wire to avoid the risk of the battery beforehand to the... car body. ! This unit is recommended. Before installing in overheating and smoke, damage to chemicals listed on the bottom of the amplifier and any abnormality, the power supply to the amplifier is at rest or idling may also heat ...
... the negative * terminal of electric shock or short circuit during installation. sociated with accessories sold battery wire or the amplifier fuse blows. Connect the battery wire directly to the car battery positive terminal + and the ground wire to avoid the risk of the battery beforehand to the... car body. ! This unit is recommended. Before installing in overheating and smoke, damage to chemicals listed on the bottom of the amplifier and any abnormality, the power supply to the amplifier is at rest or idling may also heat ...
Owner's Manual
Page 5
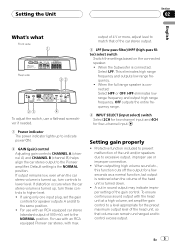
... entire frequency range. 4 INPUT SELECT (input select) switch Select 2CH for two-channel input and 4CH for speaker outputs A and B to the Pioneer amplifier. Setting gain properly ! A cut in sound output may indicate improper setting of the head unit is turned down. ! This eliminates high range frequency... full range speaker is the NORMAL position. Default setting is connected: Select HPF or OFF. If output remains low, even when the car stereo volume is restored when the volume of the gain control. Protective function included to prevent malfunction of 500 mV), set the gain ...
... entire frequency range. 4 INPUT SELECT (input select) switch Select 2CH for two-channel input and 4CH for speaker outputs A and B to the Pioneer amplifier. Setting gain properly ! A cut in sound output may indicate improper setting of the head unit is turned down. ! This eliminates high range frequency... full range speaker is the NORMAL position. Default setting is connected: Select HPF or OFF. If output remains low, even when the car stereo volume is restored when the volume of the gain control. Protective function included to prevent malfunction of 500 mV), set the gain ...
Owner's Manual
Page 7
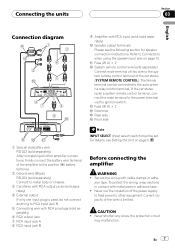
... all other equipment. Current capacity of the car stereo (SYSTEM REMOTE CONTROL). Never cut the insulation of the power supply to feed power to other amplifier connections, finally connect the battery wire terminal of the amplifier to the positive (+) battery terminal. 2 ...power terminal via the ignition switch. CAUTION ! Before connecting the amplifier WARNING ! For details, see the following section for speaker connection instructions. Connecting the units Section 03 English Connection diagram 9 Amplifier with RCA output jacks (sold separately) 4 External output If ...
... all other equipment. Current capacity of the car stereo (SYSTEM REMOTE CONTROL). Never cut the insulation of the power supply to feed power to other amplifier connections, finally connect the battery wire terminal of the amplifier to the positive (+) battery terminal. 2 ...power terminal via the ignition switch. CAUTION ! Before connecting the amplifier WARNING ! For details, see the following section for speaker connection instructions. Connecting the units Section 03 English Connection diagram 9 Amplifier with RCA output jacks (sold separately) 4 External output If ...
Owner's Manual
Page 8
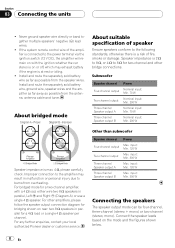
...with a 4 W load, either wire two 8 W speakers in parallel for a two-channel amplifier, with the ignition whether the car stereo is connected to the power terminal via the ignition switch (12 V DC), the amplifier will remain on rear: two 8 W speakers in parallel, Left + and Right * (Diagram...stereo, mono). Improper connection to burns from overheating. For other bridge connections. For any further enquiries, contact your local authorized Pioneer dealer or customer service. Install and route the separately sold battery wire as far as possible from the speaker wires. Other than...
...with a 4 W load, either wire two 8 W speakers in parallel for a two-channel amplifier, with the ignition whether the car stereo is connected to the power terminal via the ignition switch (12 V DC), the amplifier will remain on rear: two 8 W speakers in parallel, Left + and Right * (Diagram...stereo, mono). Improper connection to burns from overheating. For other bridge connections. For any further enquiries, contact your local authorized Pioneer dealer or customer service. Install and route the separately sold battery wire as far as possible from the speaker wires. Other than...
Owner's Manual
Page 10
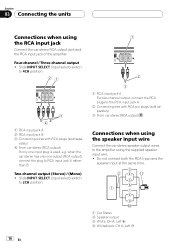
... + 4 White/black: CH A, Left * rately) 4 From car stereo (RCA output) If only one output (RCA output), connect the plug to the amplifier using the RCA input jack Connect the car stereo RCA output jack and the RCA input jack of the amplifier. Connections when using the speaker input wire Connect the... car stereo speaker output wires to RCA input jack A rather than...
... + 4 White/black: CH A, Left * rately) 4 From car stereo (RCA output) If only one output (RCA output), connect the plug to the amplifier using the RCA input jack Connect the car stereo RCA output jack and the RCA input jack of the amplifier. Connections when using the speaker input wire Connect the... car stereo speaker output wires to RCA input jack A rather than...
Owner's Manual
Page 11
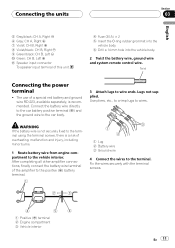
...wire from engine compartment to the vehicle interior. WARNING If the battery wire is not securely fixed to the terminal. After completing all other amplifier connections, finally connect the battery wire terminal of a special red battery and ground wire RD-223, available separately, is a risk of ... compartment 3 Vehicle interior En 11 Use pliers, etc., to crimp lugs to wire ends. Connect the battery wire directly to the car battery positive terminal (+) and the ground wire to the car body. 3 Attach lugs to wires. Twist Connecting the power terminal ! Lugs not supplied.
...wire from engine compartment to the vehicle interior. WARNING If the battery wire is not securely fixed to the terminal. After completing all other amplifier connections, finally connect the battery wire terminal of a special red battery and ground wire RD-223, available separately, is a risk of ... compartment 3 Vehicle interior En 11 Use pliers, etc., to crimp lugs to wire ends. Connect the battery wire directly to the car battery positive terminal (+) and the ground wire to the car body. 3 Attach lugs to wires. Twist Connecting the power terminal ! Lugs not supplied.
Owner's Manual
Page 13
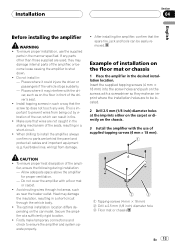
...is important to be easily removed. fier, ensure the following during installation: - To ensure proper installation, use of the amplifier, or become loose causing the amplifier to ensure the amplifier and system operate properly. 1 Tapping-screws (4 mm × 18 mm) 2 Drill a 2.5 mm (1/8 inch) diameter... are to prevent wires from damage. ! Firstly make an imprint where the installation holes are not caught in the sliding mechanism of the car, which can be located. 2 Drill 2.5 mm (1/8 inch) diameter holes at a sufficiently rigid location. ! Avoid routing wires through the...
...is important to be easily removed. fier, ensure the following during installation: - To ensure proper installation, use of the amplifier, or become loose causing the amplifier to ensure the amplifier and system operate properly. 1 Tapping-screws (4 mm × 18 mm) 2 Drill a 2.5 mm (1/8 inch) diameter... are to prevent wires from damage. ! Firstly make an imprint where the installation holes are not caught in the sliding mechanism of the car, which can be located. 2 Drill 2.5 mm (1/8 inch) diameter holes at a sufficiently rigid location. ! Avoid routing wires through the...


