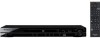

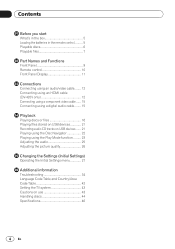
Operating Instructions
Page 3
.... English NOTE: This equipment has been tested and found to comply with the limits for help. These limits are used in accordance with the instructions, may invalidate the user's right to operate the equipment. Connect the equipment into an outlet on the power cord, or pinch the cord. Consult the dealer or an experienced radio/TV technician for a Class B digital device, pursuant...
.... English NOTE: This equipment has been tested and found to comply with the limits for help. These limits are used in accordance with the instructions, may invalidate the user's right to operate the equipment. Connect the equipment into an outlet on the power cord, or pinch the cord. Consult the dealer or an experienced radio/TV technician for a Class B digital device, pursuant...
Operating Instructions
Page 4
... using an audio/video cable........ 12 Connecting using an HDMI cable (DV-420V only 12 Connecting using a component video cable....... 15 Connecting using a digital audio cable........ 15 Playback Playing discs or files 16 Playing files stored on USB devices 21 Recording audio CD tracks on USB devices....... 21 Playing using the Disc Navigator 22 Playing using the Play Mode function.......... 23 Adjusting the audio 25 Adjusting the picture quality 26 Changing the Settings (Initial Settings) Operating the Initial Settings menu 27 Additional information Troubleshooting 34 Language Code...
... using an audio/video cable........ 12 Connecting using an HDMI cable (DV-420V only 12 Connecting using a component video cable....... 15 Connecting using a digital audio cable........ 15 Playback Playing discs or files 16 Playing files stored on USB devices 21 Recording audio CD tracks on USB devices....... 21 Playing using the Disc Navigator 22 Playing using the Play Mode function.......... 23 Adjusting the audio 25 Adjusting the picture quality 26 Changing the Settings (Initial Settings) Operating the Initial Settings menu 27 Additional information Troubleshooting 34 Language Code...
Operating Instructions
Page 6
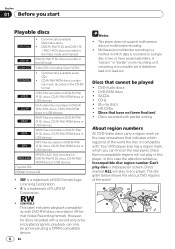
However, for discs recorded with a record-only-once encrypted program, playback can find on the rear panel. Discs from lead-in to lead-out. Discs marked ALL will not play disc is displayed on screen. Discs that cannot be played DVD-Audio discs DVD-RAM discs SACDs CD-G Blu-ray discs HD DVDs Discs that have not been finalized Discs recorded with packet writing About region numbers All DVD-Video discs carry a region mark on the...
However, for discs recorded with a record-only-once encrypted program, playback can find on the rear panel. Discs from lead-in to lead-out. Discs marked ALL will not play disc is displayed on screen. Discs that cannot be played DVD-Audio discs DVD-RAM discs SACDs CD-G Blu-ray discs HD DVDs Discs that have not been finalized Discs recorded with packet writing About region numbers All DVD-Video discs carry a region mark on the...
Operating Instructions
Page 7
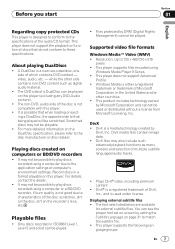
... application settings or computer's environment settings. Supported video file formats Windows Media™ Video (WMV) Resolution: Up to 720 x 480/720 x 576 pixels This player supports files encoded using a computer due to the disc manufacturer or disc retailer. Record discs in the United States and/or other side contains non-DVD content such as menu screens and selection of multiple subtitle languages/audio tracks. Plays DivX® video, including premium content DivX®...
... application settings or computer's environment settings. Supported video file formats Windows Media™ Video (WMV) Resolution: Up to 720 x 480/720 x 576 pixels This player supports files encoded using a computer due to the disc manufacturer or disc retailer. Record discs in the United States and/or other side contains non-DVD content such as menu screens and selection of multiple subtitle languages/audio tracks. Plays DivX® video, including premium content DivX®...
Operating Instructions
Page 9
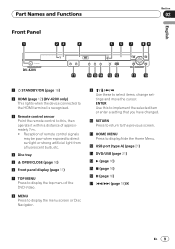
...; Reception of remote control signals may be poor when exposed to direct sunlight or strong artificial light from a fluorescent bulb, etc. 4 Disc tray 5 OPEN/CLOSE (page 16) 6 Front panel display (page 11) 7 TOP MENU Press to display the top menu of the DVD‑Video. 8 MENU Press to display the menu screen or Disc Navigator. 9 Use these to select items, change settings and move the cursor. Part Names and Functions Front Panel 1 23 4 Section 02 English 56 7 89...
...; Reception of remote control signals may be poor when exposed to direct sunlight or strong artificial light from a fluorescent bulb, etc. 4 Disc tray 5 OPEN/CLOSE (page 16) 6 Front panel display (page 11) 7 TOP MENU Press to display the top menu of the DVD‑Video. 8 MENU Press to display the menu screen or Disc Navigator. 9 Use these to select items, change settings and move the cursor. Part Names and Functions Front Panel 1 23 4 Section 02 English 56 7 89...

Operating Instructions
Page 10
... return to display the menu screen or Disc Navigator. Section 02 Part Names and Functions Remote control 1 2 3 4 5 STANDBY/ON OPEN/CLOSE 14 AUDIO SUBTITLE ANGLE 15 DVD/ 1 2 3 USB 16 4 5 6 CLEAR 17 7890 TOP MENU MENU 18 6 7 8 9 10 11 12 13 ENTER HOME MENU RETURN PLAY PREV PAUSE STOP NEXT USB PLAY MODE ZOOM DISPLAY REC 19 20 21 22 23 24 DVD 1 STANDBY/ON (page 16) 2 AUDIO (page 18) 3 SUBTITLE (page 19) 4 Number buttons (0 to 9) Use these to select items, change settings and move...
... return to display the menu screen or Disc Navigator. Section 02 Part Names and Functions Remote control 1 2 3 4 5 STANDBY/ON OPEN/CLOSE 14 AUDIO SUBTITLE ANGLE 15 DVD/ 1 2 3 USB 16 4 5 6 CLEAR 17 7890 TOP MENU MENU 18 6 7 8 9 10 11 12 13 ENTER HOME MENU RETURN PLAY PREV PAUSE STOP NEXT USB PLAY MODE ZOOM DISPLAY REC 19 20 21 22 23 24 DVD 1 STANDBY/ON (page 16) 2 AUDIO (page 18) 3 SUBTITLE (page 19) 4 Number buttons (0 to 9) Use these to select items, change settings and move...
Operating Instructions
Page 12
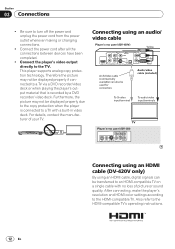
... making or changing connections. Connect the power cord after all the connections between devices have been completed. Connect the player's video output directly to an HDMI-compatible TV on a single cable with a built-in video deck. This player supports analog copy protection technology. Therefore the picture may not be transferred to the TV. Connecting using an HDMI cable, digital signals can also be displayed properly if connected to a TV via a DVD recorder/video deck or when playing the player's output material that is connected...
... making or changing connections. Connect the power cord after all the connections between devices have been completed. Connect the player's video output directly to an HDMI-compatible TV on a single cable with a built-in video deck. This player supports analog copy protection technology. Therefore the picture may not be transferred to the TV. Connecting using an HDMI cable, digital signals can also be displayed properly if connected to a TV via a DVD recorder/video deck or when playing the player's output material that is connected...
Operating Instructions
Page 14
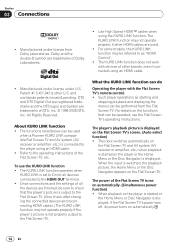
... The player's playback picture is displayed on the Flat Screen TV's screen. (Auto-select function) The input switches automatically on the Flat Screen TV and AV system (AV receiver or amplifier, etc.) when playback is started or the Home Menu or Disc Navigator is displayed, if the Flat Screen TV's power was off, its power turns on the functions that the player's picture is output to the Flat Screen TV. (Also check after changing the connected devices and reconnecting HDMI cables...
... The player's playback picture is displayed on the Flat Screen TV's screen. (Auto-select function) The input switches automatically on the Flat Screen TV and AV system (AV receiver or amplifier, etc.) when playback is started or the Home Menu or Disc Navigator is displayed, if the Flat Screen TV's power was off, its power turns on the functions that the player's picture is output to the Flat Screen TV. (Also check after changing the connected devices and reconnecting HDMI cables...
Operating Instructions
Page 21
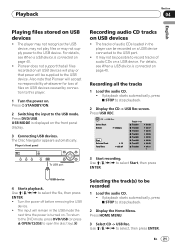
... audio CDs on a USB device. Press STANDBY/ON. 2 Switching the input to the USB device. To return to the DVD mode, press DVD/USB (or press OPEN/CLOSE to open the disc tray). Selecting the track(s) to be possible to stop playback. 2 Display the Home Menu. Recording all USB devices will play files or may not supply power to the USB mode. En 21 Press DVD/USB. USB device 4 Starts playback. USB MODE is turned on. Use to select the file, then press ENTER. Turn the power off before removing the USB device...
... audio CDs on a USB device. Press STANDBY/ON. 2 Switching the input to the USB device. To return to the DVD mode, press DVD/USB (or press OPEN/CLOSE to open the disc tray). Selecting the track(s) to be possible to stop playback. 2 Display the Home Menu. Recording all USB devices will play files or may not supply power to the USB mode. En 21 Press DVD/USB. USB device 4 Starts playback. USB MODE is turned on. Use to select the file, then press ENTER. Turn the power off before removing the USB device...

Operating Instructions
Page 25
... when Dolby Digital, DTS or MPEG audio signals are hard to . About Sound Retriever function When audio data is played with the extension '.wma', '.mp3' or '.m4a'. This is low and the dialogs are being output. Change the setting for files with high sound quality. Notes The effect may be weak for some DVD‑Videos, the number or time can be specified using a menu screen. For video files...
... when Dolby Digital, DTS or MPEG audio signals are hard to . About Sound Retriever function When audio data is played with the extension '.wma', '.mp3' or '.m4a'. This is low and the dialogs are being output. Change the setting for files with high sound quality. Notes The effect may be weak for some DVD‑Videos, the number or time can be specified using a menu screen. For video files...

Operating Instructions
Page 29
... player and TV are connected using an HDMI cable and HDMI Resolution is set to view 16:9 images on screen 16:9 (Wide) 16:9 picture 4:3 picture 16:9 picture 4:3 picture 16:9 picture 4:3 picture 4:3 (Pan & Scan) 16:9 (Compressed) The setting is only reflected if the disc allows the screen's aspect ratio to a widescreen (16:9) TV. Changing the Settings (Initial Settings) Section 05 English About the HDMI Out setting and the type of audio signal that is output (DV-420V only) Audio format Dolby Digital Dolby Digital Karaoke Linear PCM DTS MPEG HDMI Out settings...
... player and TV are connected using an HDMI cable and HDMI Resolution is set to view 16:9 images on screen 16:9 (Wide) 16:9 picture 4:3 picture 16:9 picture 4:3 picture 16:9 picture 4:3 picture 4:3 (Pan & Scan) 16:9 (Compressed) The setting is only reflected if the disc allows the screen's aspect ratio to a widescreen (16:9) TV. Changing the Settings (Initial Settings) Section 05 English About the HDMI Out setting and the type of audio signal that is output (DV-420V only) Audio format Dolby Digital Dolby Digital Karaoke Linear PCM DTS MPEG HDMI Out settings...
Operating Instructions
Page 30
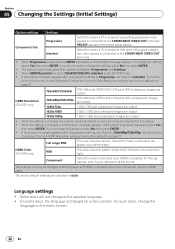
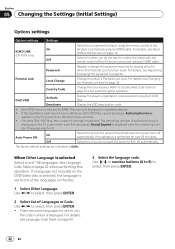
... factory default settings are connected using an HDMI cable. tions on page 27. 720x480i/ 720x576i 720 x 480 pixel (NTSC)/720 x 576 pixel (PAL) interlaced images are output. When the setting is changed on the menu screen. 30 En Language settings Some discs will not change the setting, select Yes then press ENTER. Section 05 Changing the Settings (Initial Settings) Options settings Settings Component Out Progressive Interlace Select this when a TV or projector supporting progressive video signals is properly displayed, select Yes...
... factory default settings are connected using an HDMI cable. tions on page 27. 720x480i/ 720x576i 720 x 480 pixel (NTSC)/720 x 576 pixel (PAL) interlaced images are output. When the setting is changed on the menu screen. 30 En Language settings Some discs will not change the setting, select Yes then press ENTER. Section 05 Changing the Settings (Initial Settings) Options settings Settings Component Out Progressive Interlace Select this when a TV or projector supporting progressive video signals is properly displayed, select Yes...

Operating Instructions
Page 31
... display operation indications (Play, Stop, etc.) on the TV screen. See Language Code Table on the disc. DVD Menu Lang. Choose a language for DVD‑Video playback. Changing the Settings (Initial Settings) Section 05 English Options settings Settings English Select this to listen to the sound of a DVD‑Video disc in italic. If a language not included on the DVD‑Video disc is selected, the language is set to one of 136 languages. Subtitle Language available languages Other Language Choose a language from the listed languages to set the default language...
... display operation indications (Play, Stop, etc.) on the TV screen. See Language Code Table on the disc. DVD Menu Lang. Choose a language for DVD‑Video playback. Changing the Settings (Initial Settings) Section 05 English Options settings Settings English Select this to listen to the sound of a DVD‑Video disc in italic. If a language not included on the DVD‑Video disc is selected, the language is set to one of 136 languages. Subtitle Language available languages Other Language Choose a language from the listed languages to set the default language...
Operating Instructions
Page 32
... Parental Lock function is selected Select one of viewings is displayed. For details, see Registering (changing) the password on page 33. DivX VOD Activate Deactivate Display the player's registration code required to select, then press ENTER. 2 Select List of the AV device connected using an HDMI cable. Select this when you do not want to control the player with the remote control of Languages or Code. The factory default settings are protected by DRM. If a language not included on the DVD‑Video disc is selected...
... Parental Lock function is selected Select one of viewings is displayed. For details, see Registering (changing) the password on page 33. DivX VOD Activate Deactivate Display the player's registration code required to select, then press ENTER. 2 Select List of the AV device connected using an HDMI cable. Select this when you do not want to control the player with the remote control of Languages or Code. The factory default settings are protected by DRM. If a language not included on the DVD‑Video disc is selected...

Operating Instructions
Page 34
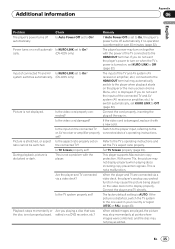
... right region See About region numbers on . Be sure to press STANDBY/ON on the player's front panel or press STANDBY/ON on the front panel display to turn off before unplugging the power cord. indicator on the remote control and wait for trouble or malfunction. Difference in volume between This is plugged into a wall outlet, etc., whenever possible. tray opens automatically. Set the disc with the DVDs and...
... right region See About region numbers on . Be sure to press STANDBY/ON on the player's front panel or press STANDBY/ON on the front panel display to turn off before unplugging the power cord. indicator on the remote control and wait for trouble or malfunction. Difference in volume between This is plugged into a wall outlet, etc., whenever possible. tray opens automatically. Set the disc with the DVDs and...
Operating Instructions
Page 35
... input, referring to the one used in . During playback, picture is damaged, replace it with a new cord. With some TVs, the picture may not play as edited. edited on , set KURO LINK to Off (page 32). Power turns on the player or the menu screen (Home Menu, etc.) is not a problem with the power of the TV connected to the HDMI OUT terminal. Is KURO LINK set the TV's aspect ratio properly. system switches...
... input, referring to the one used in . During playback, picture is damaged, replace it with a new cord. With some TVs, the picture may not play as edited. edited on , set KURO LINK to Off (page 32). Power turns on the player or the menu screen (Home Menu, etc.) is not a problem with the power of the TV connected to the HDMI OUT terminal. Is KURO LINK set the TV's aspect ratio properly. system switches...

Operating Instructions
Page 37
... operating instructions of the connected HDMI-compatible device and switch to play JPEG files. Have you playing files with different aspect ratios are played. Note, however, that only 1-byte alphanumeric characters can be displayed. Additional information Appendix 06 English Problem DTS audio signals are not output. 96 kHz/88.2 kHz digital audio signals are not recognized. Folder or file names are not displayed or are displayed when playing JPEG files. Time is connected. Black bars are not properly displayed. Does the connected AV receiver...
... operating instructions of the connected HDMI-compatible device and switch to play JPEG files. Have you playing files with different aspect ratios are played. Note, however, that only 1-byte alphanumeric characters can be displayed. Additional information Appendix 06 English Problem DTS audio signals are not output. 96 kHz/88.2 kHz digital audio signals are not recognized. Folder or file names are not displayed or are displayed when playing JPEG files. Time is connected. Black bars are not properly displayed. Does the connected AV receiver...

Operating Instructions
Page 39
... HDMI cable you are connected by HDMI cable. Is KURO LINK set to a Pioneer product compatible with devices of other brands, even if connected using a High Speed HDMI cable? Is the player's power turned off . The KURO LINK function will not work properly if HDMI cable other brands are connected between the KURO LINK-compatible device and the player. The KURO LINK function may continue using the Flat Screen TV's remote controller, the message CEC200 is displayed if the player's power is selected using...
... HDMI cable you are connected by HDMI cable. Is KURO LINK set to a Pioneer product compatible with devices of other brands, even if connected using a High Speed HDMI cable? Is the player's power turned off . The KURO LINK function will not work properly if HDMI cable other brands are connected between the KURO LINK-compatible device and the player. The KURO LINK function may continue using the Flat Screen TV's remote controller, the message CEC200 is displayed if the player's power is selected using...
Operating Instructions
Page 40
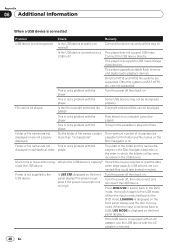
...). Appendix 06 Additional information When a USB device is connected Problem Check Remedy USB device is required to the USB device. This player supports portable flash memory and digital audio playback devices. This is not a problem with the player. This is recognized. playable for the folder and file names on the front panel display and the disc is not a problem with the displayed in ). Much time is not recognized. Turn the power off , then disconnect and reconnect...
...). Appendix 06 Additional information When a USB device is connected Problem Check Remedy USB device is required to the USB device. This player supports portable flash memory and digital audio playback devices. This is not a problem with the player. This is recognized. playable for the folder and file names on the front panel display and the disc is not a problem with the displayed in ). Much time is not recognized. Turn the power off , then disconnect and reconnect...
Operating Instructions
Page 43
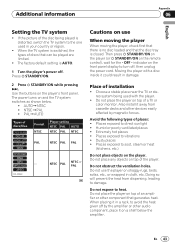
... component that generates heat. Additional information Appendix 06 English Setting the TV system If the picture of the disc being used in your country or region. When the TV system is switched, the types of discs that can be played are limited. The factory default setting is AUTO. 1 Turn the player's power off. indicator on the player. Also install it could result in damage. NTSC PAL NTSC or PAL...
... component that generates heat. Additional information Appendix 06 English Setting the TV system If the picture of the disc being used in your country or region. When the TV system is switched, the types of discs that can be played are limited. The factory default setting is AUTO. 1 Turn the player's power off. indicator on the player. Also install it could result in damage. NTSC PAL NTSC or PAL...


