Owner's Manual
Page 5
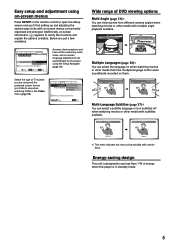
HOLA! Easy setup and adjustment using on-screen menus Press SETUP on the remote control to open the Setup screen and you'll find setting up and adjusting the system easy to do with on -screen information ( i ) appears to clarify ...
HOLA! Easy setup and adjustment using on-screen menus Press SETUP on the remote control to open the Setup screen and you'll find setting up and adjusting the system easy to do with on -screen information ( i ) appears to clarify ...
Owner's Manual
Page 6
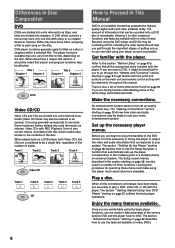
...you can begin to titles on page 21 outlines the basic player operations. One song generally corresponds to one title with PBC (Playback Control) also contain menus recorded on the disc. Video CDs with many features available. Learning the procedure for you are ready to take advantage...confusing at first, following the order below should be set up the player to the section "Before Using" on the main unit and remote control as scenes). When all the accessories were included with the parts and buttons on page 8 to confirm that corresponds to your home entertainment...
...you can begin to titles on page 21 outlines the basic player operations. One song generally corresponds to one title with PBC (Playback Control) also contain menus recorded on the disc. Video CDs with many features available. Learning the procedure for you are ready to take advantage...confusing at first, following the order below should be set up the player to the section "Before Using" on the main unit and remote control as scenes). When all the accessories were included with the parts and buttons on page 8 to confirm that corresponds to your home entertainment...
Owner's Manual
Page 7
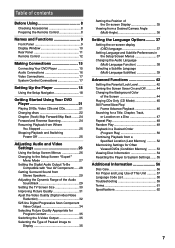
Table of contents Before Using 8 Checking Accessories 8 Preparing the Remote Control 8 Names and Functions 9 Front Panel 9 Display Window 10 Rear Panel 11 Remote Control 12 Making Connections 15 Connecting Your DVD Player 15 Audio Connections 16 Video Connections 17 System Control Connections 17 Setting Up the Player 18 Using the Setup Navigator 18 Getting Started Using...
Table of contents Before Using 8 Checking Accessories 8 Preparing the Remote Control 8 Names and Functions 9 Front Panel 9 Display Window 10 Rear Panel 11 Remote Control 12 Making Connections 15 Connecting Your DVD Player 15 Audio Connections 16 Video Connections 17 System Control Connections 17 Setting Up the Player 18 Using the Setup Navigator 18 Getting Started Using...
Owner's Manual
Page 8
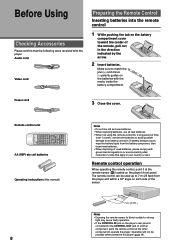
...8226; When replacing batteries, use all new batteries. • When not using the remote control for a long period of the remote, pull out in your country or area. Remote control operation When operating the remote control, point it at the other component to 7 m (23 feet) from battery corrosion... 5 SETUP VNR DISPLAY DISP ANGLE SUBTITLE AUDIO OPEN/ CLOSE 0 CONDITION MEMORY COND. Audio cord Video cord Preparing the Remote Control Inserting batteries into the remote control 1 While pushing the tab on the battery compartment cover toward the center of time (over 1 month), remove the ...
...8226; When replacing batteries, use all new batteries. • When not using the remote control for a long period of the remote, pull out in your country or area. Remote control operation When operating the remote control, point it at the other component to 7 m (23 feet) from battery corrosion... 5 SETUP VNR DISPLAY DISP ANGLE SUBTITLE AUDIO OPEN/ CLOSE 0 CONDITION MEMORY COND. Audio cord Video cord Preparing the Remote Control Inserting batteries into the remote control 1 While pushing the tab on the battery compartment cover toward the center of time (over 1 month), remove the ...
Owner's Manual
Page 9
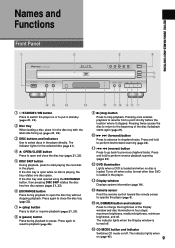
... go back to perform reverse playback scanning (pages 24). = DVD illumination Lights when a DVD is loaded and when no disc is loaded. Remote sensor Point the remote control toward the remote sensor to operate the player (page 8). @ FL DIMMER button and indicator Press to change the brightness of the disc if playback starts again...
... go back to perform reverse playback scanning (pages 24). = DVD illumination Lights when a DVD is loaded and when no disc is loaded. Remote sensor Point the remote control toward the remote sensor to operate the player (page 8). @ FL DIMMER button and indicator Press to change the brightness of the disc if playback starts again...
Owner's Manual
Page 11
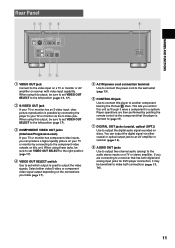
... input, clear picture reproduction is used to another component bearing the Pioneer Î mark. If you can output the digital signal via the S-Video jack. When using these jacks, be sure to set which output is possible by pointing the remote control at the component that has both connections (pages 15, 16). ...output, be beneficial to make (page 17). 5 AC IN power cord connection terminal Use to connect the power cord to the wall outlet (page 15). 6 CONTROL IN jack Use to connect this unit as though it may be sure to set VIDEO OUT SELECT to the left position (pages 15, 17...
... input, clear picture reproduction is used to another component bearing the Pioneer Î mark. If you can output the digital signal via the S-Video jack. When using these jacks, be sure to set which output is possible by pointing the remote control at the component that has both connections (pages 15, 16). ...output, be beneficial to make (page 17). 5 AC IN power cord connection terminal Use to connect the power cord to the wall outlet (page 15). 6 CONTROL IN jack Use to connect this unit as though it may be sure to set VIDEO OUT SELECT to the left position (pages 15, 17...

Owner's Manual
Page 12
... player is set a Last Memory point. Press LAST MEMORY during playback to view slow playback. Last Memory locations can be a maximum of the current title. Remote Control The remote control buttons are used for up a few frames at a time (page 46). = Number buttons (1-9, 0, +10)* Use to perform direct title and chapter/track searches, and...
... player is set a Last Memory point. Press LAST MEMORY during playback to view slow playback. Last Memory locations can be a maximum of the current title. Remote Control The remote control buttons are used for up a few frames at a time (page 46). = Number buttons (1-9, 0, +10)* Use to perform direct title and chapter/track searches, and...
Owner's Manual
Page 13
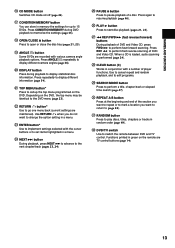
...¢ to advance to the next chapter/track (pages 23, 24). + PAUSE 8 button Press to pause playback of a disc. Depending on the remote are TV control buttons (page 14). 13 Press again to resume playback (page 46). ¡ PLAY 3 button Press to 15 DVDs. Press repeatedly to display different ...of player functions. Use to cancel repeat and random playback, and to edit programs. ¢ SEARCH MODE button Press to switch the remote between DVD and TV control. NAMES AND FUNCTIONS # CD MODE button Switches CD mode on/off (page 45). $ CONDITION MEMORY button You can store in ...
...¢ to advance to the next chapter/track (pages 23, 24). + PAUSE 8 button Press to pause playback of a disc. Depending on the remote are TV control buttons (page 14). 13 Press again to resume playback (page 46). ¡ PLAY 3 button Press to 15 DVDs. Press repeatedly to display different ...of player functions. Use to cancel repeat and random playback, and to edit programs. ¢ SEARCH MODE button Press to switch the remote between DVD and TV control. NAMES AND FUNCTIONS # CD MODE button Switches CD mode on/off (page 45). $ CONDITION MEMORY button You can store in ...

Owner's Manual
Page 14
...from the table below that the TV is responding to the programmed code. If nothing happens when you have a Pioneer TV, press and hold CLEAR, then press 0, 0 on the remote control. Confirm that corresponds to turn the TV's power on previously), then you find the one that works. Vol...Manufacturer TOSHIBA 2 SHARP 2 GE 2 MAGNAVOX 2 TOSHIBA 3 HITACHI 4 JVC 2 FUJITSU PIONEER 2 GRANDIENTE 14 TV control buttons To use the following buttons, first slide the switch over to select the TV for remote control operation. 4 TV Press TV standby. If the TV switches on (or into standby if...
...from the table below that the TV is responding to the programmed code. If nothing happens when you have a Pioneer TV, press and hold CLEAR, then press 0, 0 on the remote control. Confirm that corresponds to turn the TV's power on previously), then you find the one that works. Vol...Manufacturer TOSHIBA 2 SHARP 2 GE 2 MAGNAVOX 2 TOSHIBA 3 HITACHI 4 JVC 2 FUJITSU PIONEER 2 GRANDIENTE 14 TV control buttons To use the following buttons, first slide the switch over to select the TV for remote control operation. 4 TV Press TV standby. If the TV switches on (or into standby if...
Owner's Manual
Page 17
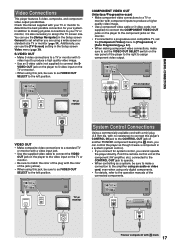
... left position. with Î mark. 17 Point the remote control unit at the component (AV amplifier, etc.) connected to the CONTROL OUT jack to operate. • When controlling as though it is also necessary to the CONTROL OUT jack of the connected components. MAKING CONNECTIONS Video Connections... position. VIDEO OUT S-VIDEO OUT COMPONENT VIDEO OUT Y PB PR VIDEO OUT SELECT AUDIO OUT R L 1 2 DIGITAL OUT OPT. CONTROL AC IN CONTROL IN VIDEO IN CONTROL OUT Pioneer component with no resistance) to connect this jack, be sure to set VIDEO OUT SELECT to connect the S-
... left position. with Î mark. 17 Point the remote control unit at the component (AV amplifier, etc.) connected to the CONTROL OUT jack to operate. • When controlling as though it is also necessary to the CONTROL OUT jack of the connected components. MAKING CONNECTIONS Video Connections... position. VIDEO OUT S-VIDEO OUT COMPONENT VIDEO OUT Y PB PR VIDEO OUT SELECT AUDIO OUT R L 1 2 DIGITAL OUT OPT. CONTROL AC IN CONTROL IN VIDEO IN CONTROL OUT Pioneer component with no resistance) to connect this jack, be sure to set VIDEO OUT SELECT to connect the S-
Owner's Manual
Page 23
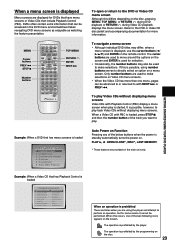
... as enjoyable as watching the feature presentation. The operation is displayed, use the cursor buttons (2/ 3/5/∞) and ENTER on the remote control. Only number buttons are used to with NEXT ¢ or PREV 4. Example: When a Video CD that has menu screens is... Menu screens are displayed for more than one of the two following icons appears on the screen. DVDs often contain extra information that include Playback Control (PBC). OPEN/ CLOSE 0 AUDIO SUBTITLE ANGLE DISPLAY DISP SETUP VNR MENU 5 TOP MENU RETURN 5 ENTER PREV 4 5 STOP 7 PLAY 3 STEP/SLOW REV ...
... as enjoyable as watching the feature presentation. The operation is displayed, use the cursor buttons (2/ 3/5/∞) and ENTER on the remote control. Only number buttons are used to with NEXT ¢ or PREV 4. Example: When a Video CD that has menu screens is... Menu screens are displayed for more than one of the two following icons appears on the screen. DVDs often contain extra information that include Playback Control (PBC). OPEN/ CLOSE 0 AUDIO SUBTITLE ANGLE DISPLAY DISP SETUP VNR MENU 5 TOP MENU RETURN 5 ENTER PREV 4 5 STOP 7 PLAY 3 STEP/SLOW REV ...
Owner's Manual
Page 24
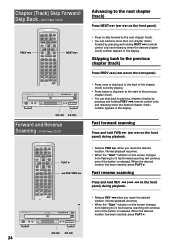
...the start of the chapter (track) currently playing. • Press twice to skip back to previous chapters (tracks) by pressing and holding PREV 4 (remote control only) and releasing when the desired chapter (track) number appears in the display. Vol + VOLUME 1 2 DDIISSCC 4 5 A-B SEARCH MODE A CH-B... the previous chapter (track). • You can advance more than one chapter (track) forward by pressing and holding NEXT ¢ (remote control only) and releasing when the desired chapter (track) number appears in the display. Normal playback resumes. • When the "Scan" ...
...the start of the chapter (track) currently playing. • Press twice to skip back to previous chapters (tracks) by pressing and holding PREV 4 (remote control only) and releasing when the desired chapter (track) number appears in the display. Vol + VOLUME 1 2 DDIISSCC 4 5 A-B SEARCH MODE A CH-B... the previous chapter (track). • You can advance more than one chapter (track) forward by pressing and holding NEXT ¢ (remote control only) and releasing when the desired chapter (track) number appears in the display. Normal playback resumes. • When the "Scan" ...
Owner's Manual
Page 57
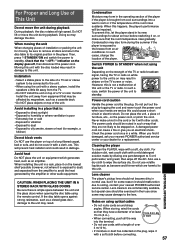
...air conditioner. Never make a knot in the player. A damaged power cord can cause a fire or give you find it damaged, ask your nearest PIONEER authorized service center or your dealer for about an hour before connecting. 57 For stubborn dirt, wet a soft cloth with other audio equipment. or more... tie it on while power to the unit is ample space between the unit and the glass doors when opening the disc table using the remote control. To prevent this happens, the player's performance will prevent heat radiation and could cause a short circuit or electric shock. Switch POWER to ...
...air conditioner. Never make a knot in the player. A damaged power cord can cause a fire or give you find it damaged, ask your nearest PIONEER authorized service center or your dealer for about an hour before connecting. 57 For stubborn dirt, wet a soft cloth with other audio equipment. or more... tie it on while power to the unit is ample space between the unit and the glass doors when opening the disc table using the remote control. To prevent this happens, the player's performance will prevent heat radiation and could cause a short circuit or electric shock. Switch POWER to ...
Owner's Manual
Page 60
.... This is not a malfunction. \ Due to the digital input on the player is being used. \ Point the remote control at the component that the player is wrong. \ Check to (page 17). The disc is not possible. The connection...Caution Static electricity or other external influence may prevent recording or cause picture problems. Remote control operation is dirty. \ Refer to exit the pause mode. The remote control is too far from the digital output jacks. DVDs and CDs use different recording ...In this does not correct the problem, please consult your nearest PIONEER service center. 60
.... This is not a malfunction. \ Due to the digital input on the player is being used. \ Point the remote control at the component that the player is wrong. \ Check to (page 17). The disc is not possible. The connection...Caution Static electricity or other external influence may prevent recording or cause picture problems. Remote control operation is dirty. \ Refer to exit the pause mode. The remote control is too far from the digital output jacks. DVDs and CDs use different recording ...In this does not correct the problem, please consult your nearest PIONEER service center. 60
Owner's Manual
Page 62
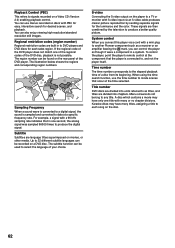
... regions and corresponding region numbers. The subtitle function can be found on a Video CD (Version 2.0) enabling playback control. To control the player, point the player's remote control at the component that occur at a specific frequency rate. Menu screens do not belong to as though it were...search function, use menus recorded on movies, or other media. System control When you can also enjoy viewing high-resolution/standard resolution still images. For example, a signal with a mini plug to another Pioneer component such as a receiver or an amplifier bearing the Î mark...
... regions and corresponding region numbers. The subtitle function can be found on a Video CD (Version 2.0) enabling playback control. To control the player, point the player's remote control at the component that occur at a specific frequency rate. Menu screens do not belong to as though it were...search function, use menus recorded on movies, or other media. System control When you can also enjoy viewing high-resolution/standard resolution still images. For example, a signal with a mini plug to another Pioneer component such as a receiver or an amplifier bearing the Î mark...

Owner's Manual
Page 63
...dB Total harmonic distortion 0.0018 % Wow and flutter Limit of sound. To establish a safe level: • Start your volume control at a safe level BEFORE your equipment offers. Once you can be loud and harmful to change without distortion. Sound can maximize ...PEAK) or lower Digital output Optical digital output Optical digital jack Coaxial digital output RCA jack Other terminals CONTROL IN Minijack (3.5 ø) Accessories Audio cord 1 Video cord 1 Power cord 1 Remote control unit 1 AA (R6P) dry cell batteries 2 Operating instructions 1 Note The specifications and design of...
...dB Total harmonic distortion 0.0018 % Wow and flutter Limit of sound. To establish a safe level: • Start your volume control at a safe level BEFORE your equipment offers. Once you can be loud and harmful to change without distortion. Sound can maximize ...PEAK) or lower Digital output Optical digital output Optical digital jack Coaxial digital output RCA jack Other terminals CONTROL IN Minijack (3.5 ø) Accessories Audio cord 1 Video cord 1 Power cord 1 Remote control unit 1 AA (R6P) dry cell batteries 2 Operating instructions 1 Note The specifications and design of...


