
Owner's Manual
Page 3
..., FLOWER POT, COSMETICS CONTAINER AND MEDICINE BOTTLE ETC. model] IMPORTANT NOTICE The serial number for your enclosed warranty card and keep from the wall outlet and disconnect the antenna or cable system. If an outside antenna system should not be sure the service technician has used replacement parts specified by the operating instructions as radiators, heat registers, stoves, or other products...
..., FLOWER POT, COSMETICS CONTAINER AND MEDICINE BOTTLE ETC. model] IMPORTANT NOTICE The serial number for your enclosed warranty card and keep from the wall outlet and disconnect the antenna or cable system. If an outside antenna system should not be sure the service technician has used replacement parts specified by the operating instructions as radiators, heat registers, stoves, or other products...

Owner's Manual
Page 4
...For Canadian model] This Class B digital apparatus complies with the instructions, may cause harmful interference to radio communications. H009_2L CAUTION: THE STANDBY/ON BUTTON IS SECONDARY CONNECTED AND THEREFORE DOES NOT SEPARATE THE UNIT FROM MAINS POWER IN STANDBY POSITION. This equipment generates, uses, and... not remove any covers or attempt to gain access to the inside of the unit H018A_En tors for help. H012_En CAUTION • Use of controls or adjustments or performance of higher class than those specified herein may invalidate the user's right to operate the ...
...For Canadian model] This Class B digital apparatus complies with the instructions, may cause harmful interference to radio communications. H009_2L CAUTION: THE STANDBY/ON BUTTON IS SECONDARY CONNECTED AND THEREFORE DOES NOT SEPARATE THE UNIT FROM MAINS POWER IN STANDBY POSITION. This equipment generates, uses, and... not remove any covers or attempt to gain access to the inside of the unit H018A_En tors for help. H012_En CAUTION • Use of controls or adjustments or performance of higher class than those specified herein may invalidate the user's right to operate the ...
Owner's Manual
Page 6
... 02 Connecting Up Rear panel 12 Easy connections 13 Using other types of a disc 36 Using repeat play 36 Using random play 37 Creating a program list 38 Editing a program list 40 Other functions available from the program menu 41 Searching a disc 41 Switching subtitles 42 Switching DVD-Video audio language .......... 43 Switching DVD-RW audio channel 43 Switching DVD-Audio audio channel 43 Switching CD/MP3/Video CD/Super VCD audio channel 44 Zooming the screen 44 Switching camera angles 45 Displaying disc information 45 6 En Please read through these operating instructions so...
... 02 Connecting Up Rear panel 12 Easy connections 13 Using other types of a disc 36 Using repeat play 36 Using random play 37 Creating a program list 38 Editing a program list 40 Other functions available from the program menu 41 Searching a disc 41 Switching subtitles 42 Switching DVD-Video audio language .......... 43 Switching DVD-RW audio channel 43 Switching DVD-Audio audio channel 43 Switching CD/MP3/Video CD/Super VCD audio channel 44 Zooming the screen 44 Switching camera angles 45 Displaying disc information 45 6 En Please read through these operating instructions so...
Owner's Manual
Page 7
... Settings Menu Using the Initial Settings menu 51 Digital Audio Out settings 51 Digital Out 51 Dolby Digital Out 51 DTS Out 52 Linear PCM Out 52 MPEG Out 52 Video Output settings 53 TV Screen 53 Auto Progressive (DV-656A only 53 S-Video Out 53 Still Picture 54 Language settings 54 Audio Language 54 Subtitle Language 55 Auto Language 55 DVD Menu Language 56 Subtitle Display 56 Display settings 56 OSD Language 56 On Screen Display 56 Angle Indicator 57 Background 57 Screen Saver 57 Options 57 Parental Lock 57 Registering a new password...
... Settings Menu Using the Initial Settings menu 51 Digital Audio Out settings 51 Digital Out 51 Dolby Digital Out 51 DTS Out 52 Linear PCM Out 52 MPEG Out 52 Video Output settings 53 TV Screen 53 Auto Progressive (DV-656A only 53 S-Video Out 53 Still Picture 54 Language settings 54 Audio Language 54 Subtitle Language 55 Auto Language 55 DVD Menu Language 56 Subtitle Display 56 Display settings 56 OSD Language 56 On Screen Display 56 Angle Indicator 57 Background 57 Screen Saver 57 Options 57 Parental Lock 57 Registering a new password...

Owner's Manual
Page 8
... audio performance of the picture at up and using your DVD player is made very easy using the component video outputs, you can enjoy extremely stable, flicker free images, with multichannel outputs R 1 Logos: This player features multichannel analog outputs for a closer look (see page 44). TruSurround*4 and Virtual Dolby Digital Logo: TruSurround/Virtual Dolby Digital creates a realistic surround-sound effect from Dolby Laboratories. The on -screen displays Setting up to 4x magnification for connection...
... audio performance of the picture at up and using your DVD player is made very easy using the component video outputs, you can enjoy extremely stable, flicker free images, with multichannel outputs R 1 Logos: This player features multichannel analog outputs for a closer look (see page 44). TruSurround*4 and Virtual Dolby Digital Logo: TruSurround/Virtual Dolby Digital creates a realistic surround-sound effect from Dolby Laboratories. The on -screen displays Setting up to 4x magnification for connection...

Owner's Manual
Page 12
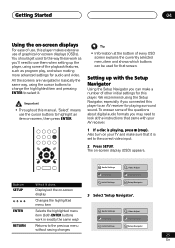
... SURROUND DV-655A Taiwan model CENTER AUDIO OUT (5.1ch) SUB WOOFER 1 2 S-VIDEO OUT 1 2 VIDEO OUT Y PB PR COMPONENT VIDEO OUT D1/D2 VIDEO OUT When connecting this player up to your TV, AV receiver or other components, make sure that all components are switched off and unplugged. 1 CONTROL IN / OUT For passing remote control signals to have the manuals supplied with your other Pioneer components (page 17). 2 DIGITAL AUDIO OUT - OPTICAL / COAXIAL Digital audio outputs for connection to a PCM, Dolby Digital, DTS...
... SURROUND DV-655A Taiwan model CENTER AUDIO OUT (5.1ch) SUB WOOFER 1 2 S-VIDEO OUT 1 2 VIDEO OUT Y PB PR COMPONENT VIDEO OUT D1/D2 VIDEO OUT When connecting this player up to your TV, AV receiver or other components, make sure that all components are switched off and unplugged. 1 CONTROL IN / OUT For passing remote control signals to have the manuals supplied with your other Pioneer components (page 17). 2 DIGITAL AUDIO OUT - OPTICAL / COAXIAL Digital audio outputs for connection to a PCM, Dolby Digital, DTS...

Owner's Manual
Page 16
... WOOFER S-VIDEO OUT VIDEO OUT Y PB PR COMPONENT VIDEO OUT This enables you can also connect this player to your AV receiver using a stereo analog connection. 1 Connect one of the digital outputs. AV receiver AUDIO/ VIDEO INPUT OPTICAL COAXIAL L IN OUT R CONTROL DIGITAL AUDIO OUT AUDIO OUT (2ch) L R FRONT SURROUND DV-656A CENTER AUDIO OUT (5.1ch) SUB WOOFER S-VIDEO OUT VIDEO OUT Y PB PR COMPONENT VIDEO OUT The diagram shows standard video connections, but you to listen to multichannel surround sound. Take care...
... WOOFER S-VIDEO OUT VIDEO OUT Y PB PR COMPONENT VIDEO OUT This enables you can also connect this player to your AV receiver using a stereo analog connection. 1 Connect one of the digital outputs. AV receiver AUDIO/ VIDEO INPUT OPTICAL COAXIAL L IN OUT R CONTROL DIGITAL AUDIO OUT AUDIO OUT (2ch) L R FRONT SURROUND DV-656A CENTER AUDIO OUT (5.1ch) SUB WOOFER S-VIDEO OUT VIDEO OUT Y PB PR COMPONENT VIDEO OUT The diagram shows standard video connections, but you to listen to multichannel surround sound. Take care...

Owner's Manual
Page 19
... compatible with progressive video Macro Vision System Copy Guard. In this case, press the PROGRESSIVE button on more information (DV-656A only). • You can do this player. With a DVD-Video disc you want to display video on the front panel to swich back to interlace (the PROGRESSIVE indicator should be able to correct this unit with a progressive scan signal and switch the player to progressive, you connect a TV that the video output is on-screen...
... compatible with progressive video Macro Vision System Copy Guard. In this case, press the PROGRESSIVE button on more information (DV-656A only). • You can do this player. With a DVD-Video disc you want to display video on the front panel to swich back to interlace (the PROGRESSIVE indicator should be able to correct this unit with a progressive scan signal and switch the player to progressive, you connect a TV that the video output is on-screen...

Owner's Manual
Page 23
.... 23 En STANDBY/ON Let's Get Started When you switch on and set to work with the kind of TV you 've loaded the batteries in Taiwan: The default onscreen menu language is switched on the player for the first time, you connected the DVD player to English. Before continuing, make sure that it is set to the correct input. • For customers in the remote control. Also, switch on my TV...
.... 23 En STANDBY/ON Let's Get Started When you switch on and set to work with the kind of TV you 've loaded the batteries in Taiwan: The default onscreen menu language is switched on the player for the first time, you connected the DVD player to English. Before continuing, make sure that it is set to the correct input. • For customers in the remote control. Also, switch on my TV...
Owner's Manual
Page 25
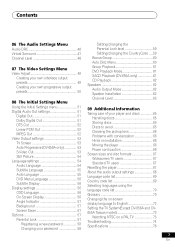
... changes Initial Settings Setup Navigator 25 En Audio Settings Video Adjust Play Mode Disc Navigator Button SETUP What it does Display/exit the on -screen display (OSD) appears. The on -screen display Changes the highlighted menu item Initial Settings Setup Navigator 3 Select 'Setup Navigator'. Setting up with your TV and make a number of other initial settings for audio and video. Also turn on your AV receiver. 1 If a disc is set to the correct video input. 2 Press SETUP. Getting Started 04 Using the on-screen displays For ease of use, this manual, 'Select...
... changes Initial Settings Setup Navigator 25 En Audio Settings Video Adjust Play Mode Disc Navigator Button SETUP What it does Display/exit the on -screen display (OSD) appears. The on -screen display Changes the highlighted menu item Initial Settings Setup Navigator 3 Select 'Setup Navigator'. Setting up with your TV and make a number of other initial settings for audio and video. Also turn on your AV receiver. 1 If a disc is set to the correct video input. 2 Press SETUP. Getting Started 04 Using the on-screen displays For ease of use, this manual, 'Select...

Owner's Manual
Page 53
... a problem with your TV for details on page 71.) 53 En When playing software recorded in the Glossary on what options are output as Off. Auto Progressive (DV-656A only) • Default setting: Off You only need to make this setting if you connected this to MPEG, otherwise set this player to your TV using an S-Video cord. Video Output settings TV Screen • Default setting: 16:9 (Wide) Initial Settings Digital Audio Out Video Output Language Display Options Speakers TV Screen Auto Progressive S-Video Out Still Picture...
... a problem with your TV for details on page 71.) 53 En When playing software recorded in the Glossary on what options are output as Off. Auto Progressive (DV-656A only) • Default setting: Off You only need to make this setting if you connected this to MPEG, otherwise set this player to your TV using an S-Video cord. Video Output settings TV Screen • Default setting: 16:9 (Wide) Initial Settings Digital Audio Out Video Output Language Display Options Speakers TV Screen Auto Progressive S-Video Out Still Picture...

Owner's Manual
Page 57
... your DVD player. If a constant image is displayed on a conventional CRT-type TV, it 's factory settings (page 67), then register a new password. This gives you some control about what is displayed on the country code you set. The player does not play certain scenes on these discs, depending on -screen when the player is stopped. These discs will always play . Background • Default setting: Pioneer Logo Initial Settings Digital Audio Out Video Output Language Display Options Speakers OSD Language On Screen Display...
... your DVD player. If a constant image is displayed on a conventional CRT-type TV, it 's factory settings (page 67), then register a new password. This gives you some control about what is displayed on the country code you set. The player does not play certain scenes on these discs, depending on -screen when the player is stopped. These discs will always play . Background • Default setting: Pioneer Logo Initial Settings Digital Audio Out Video Output Language Display Options Speakers OSD Language On Screen Display...
Owner's Manual
Page 59
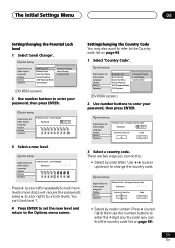
... to the Country code list on page 69). 59 En Initial Settings Digital Audio Out Video Output Language Display Options Speakers Parental Lock : Level Change Password **** 1 2 3 4 5 6 7 8 off Setting/changing the Country Code You may also want to refer to the Options menu screen. 3 Select a country code. Initial Settings Digital Audio Out Video Output Language Display Options Speakers Parental Lock Bonus Group Auto Disc Menu Group Playback DVD Playback Mode CD Playback Password Change Level Change Country Code (DV-656A screen) 2 Use number buttons to unlock levels.
... to the Country code list on page 69). 59 En Initial Settings Digital Audio Out Video Output Language Display Options Speakers Parental Lock : Level Change Password **** 1 2 3 4 5 6 7 8 off Setting/changing the Country Code You may also want to refer to the Options menu screen. 3 Select a country code. Initial Settings Digital Audio Out Video Output Language Display Options Speakers Parental Lock Bonus Group Auto Disc Menu Group Playback DVD Playback Mode CD Playback Password Change Level Change Country Code (DV-656A screen) 2 Use number buttons to unlock levels.
Owner's Manual
Page 60
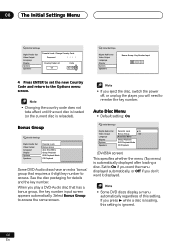
... Video Output Language Display Options Speakers Parental Lock : Change Country Code Password **** Country Code List us Code 2 1 1 9 Initial Settings Digital Audio Out Video Output Language Display Options Speakers Bonus Group : Key Number Input 2*** 4 Press ENTER to set the new Country Code and return to the Options menu screen. • Changing the country code does not take effect until the next disc is loaded (or the current disc is reloaded). • If you eject the disc, switch the power off, or unplug the player, you will need...
... Video Output Language Display Options Speakers Parental Lock : Change Country Code Password **** Country Code List us Code 2 1 1 9 Initial Settings Digital Audio Out Video Output Language Display Options Speakers Bonus Group : Key Number Input 2*** 4 Press ENTER to set the new Country Code and return to the Options menu screen. • Changing the country code does not take effect until the next disc is loaded (or the current disc is reloaded). • If you eject the disc, switch the power off, or unplug the player, you will need...
Owner's Manual
Page 61
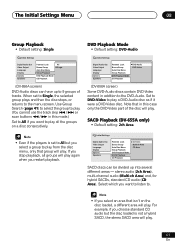
... Multi-ch Area CD Area SACD discs can have up into several different areas - When set to All but the disc loaded is set to Single, the selected group plays and then the disc stops, or returns to the menu screen. Set to DVD-Video to play . The Initial Settings Menu 08 Group Playback • Default setting: Single DVD Playback Mode • Default setting: DVD-Audio Initial Settings Digital Audio Out Video Output Language Display Options Speakers Parental Lock Bonus Group Auto Disc Menu Group Playback DVD Playback Mode CD Playback All Single (DV-656A screen) DVD-Audio discs...
... Multi-ch Area CD Area SACD discs can have up into several different areas - When set to All but the disc loaded is set to Single, the selected group plays and then the disc stops, or returns to the menu screen. Set to DVD-Video to play . The Initial Settings Menu 08 Group Playback • Default setting: Single DVD Playback Mode • Default setting: DVD-Audio Initial Settings Digital Audio Out Video Output Language Display Options Speakers Parental Lock Bonus Group Auto Disc Menu Group Playback DVD Playback Mode CD Playback All Single (DV-656A screen) DVD-Audio discs...

Owner's Manual
Page 62
...using the 5.1 channel analog outputs. Change the setting back to PCM Playback to play DTS CDs, however you may notice some noise when a DTS CD starts playing. 08 The Initial Settings Menu CD Playback • Default setting: PCM Playback Initial Settings Digital Audio Out Video Output Language Display Options Speakers Parental Lock Bonus Group Auto Disc Menu Group Playback DVD Playback Mode CD Playback PCM Playback DTS CD Playback (DV-656A screen) When set Audio Output Mode to 5.1 Channel, you'll only get sound from all the audio recorded on the disc. • Some DVD-Audio discs...
...using the 5.1 channel analog outputs. Change the setting back to PCM Playback to play DTS CDs, however you may notice some noise when a DTS CD starts playing. 08 The Initial Settings Menu CD Playback • Default setting: PCM Playback Initial Settings Digital Audio Out Video Output Language Display Options Speakers Parental Lock Bonus Group Auto Disc Menu Group Playback DVD Playback Mode CD Playback PCM Playback DTS CD Playback (DV-656A screen) When set Audio Output Mode to 5.1 Channel, you'll only get sound from all the audio recorded on the disc. • Some DVD-Audio discs...

Owner's Manual
Page 71
.... S1 S-video output This S-video signal format includes aspect ratio information (4:3 or 16:9) within the video signal. See also Digital audio. See also Browsable Picture. Progressive scan video Also called non-interlaced video, this unit can find the region code of the world. Standard CD audio has a sampling frequency of encoding digital audio, found on -screen menus recorded onto the disc. Packed PCM (DVD-Audio only) A lossless compression system that have compatible region codes. See also Digital audio. Especially good for discs that...
.... S1 S-video output This S-video signal format includes aspect ratio information (4:3 or 16:9) within the video signal. See also Digital audio. See also Browsable Picture. Progressive scan video Also called non-interlaced video, this unit can find the region code of the world. Standard CD audio has a sampling frequency of encoding digital audio, found on -screen menus recorded onto the disc. Packed PCM (DVD-Audio only) A lossless compression system that have compatible region codes. See also Digital audio. Especially good for discs that...

Owner's Manual
Page 74
... below , ask your nearest Pioneer authorized service center or your dealer to carry out repair work . • The CONTROL IN jack on the rear panel is connected: Point the remote control at the connected component to evaporate. Sometimes the trouble may have been illegally copied. operation buttons cannot be canceled: Press STANDBY/ON on the front panel to power failure or by unplugging the power cord, settings will be • Switch the power off .
... below , ask your nearest Pioneer authorized service center or your dealer to carry out repair work . • The CONTROL IN jack on the rear panel is connected: Point the remote control at the connected component to evaporate. Sometimes the trouble may have been illegally copied. operation buttons cannot be canceled: Press STANDBY/ON on the front panel to power failure or by unplugging the power cord, settings will be • Switch the power off .

Owner's Manual
Page 75
... scanning discs other than audio CDs • Some DVD discs do not output digital audio: Switch your amplifier to progressive but your TV/monitor is not a malfunction. • The TV system may appear on some sections of dirt, oxide, etc. Some discs include a copy prevention signal, and when this device through a VCR or an AV selector may prevent recording or cause picture problems. This is connected using an S-video cable, try changing the S-Video...
... scanning discs other than audio CDs • Some DVD discs do not output digital audio: Switch your amplifier to progressive but your TV/monitor is not a malfunction. • The TV system may appear on some sections of dirt, oxide, etc. Some discs include a copy prevention signal, and when this device through a VCR or an AV selector may prevent recording or cause picture problems. This is connected using an S-video cable, try changing the S-Video...

Owner's Manual
Page 76
... compatible amplifier or decoder using a digital audio cable, check the amplifier settings, and that the cable is properly connected. Cannot output 192kHz or 176.4kHz digital audio. • The player does not output digital audio at 48 kHz. malfunction. Listen through the player's analog outputs. • Check that the settings in the audio format and is automatically downsampled. Cannot listen to high-sampling • Make sure that Audio Output Mode is set to 2 Channel if you play multi-channel audio...
... compatible amplifier or decoder using a digital audio cable, check the amplifier settings, and that the cable is properly connected. Cannot output 192kHz or 176.4kHz digital audio. • The player does not output digital audio at 48 kHz. malfunction. Listen through the player's analog outputs. • Check that the settings in the audio format and is automatically downsampled. Cannot listen to high-sampling • Make sure that Audio Output Mode is set to 2 Channel if you play multi-channel audio...


