Owner's Manual
Page 2
...with arrowhead, within the product's enclosure that interference will expose you to lead, a chemical known to environmental considerations. CAUTION : THE USE OF OPTICAL INSTRUMENTS WITH THIS PRODUCT WILL INCREASE EYE HAZARD. CAUTION: TO PREVENT THE RISK OF ELECTRIC SHOCK, DO NOT REMOVE COVER ...NOT EXPOSE THIS APPLIANCE TO RAIN OR MOISTURE. THE SERIAL NUMBER FOR THIS EQUIPMENT IS LOCATED IN THE REAR. If this Pioneer product. D6-8-2-1_En Information to User Alteration or modifications carried out without appropriate authorization may cause harmful interference to cause cancer...
...with arrowhead, within the product's enclosure that interference will expose you to lead, a chemical known to environmental considerations. CAUTION : THE USE OF OPTICAL INSTRUMENTS WITH THIS PRODUCT WILL INCREASE EYE HAZARD. CAUTION: TO PREVENT THE RISK OF ELECTRIC SHOCK, DO NOT REMOVE COVER ...NOT EXPOSE THIS APPLIANCE TO RAIN OR MOISTURE. THE SERIAL NUMBER FOR THIS EQUIPMENT IS LOCATED IN THE REAR. If this Pioneer product. D6-8-2-1_En Information to User Alteration or modifications carried out without appropriate authorization may cause harmful interference to cause cancer...
Owner's Manual
Page 3
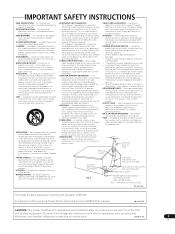
... voltage points or short-out parts that produce heat. SAFETY CHECK - The product should be sure the service technician has used replacement parts specified by the product manufacturer as a bookcase or rack unless proper ventilation is provided or the manufacturer's instructions ... provides information with Canadian ICES-003. ANTENNA LEAD IN WIRE GROUND CLAMP ELECTRIC SERVICE EQUIPMENT Fig. RETAIN INSTRUCTIONS - CLEANING - Do not use shielded cables and connectors for long periods of the grounding type plug. A product and cart combination should be walked on the product....
... voltage points or short-out parts that produce heat. SAFETY CHECK - The product should be sure the service technician has used replacement parts specified by the product manufacturer as a bookcase or rack unless proper ventilation is provided or the manufacturer's instructions ... provides information with Canadian ICES-003. ANTENNA LEAD IN WIRE GROUND CLAMP ELECTRIC SERVICE EQUIPMENT Fig. RETAIN INSTRUCTIONS - CLEANING - Do not use shielded cables and connectors for long periods of the grounding type plug. A product and cart combination should be walked on the product....

Owner's Manual
Page 4
...the sound until it is prohibited. Reverse engineering or disassembly is too late, this by playing it damaged, ask your nearest PIONEER authorized service center or your volume control at a safe level. This manufacturer and the Electronic Industries Association's Consumer Electronics Group want... you 've just purchased is included for home and other rights owners. Used wisely, your sensitive hearing. THE FOLLOWING NOISES CAN BE DANGEROUS UNDER CONSTANT EXPOSURE 90 Subway, motorcycle, truck traffic, lawn mower...
...the sound until it is prohibited. Reverse engineering or disassembly is too late, this by playing it damaged, ask your nearest PIONEER authorized service center or your volume control at a safe level. This manufacturer and the Electronic Industries Association's Consumer Electronics Group want... you 've just purchased is included for home and other rights owners. Used wisely, your sensitive hearing. THE FOLLOWING NOISES CAN BE DANGEROUS UNDER CONSTANT EXPOSURE 90 Subway, motorcycle, truck traffic, lawn mower...
Owner's Manual
Page 5
...8 02 Connections Rear panel 10 Easy connections 11 Connecting using the S-Video output 12 Connecting using the component video output 12 Connecting to an AV receiver 13 Controlling this player via another Pioneer component 14 Connecting using HDMI 14 Changing the output resolution 15 03 Controls and... Distance 39 Speaker Installation 39 08 Additional information Taking care of your player and discs 40 Screen sizes and disc formats 41 Resetting the player 41 DVD-Video regions 41 Selecting languages using the language code list 41 Troubleshooting 42 Glossary 45 Language code list...
...8 02 Connections Rear panel 10 Easy connections 11 Connecting using the S-Video output 12 Connecting using the component video output 12 Connecting to an AV receiver 13 Controlling this player via another Pioneer component 14 Connecting using HDMI 14 Changing the output resolution 15 03 Controls and... Distance 39 Speaker Installation 39 08 Additional information Taking care of your player and discs 40 Screen sizes and disc formats 41 Resetting the player 41 DVD-Video regions 41 Selecting languages using the language code list 41 Troubleshooting 42 Glossary 45 Language code list...
Owner's Manual
Page 6
... analog audio sources with SACD playback, you can select which operations can control this player is not displayed). This is particularly useful when listening to high-quality audio formats such as DVD-Audio and Super Audio CD. • PureCinema Progressive Scan video When connected to give... Ultra Certified, and associated logos are trademarks or registered trademarks of HDMI Licensing LLC. • HDMI Control By connecting this unit to a Pioneer plasma display or AV system (amplifier or AV receiver etc.) with an HDMI cable, you control this unit from a connected plasma display that...
... analog audio sources with SACD playback, you can select which operations can control this player is not displayed). This is particularly useful when listening to high-quality audio formats such as DVD-Audio and Super Audio CD. • PureCinema Progressive Scan video When connected to give... Ultra Certified, and associated logos are trademarks or registered trademarks of HDMI Licensing LLC. • HDMI Control By connecting this unit to a Pioneer plasma display or AV system (amplifier or AV receiver etc.) with an HDMI cable, you control this unit from a connected plasma display that...

Owner's Manual
Page 7
.... Close the cover when you're finished. Important Incorrect use . • Use near radiators and other heat-generating appliances. • Place on a window sill or a place where the player will be exposed to direct sunlight. • Use in an excessively dusty or damp environment. • Place...cable • Operating instructions • Warranty card Putting the batteries in a kitchen or other room where the player may be exposed to smoke or steam. • Use on a thick rug or carpet, or cover with governmental regulations or environmental public instruction's rules that apply ...
.... Close the cover when you're finished. Important Incorrect use . • Use near radiators and other heat-generating appliances. • Place on a window sill or a place where the player will be exposed to direct sunlight. • Use in an excessively dusty or damp environment. • Place...cable • Operating instructions • Warranty card Putting the batteries in a kitchen or other room where the player may be exposed to smoke or steam. • Use on a thick rug or carpet, or cover with governmental regulations or environmental public instruction's rules that apply ...
Owner's Manual
Page 8
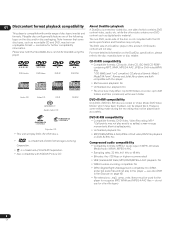
... not play . logos on page 45) • File extensions: .mp3, .wma, .m4a (these must be recorded using this player. • Multi-session playback: No • Unfinalized disc playback: No • File structure (may not play DVD+R/+RW discs. • is a trademark of a DualDisc plays in the Glossary on the disc and/or disc...
... not play . logos on page 45) • File extensions: .mp3, .wma, .m4a (these must be recorded using this player. • Multi-session playback: No • Unfinalized disc playback: No • File structure (may not play DVD+R/+RW discs. • is a trademark of a DualDisc plays in the Glossary on the disc and/or disc...

Owner's Manual
Page 9
...of DivX® media files and the DivX® Media Format. necessarily DivX video files and therefore may not be used for the player to recognize JPEG files-do not use for other countries. WMA content can playback Windows Media Audio content. DivX media files contain not only video but not ... not shown within the disc navigation menu): .srt, .sub, .ssa, .smi • The filename of DivX® video (including DivX® 6) with this player. extension are recognized as DVD-Video, individual DivX video files are available for Windows Media Audio and refers to create the disc.
...of DivX® media files and the DivX® Media Format. necessarily DivX video files and therefore may not be used for the player to recognize JPEG files-do not use for other countries. WMA content can playback Windows Media Audio content. DivX media files contain not only video but not ... not shown within the disc navigation menu): .srt, .sub, .ssa, .smi • The filename of DivX® video (including DivX® 6) with this player. extension are recognized as DVD-Video, individual DivX video files are available for Windows Media Audio and refers to create the disc.

Owner's Manual
Page 10
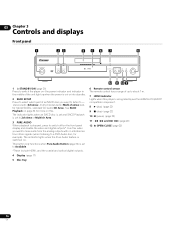
... video cable (page 12). 7 CONTROL IN Use to an AV receiver with a CONTROL OUT terminal and bearing the mark. Connect the CONTROL OUT of the other component to the CONTROL IN of this player from the remote sensor of another Pioneer component with multi-channel analog audio inputs (page... 13). 9 AUDIO OUT (2ch) Stereo analog audio outputs for connection to a TV, monitor or AV receiver that you can connect to your TV or AV receiver using a mini-plug cord ...
... video cable (page 12). 7 CONTROL IN Use to an AV receiver with a CONTROL OUT terminal and bearing the mark. Connect the CONTROL OUT of the other component to the CONTROL IN of this player from the remote sensor of another Pioneer component with multi-channel analog audio inputs (page... 13). 9 AUDIO OUT (2ch) Stereo analog audio outputs for connection to a TV, monitor or AV receiver that you can connect to your TV or AV receiver using a mini-plug cord ...

Owner's Manual
Page 11
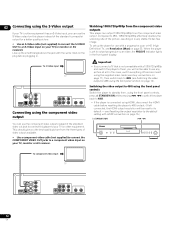
...switch it into a power outlet. In this setup, stereo audio is played through the speakers in your TV. • This player is a basic setup that allows you want to use a component or S-Video cable for more information.) To audio inputs To video inputs TV Yellow Red White 1 Connect the VIDEO OUT... and white plugs to the audio outputs and the yellow plug to the AC IN inlet, then plug into standby using just the cables supplied with the player. message to play discs using either the front panel STANDBY/ON button, or the remote control, and wait of A/V inputs on some ...
...switch it into a power outlet. In this setup, stereo audio is played through the speakers in your TV. • This player is a basic setup that allows you want to use a component or S-Video cable for more information.) To audio inputs To video inputs TV Yellow Red White 1 Connect the VIDEO OUT... and white plugs to the audio outputs and the yellow plug to the AC IN inlet, then plug into standby using just the cables supplied with the player. message to play discs using either the front panel STANDBY/ON button, or the remote control, and wait of A/V inputs on some ...
Owner's Manual
Page 12
...setting with the same mark on page 33. To component video input TV 12 En This player can use the component video output instead of the standard (composite) output for use the S-Video output on this player instead of the standard video out jack to connect this case, switch everything off and ... monitor or AV receiver. This should give you will be able to see Switching the video output to its default - Line up the player for a better quality picture. • Use an S-Video cable (not supplied) to connect the S-VIDEO OUT to an S-Video input on page 11), then switch back to a...
...setting with the same mark on page 33. To component video input TV 12 En This player can use the component video output instead of the standard (composite) output for use the S-Video output on this player instead of the standard video out jack to connect this case, switch everything off and ... monitor or AV receiver. This should give you will be able to see Switching the video output to its default - Line up the player for a better quality picture. • Use an S-Video cable (not supplied) to connect the S-VIDEO OUT to an S-Video input on page 11), then switch back to a...

Owner's Manual
Page 13
...your AV receiver. You can also use an optical cable (not supplied) to connect the DIGITAL AUDIO OUT OPTICAL jack to an optical input on page 32 and refer to the operating instructions that came with all kinds of video cable between your DVD player and AV receiver, and between ...your AV receiver and TV. Tip • After connecting up this player to output only digital audio in a compatible format. See Digital Audio Out settings on your AV receiver. For a coaxial connection, use any of analog audio and ...
...your AV receiver. You can also use an optical cable (not supplied) to connect the DIGITAL AUDIO OUT OPTICAL jack to an optical input on page 32 and refer to the operating instructions that came with all kinds of video cable between your DVD player and AV receiver, and between ...your AV receiver and TV. Tip • After connecting up this player to output only digital audio in a compatible format. See Digital Audio Out settings on your AV receiver. For a coaxial connection, use any of analog audio and ...

Owner's Manual
Page 14
... to do not have connected, using a commercially available HDMI cable. placement of including DVD-Video, DVD-Audio (see HDMI Out on page 32, Resolution (Max) and HDMI Color on the HDMI cable being used, 1080p output may not appear correctly. 14 En Pioneer component. remote control sensor of this player to control this player via System Control, point...
... to do not have connected, using a commercially available HDMI cable. placement of including DVD-Video, DVD-Audio (see HDMI Out on page 32, Resolution (Max) and HDMI Color on the HDMI cable being used, 1080p output may not appear correctly. 14 En Pioneer component. remote control sensor of this player to control this player via System Control, point...
Owner's Manual
Page 15
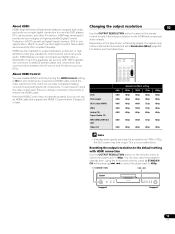
...to On for all components. About HDMI Control You can also switch the player to standby then, using the front panel controls, press STANDBY/ ON while pressing to switch the player back to 480p. DVD DVD-Audio DivX video/WMV JPEG Audio CD/ Super Audio CD MP3/WMA/MPEG...-4 AAC Video CD Resolution (Max) setting 480i 480p 1080i 720p 1080p 480i 480p 480p ...
...to On for all components. About HDMI Control You can also switch the player to standby then, using the front panel controls, press STANDBY/ ON while pressing to switch the player back to 480p. DVD DVD-Audio DivX video/WMV JPEG Audio CD/ Super Audio CD MP3/WMA/MPEG...-4 AAC Video CD Resolution (Max) setting 480i 480p 1080i 720p 1080p 480i 480p 480p ...
Owner's Manual
Page 16
See SACD Playback on page 34 for more on . Use this when you want to hear audio from the analog outputs with no ...Controls and displays Front panel 1 23 4 5 6 7 8 1 STANDBY/ON (page 20) Press to switch the player on (the power indicator and indicator in the middle of the unit light up when the power is on) or into standby. ... SETUP Press to select which part of up to a DVD-Audio disc, for hybrid SACDs, standard CD audio(CD Area). The indicator lights when the Pure Audio feature is switched on this player is recognized by another HDMl or DVI/HDCP compatible component...
See SACD Playback on page 34 for more on . Use this when you want to hear audio from the analog outputs with no ...Controls and displays Front panel 1 23 4 5 6 7 8 1 STANDBY/ON (page 20) Press to switch the player on (the power indicator and indicator in the middle of the unit light up when the power is on) or into standby. ... SETUP Press to select which part of up to a DVD-Audio disc, for hybrid SACDs, standard CD audio(CD Area). The indicator lights when the Pure Audio feature is switched on this player is recognized by another HDMl or DVI/HDCP compatible component...
Owner's Manual
Page 18
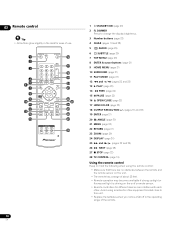
...; Remote operation may become unreliable if strong sunlight or fluorescent light is shining on the unit. • The remote has a range of the remote. Avoid using the remote control: • Make sure that there are no obstacles between the remote and the remote sensor on the unit's remote sensor. • Remote... controllers for ease of use. 1 2 3 4 5 6 7 8 9 10 11 12 13 14 15 16 17 18 19 20 21 22 23 24 25 26 27 28 18 En 1 STANDBY/ON (page...
...; Remote operation may become unreliable if strong sunlight or fluorescent light is shining on the unit. • The remote has a range of the remote. Avoid using the remote control: • Make sure that there are no obstacles between the remote and the remote sensor on the unit's remote sensor. • Remote... controllers for ease of use. 1 2 3 4 5 6 7 8 9 10 11 12 13 14 15 16 17 18 19 20 21 22 23 24 25 26 27 28 18 En 1 STANDBY/ON (page...

Owner's Manual
Page 19
...change the TV's video input VOLUME +/- Use to control your TV. Use to program the remote with a maker code from the table below shows how to change TV channels Maker Aiwa Funai GE General Goldstar Grandiente Hitachi Magnavox Mitsubishi NEC Panasonic Philips Pioneer RCA Samsung Sanyo Sharp Sony Toshiba JVC ...Button TV What it doesn't and there is more than one in the table below for your maker, repeat step 1 with your TV. Using the TV remote control buttons The table below . 1 Press and hold down the CLEAR button, then enter the maker code for your make, input...
...change the TV's video input VOLUME +/- Use to control your TV. Use to program the remote with a maker code from the table below shows how to change TV channels Maker Aiwa Funai GE General Goldstar Grandiente Hitachi Magnavox Mitsubishi NEC Panasonic Philips Pioneer RCA Samsung Sanyo Sharp Sony Toshiba JVC ...Button TV What it doesn't and there is more than one in the table below for your maker, repeat step 1 with your TV. Using the TV remote control buttons The table below . 1 Press and hold down the CLEAR button, then enter the maker code for your make, input...

Owner's Manual
Page 20
... display the Startup Navigator screen. • When you switch on and setting up 4 Press ENTER to make a few basic player settings. 1 Switch on . We recommend using this unit connected to a plasma display that is compatible with HDMI Control, language settings are imported from the plasma display's OSD...• If you have selected COAX/OPT, proceed to step 7. • If you have selected HDMI or I don't know, proceed to step 8. 6 Use the / buttons to select whether to output the analog audio signals from the DIGITAL AUDIO OUT (COAXIAL/OPTICAL) into linear PCM format ('Yes...
... display the Startup Navigator screen. • When you switch on and setting up 4 Press ENTER to make a few basic player settings. 1 Switch on . We recommend using this unit connected to a plasma display that is compatible with HDMI Control, language settings are imported from the plasma display's OSD...• If you have selected COAX/OPT, proceed to step 7. • If you have selected HDMI or I don't know, proceed to step 8. 6 Use the / buttons to select whether to output the analog audio signals from the DIGITAL AUDIO OUT (COAXIAL/OPTICAL) into linear PCM format ('Yes...
Owner's Manual
Page 21
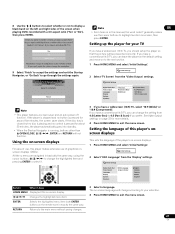
... around five minutes, the screen saver starts. Setting the language of this player's onscreen displays This sets the language of the player's on -screen displays For ease of use, this manual, the word 'select' generally means use of the screen when playing DVDs recorded with a 4:3 aspect ratio ('Yes' or 'No'), then press ENTER. The on...
... around five minutes, the screen saver starts. Setting the language of this player's onscreen displays This sets the language of the player's on -screen displays For ease of use, this manual, the word 'select' generally means use of the screen when playing DVDs recorded with a 4:3 aspect ratio ('Yes' or 'No'), then press ENTER. The on...

Owner's Manual
Page 22
.... Press (play) to (remote only) resume normal playback. Press to play face down). appear. Load a disc with the label side facing up, using the disc tray guide to switch it is specified. The following chapter covers other media file types (MP3/ WMA/MPEG-4 AAC/JPEG) from the selected...Video CD PBC menus on page 23 for CD/SACD/Video CD). • If the disc is turned on. 1 If the player isn't already on, press STANDBY/ON to align the disc (if you 're playing a DVD, disc containing DivX video/WMV files or Video CD, also turn on -screen display.
.... Press (play) to (remote only) resume normal playback. Press to play face down). appear. Load a disc with the label side facing up, using the disc tray guide to switch it is specified. The following chapter covers other media file types (MP3/ WMA/MPEG-4 AAC/JPEG) from the selected...Video CD PBC menus on page 23 for CD/SACD/Video CD). • If the disc is turned on. 1 If the player isn't already on, press STANDBY/ON to align the disc (if you 're playing a DVD, disc containing DivX video/WMV files or Video CD, also turn on -screen display.


