
Owner's Manual
Page 5
This allows playback of TV screen you are using on-screen menus Press SETUP on the remote control to do with certain discs. Additionally, on -screen menus conveniently organized and arranged. Below are just a few questions and have multiple language and/or ...
This allows playback of TV screen you are using on-screen menus Press SETUP on the remote control to do with certain discs. Additionally, on -screen menus conveniently organized and arranged. Below are just a few questions and have multiple language and/or ...
Owner's Manual
Page 6
.... The section "Getting Started Using Your DVD Player" starting on page 9 to get through the "Names and Functions" section starting on the main unit and remote control as they will make using the DVD player and DVDs may be referred to as scenes). One song generally corresponds to one title with...
.... The section "Getting Started Using Your DVD Player" starting on page 9 to get through the "Names and Functions" section starting on the main unit and remote control as they will make using the DVD player and DVDs may be referred to as scenes). One song generally corresponds to one title with...

Owner's Manual
Page 7
... 8 Names and Functions 9 Front Panel 9 Display Window 10 Rear Panel 11 Remote Control 12 Making Connections 14 Connecting Your DVD Player 14 Audio Connections 15 Video Connections 16 System Control Connections 16 Setting Up the Player 17 ...
... 8 Names and Functions 9 Front Panel 9 Display Window 10 Rear Panel 11 Remote Control 12 Making Connections 14 Connecting Your DVD Player 14 Audio Connections 15 Video Connections 16 System Control Connections 16 Setting Up the Player 17 ...

Owner's Manual
Page 8
...m (23 feet ) from the player and within a 30° angle on each side of the sensor. 30 30 7m (23ft.) Notes • Exposing the remote sensor to direct sunlight or strong light may cause faulty operation. • If the CONTROL IN jack on the player's rear panel is connected to...new batteries. • When replacing batteries, use all new batteries. • When not using the remote control for a long period of another component, point the remote control at this player (page 16). The remote control can be possible when pointed at the other component to match the plus (+) and minus (-) ...
...m (23 feet ) from the player and within a 30° angle on each side of the sensor. 30 30 7m (23ft.) Notes • Exposing the remote sensor to direct sunlight or strong light may cause faulty operation. • If the CONTROL IN jack on the player's rear panel is connected to...new batteries. • When replacing batteries, use all new batteries. • When not using the remote control for a long period of another component, point the remote control at this player (page 16). The remote control can be possible when pointed at the other component to match the plus (+) and minus (-) ...

Owner's Manual
Page 9
... starts again (page 23). 5 8 (pause) button Press during playback to stop ) button Press to pause. Press and hold to perform reverse playback scanning (pages 22). 9 Remote sensor Point the remote control toward the remote sensor to chapters/tracks. Pressing once enables playback to previous chapters/tracks.
... starts again (page 23). 5 8 (pause) button Press during playback to stop ) button Press to pause. Press and hold to perform reverse playback scanning (pages 22). 9 Remote sensor Point the remote control toward the remote sensor to chapters/tracks. Pressing once enables playback to previous chapters/tracks.
Owner's Manual
Page 11
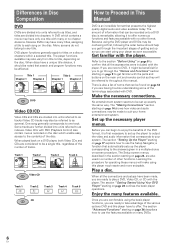
... power cord to the wall outlet (page 14). 6 S-VIDEO OUT jack f your TV or monitor via either optical output jack to another component bearing the Pioneer Î mark. You can produce a higher quality picture on your TV or monitor by connecting to the component video outputs on this output, be sure... or monitor has component video inputs, you control this unit as though it may be sure to set which output is possible by pointing the remote control at the component that has both connections (pages 14, 15). 2 VIDEO OUT jack Connect to the audio stereo inputs on a TV or monitor or...
... power cord to the wall outlet (page 14). 6 S-VIDEO OUT jack f your TV or monitor via either optical output jack to another component bearing the Pioneer Î mark. You can produce a higher quality picture on your TV or monitor by connecting to the component video outputs on this output, be sure... or monitor has component video inputs, you control this unit as though it may be sure to set which output is possible by pointing the remote control at the component that has both connections (pages 14, 15). 2 VIDEO OUT jack Connect to the audio stereo inputs on a TV or monitor or...

Owner's Manual
Page 12
... to put in the stop playback. Pressing twice causes the disc to return to the beginning of the subtitle languages programmed on a DVD (page 32). Remote Control 1 2 3 4 5 6 7 8 9 0 = ~ ! @ OPEN/ LAST CONDITION CLOSE MEMORY MEMORY AUDIO SUB TITLE ANGLE REPEAT SETUP REPEAT MENU TOP MENU A-B DISPLAY RETURN ¶ 5 ¶ ENTER 2 5 5 3 PREV 4 NEXT ¢...
... to put in the stop playback. Pressing twice causes the disc to return to the beginning of the subtitle languages programmed on a DVD (page 32). Remote Control 1 2 3 4 5 6 7 8 9 0 = ~ ! @ OPEN/ LAST CONDITION CLOSE MEMORY MEMORY AUDIO SUB TITLE ANGLE REPEAT SETUP REPEAT MENU TOP MENU A-B DISPLAY RETURN ¶ 5 ¶ ENTER 2 5 5 3 PREV 4 NEXT ¢...
Owner's Manual
Page 16
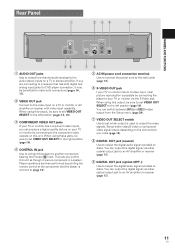
...on the player to the component jacks on the rear panel of the player to the right to assign the TV screen size. Point the remote control unit at the component (AV amplifier, etc.) connected to the CONTROL OUT jack to operate. • When controlling as though it... necessary to assign component video output. R DIGITAL OUT VIDEO OUT VIDEO OUT SELECT S-VIDEO OUT COMPONENT VIDEO OUT Y PB PR CONTROL IN AC IN Pioneer component with a mini plug (3.5 mm dia. Video Connections This player features S-video, composite, and component video output possibilities. In addition to making video...
...on the player to the component jacks on the rear panel of the player to the right to assign the TV screen size. Point the remote control unit at the component (AV amplifier, etc.) connected to the CONTROL OUT jack to operate. • When controlling as though it... necessary to assign component video output. R DIGITAL OUT VIDEO OUT VIDEO OUT SELECT S-VIDEO OUT COMPONENT VIDEO OUT Y PB PR CONTROL IN AC IN Pioneer component with a mini plug (3.5 mm dia. Video Connections This player features S-video, composite, and component video output possibilities. In addition to making video...
Owner's Manual
Page 17
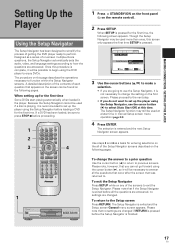
... next Setup Navigator screen appears. Once this page describes the operations necessary to function within the Setup Navigator screens. To change the setting on the remote control). 2 Press SETUP. To return to answer all of the Setup Navigator screens described on the following screen appears. When setting up the player using...
... next Setup Navigator screen appears. Once this page describes the operations necessary to function within the Setup Navigator screens. To change the setting on the remote control). 2 Press SETUP. To return to answer all of the Setup Navigator screens described on the following screen appears. When setting up the player using...

Owner's Manual
Page 21
... Video CDs without displaying menu screens Video CDs with PREV 4 or NEXT ¢. The cursor buttons are used to move around the options on the remote control. MENU Cursor buttons PREV 4 STOP 7 Number buttons OPEN/ LAST CONDITION CLOSE MEMORY MEMORY AUDIO SUB TITLE ANGLE REPEAT SETUP REPEAT MENU TOP MENU A-B DISPLAY...
... Video CDs without displaying menu screens Video CDs with PREV 4 or NEXT ¢. The cursor buttons are used to move around the options on the remote control. MENU Cursor buttons PREV 4 STOP 7 Number buttons OPEN/ LAST CONDITION CLOSE MEMORY MEMORY AUDIO SUB TITLE ANGLE REPEAT SETUP REPEAT MENU TOP MENU A-B DISPLAY...
Owner's Manual
Page 24
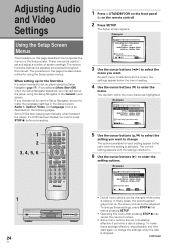
... the Setup screen. The options available for using the Setup Navigator in the Setup screen Audio 1, Audio 2, Video, and Language menus as described on the remote control) 2 Press SETUP. To change .
... the Setup screen. The options available for using the Setup Navigator in the Setup screen Audio 1, Audio 2, Video, and Language menus as described on the remote control) 2 Press SETUP. To change .

Owner's Manual
Page 50
...sure there is brought from an air conditioner. To prevent this unit with the disc loaded may result in a rack, place it on using the remote control. Cleaning the player To clean the PLAYER, wipe with a stereo system, install the speakers a little bit away from the amplifier to oily...of a TV or color monitor. Power-cord caution Handle the power cord by tugging the cord and never touch the power cord when your nearest PIONEER authorized service center. When storing, wind the cords so that is: • Exposed to direct sunlight • Exposed to humidity or where ...
...sure there is brought from an air conditioner. To prevent this unit with the disc loaded may result in a rack, place it on using the remote control. Cleaning the player To clean the PLAYER, wipe with a stereo system, install the speakers a little bit away from the amplifier to oily...of a TV or color monitor. Power-cord caution Handle the power cord by tugging the cord and never touch the power cord when your nearest PIONEER authorized service center. When storing, wind the cords so that is: • Exposed to direct sunlight • Exposed to humidity or where ...

Owner's Manual
Page 52
...or monitor you should be used . Sometimes the trouble may appear on some sections of this component, check the points below , ask your nearest PIONEER authorized service center or your TV, receiver, or amplifier is not a malfunction. \ Due to carry out repair work. The screen is compatible... loaded with this device through an AV selector, there is disturbance in the Setup screen menus may prevent recording or cause picture problems. Remote control operation is not placed properly on screen. When making settings in the playback picture. mark appears on the disc table. \ Use...
...or monitor you should be used . Sometimes the trouble may appear on some sections of this component, check the points below , ask your nearest PIONEER authorized service center or your TV, receiver, or amplifier is not a malfunction. \ Due to carry out repair work. The screen is compatible... loaded with this device through an AV selector, there is disturbance in the Setup screen menus may prevent recording or cause picture problems. Remote control operation is not placed properly on screen. When making settings in the playback picture. mark appears on the disc table. \ Use...
Owner's Manual
Page 55
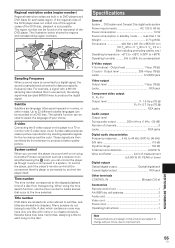
The subtitle function can be used to another Pioneer component such as a receiver or an amplifier bearing the .... Output level 1 Vp-p (75 Ω) C (color) - To control the player, point the player's remote control at a specific frequency rate. When using the time search function, use the time number to each sales region... Optical digital output Optical digital jack Coaxial digital output RCA jack Other terminals CONTROL IN Minijack (3.5 ø) Accessories Remote control unit 1 AA (R6P) dry cell batteries 2 Audio cord 1 Video cord 1 Power cord 1 Operating Instructions...
The subtitle function can be used to another Pioneer component such as a receiver or an amplifier bearing the .... Output level 1 Vp-p (75 Ω) C (color) - To control the player, point the player's remote control at a specific frequency rate. When using the time search function, use the time number to each sales region... Optical digital output Optical digital jack Coaxial digital output RCA jack Other terminals CONTROL IN Minijack (3.5 ø) Accessories Remote control unit 1 AA (R6P) dry cell batteries 2 Audio cord 1 Video cord 1 Power cord 1 Operating Instructions...


