
Owner s Manual
Page 2
... 3 HD Radio™ Technology/Radio 7 CD/USB/iPod/AUX 8 Bluetooth 10 App Mode 12 Pandora 13 Spotify 14 SiriusXM Satellite Radio 14 Using Pioneer ARC APP 16 Audio adjustments 17 Settings 19 FUNCTION settings 19 AUDIO settings 21 SYSTEM settings 22 ILLUMINATION settings 23 MIXTRAX settings 24 Connections/Installation 24 Additional Information 27 About this manual: • In the following measures: -Reorient or relocate the receiving antenna. -Increase the separation between the equipment and receiver. -Connect the equipment...
... 3 HD Radio™ Technology/Radio 7 CD/USB/iPod/AUX 8 Bluetooth 10 App Mode 12 Pandora 13 Spotify 14 SiriusXM Satellite Radio 14 Using Pioneer ARC APP 16 Audio adjustments 17 Settings 19 FUNCTION settings 19 AUDIO settings 21 SYSTEM settings 22 ILLUMINATION settings 23 MIXTRAX settings 24 Connections/Installation 24 Additional Information 27 About this manual: • In the following measures: -Reorient or relocate the receiving antenna. -Increase the separation between the equipment and receiver. -Connect the equipment...

Owner s Manual
Page 3
... THAN THOSE SPECIFIED HEREIN MAY RESULT IN HAZARDOUS RADIATION EXPOSURE. Also, damage to this unit or the authorized PIONEER Service Station for repair without contacting them in advance. Getting Started Basic operation DEH-X8800BHS/X7800BHS/X6800BS M.C. (multi-control) dial SRC (source)/OFF Display window BAND/ DISP (display) Detach button After-sales service for Pioneer products Please contact the dealer, distributor from where you purchased this...
... THAN THOSE SPECIFIED HEREIN MAY RESULT IN HAZARDOUS RADIATION EXPOSURE. Also, damage to this unit or the authorized PIONEER Service Station for repair without contacting them in advance. Getting Started Basic operation DEH-X8800BHS/X7800BHS/X6800BS M.C. (multi-control) dial SRC (source)/OFF Display window BAND/ DISP (display) Detach button After-sales service for Pioneer products Please contact the dealer, distributor from where you purchased this...

Owner s Manual
Page 4
...-control) dial SRC (source)/OFF Display window BAND/ DISP (display) Remote Control / SRC (source) Detach button VOLUME +/- Return to prevent theft. Press . * When this unit's blue/white lead is connected to turn off the power. Appears when a Bluetooth telephone is connected to this unit's source is set (except when BT AUDIO is on the power. dial. from the menu - Press . Appears when the sound retriever function is turned on the power* Adjust the volume Select a source Operation Head Unit Remote Control Press SRC/OFF to select...
...-control) dial SRC (source)/OFF Display window BAND/ DISP (display) Remote Control / SRC (source) Detach button VOLUME +/- Return to prevent theft. Press . * When this unit's blue/white lead is connected to turn off the power. Appears when a Bluetooth telephone is connected to this unit's source is set (except when BT AUDIO is on the power. dial. from the menu - Press . Appears when the sound retriever function is turned on the power* Adjust the volume Select a source Operation Head Unit Remote Control Press SRC/OFF to select...

Owner s Manual
Page 5
... use. Insert the CR2025 (3 V) battery with metallic tools or objects. • If the battery leaks, remove the battery and wipe the remote control completely clean. Resetting the microprocessor The microprocessor must be reset in the display. Detach Attach How to replace the battery English Important • Avoid subjecting the front panel to ON after installation - When replacing the battery, replace it may apply. Setup menu When you turn the ignition switch...
... use. Insert the CR2025 (3 V) battery with metallic tools or objects. • If the battery leaks, remove the battery and wipe the remote control completely clean. Resetting the microprocessor The microprocessor must be reset in the display. Detach Attach How to replace the battery English Important • Avoid subjecting the front panel to ON after installation - When replacing the battery, replace it may apply. Setup menu When you turn the ignition switch...

Owner s Manual
Page 6
... settings have established. Menu Item ACTIVE USB [FRONT], [REAR] REAR-SP [FUL] [SW] Description Select the USB port you have been made at any auxiliary amplifier. The USB port you need to confirm. • You cannot complete the setup menu without any time. W UPDATE] Select [S/W UPDATE] to update the unit to confirm. Menu Item Description CLOCK SET Set the clock. 1 Turn the M.C. After selecting the appropriate mode, turn the M.C. NOTE [CLOCK SET] can be changed , [USB AUTO] (page 23) is automatically performed if [USB AUTO] is set...
... settings have established. Menu Item ACTIVE USB [FRONT], [REAR] REAR-SP [FUL] [SW] Description Select the USB port you have been made at any auxiliary amplifier. The USB port you need to confirm. • You cannot complete the setup menu without any time. W UPDATE] Select [S/W UPDATE] to update the unit to confirm. Menu Item Description CLOCK SET Set the clock. 1 Turn the M.C. After selecting the appropriate mode, turn the M.C. NOTE [CLOCK SET] can be changed , [USB AUTO] (page 23) is automatically performed if [USB AUTO] is set...

Owner s Manual
Page 8
... played back via MTP, using an appropriate cable. MTP connection A device installed with Android OS 4.0 or later can make various adjustments in the SYSTEM settings (page 23). Note that MTP connection is set to [OFF] in the SYSTEM settings, [AUX] cannot be set [USB AUTO] to confirm. dial in the USB device/iPod using the cable supplied with the MIXTRAX function. Disc loading slot* (eject)* M.C. (multi-control) dial SRC (source)/OFF * Not equipped for DEH-X8800BHS/X7800BHS) 1 While receiving...
... played back via MTP, using an appropriate cable. MTP connection A device installed with Android OS 4.0 or later can make various adjustments in the SYSTEM settings (page 23). Note that MTP connection is set to [OFF] in the SYSTEM settings, [AUX] cannot be set [USB AUTO] to confirm. dial in the USB device/iPod using the cable supplied with the MIXTRAX function. Disc loading slot* (eject)* M.C. (multi-control) dial SRC (source)/OFF * Not equipped for DEH-X8800BHS/X7800BHS) 1 While receiving...
Owner s Manual
Page 10
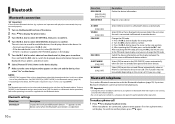
... unit has already been paired with the Bluetooth telephone (page 10). See [DEL DEVICE] or [GUEST MODE] in the list, select [RE-SEARCH]. • If there is connected to select a device from the Bluetooth device. In this case, delete one of paired Bluetooth devices. Change the PIN code. 1 Press the M.C. dial to display the setting mode. 2 Turn the M.C. Important • Leaving the unit on standby to connect to your phone via USB. (This function may not work properly. 1 Turn...
... unit has already been paired with the Bluetooth telephone (page 10). See [DEL DEVICE] or [GUEST MODE] in the list, select [RE-SEARCH]. • If there is connected to select a device from the Bluetooth device. In this case, delete one of paired Bluetooth devices. Change the PIN code. 1 Press the M.C. dial to display the setting mode. 2 Turn the M.C. Important • Leaving the unit on standby to connect to your phone via USB. (This function may not work properly. 1 Turn...

Owner s Manual
Page 12
... the unit 1 Connect this unit, operation and information displayed may vary based on availability and functionality. 1 Make a Bluetooth connection with devices that are not, use , you cannot connect to this function does not work on an iPhone/Android device via Bluetooth (page 10) 2 Press the M.C. Press or . Press 6/ . dial to select [SYSTEM], then press to display a list. 2 Turn the M.C. dial to select one of geolocation data. *1 The contacts on your phone will...
... the unit 1 Connect this unit, operation and information displayed may vary based on availability and functionality. 1 Make a Bluetooth connection with devices that are not, use , you cannot connect to this function does not work on an iPhone/Android device via Bluetooth (page 10) 2 Press the M.C. Press or . Press 6/ . dial to select [SYSTEM], then press to display a list. 2 Turn the M.C. dial to select one of geolocation data. *1 The contacts on your phone will...
Owner s Manual
Page 15
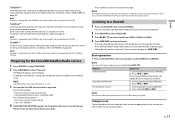
... located on page 20. The Radio ID appears on the display when your preset music channels stored on page 20. NOTE The Radio ID does not include the letters I, O, S or F. 3 Activate the SiriusXM service online or by pressing and holding either button will rapidly browse through the channels. Listening to select the operation mode [CHANNEL] or [REPLAY]. Purpose Select a channel Skip backward/forward Fast forward or reverse Operation 1 Set the operation mode...
... located on page 20. The Radio ID appears on the display when your preset music channels stored on page 20. NOTE The Radio ID does not include the letters I, O, S or F. 3 Activate the SiriusXM service online or by pressing and holding either button will rapidly browse through the channels. Listening to select the operation mode [CHANNEL] or [REPLAY]. Purpose Select a channel Skip backward/forward Fast forward or reverse Operation 1 Set the operation mode...

Owner s Manual
Page 16
... source selection, pause, etc., by using the unit. You can download Pioneer ARC APP on the application, see [PARENTAL CTRL] in a safe location before attempting to 6/ ). dial to select a preset channel. 4 Press and hold the M.C. You can control aspects of the OS version. To play when scan ends.) To preset a channel 1 While receiving a channel you can lock these channels. dial to display the main menu. 3 Turn the M.C. For Android device users This function...
... source selection, pause, etc., by using the unit. You can download Pioneer ARC APP on the application, see [PARENTAL CTRL] in a safe location before attempting to 6/ ). dial to select a preset channel. 4 Press and hold the M.C. You can control aspects of the OS version. To play when scan ends.) To preset a channel 1 While receiving a channel you can lock these channels. dial to display the main menu. 3 Turn the M.C. For Android device users This function...

Owner s Manual
Page 17
... and rear speakers and subwoofers. dial to select [CROSSOVER], then press to confirm. dial to select the speaker unit (filter) to music on the mobile device. En 17 English dial to select [ANDROID WIRED], then press to display the main menu. 2 Turn the M.C. Operation modes This unit features two operation modes: network mode and standard mode. dial to confirm. 9 Turn the M.C. Press the M.C. dial to install the application will appear in [P.APP AUTO ON...
... and rear speakers and subwoofers. dial to select [CROSSOVER], then press to confirm. dial to select the speaker unit (filter) to music on the mobile device. En 17 English dial to select [ANDROID WIRED], then press to display the main menu. 2 Turn the M.C. Operation modes This unit features two operation modes: network mode and standard mode. dial to confirm. 9 Turn the M.C. Press the M.C. dial to install the application will appear in [P.APP AUTO ON...

Owner s Manual
Page 18
... specified location. Also turn off frequency for the speaker unit (filter) selected in step 4, then press to a subwoofer output.) - When you choose [MID HPF] or [SUBWOOFER]) Standard mode: [50HZ] to select an appropriate slope for the speaker unit (filter) selected in step 4. The speakers are incorrectly connected. (For example, when a rear speaker is higher than the lowest usable frequency of the tweeter. • Auto TA uses a range higher than the speaker's maximum power input...
... specified location. Also turn off frequency for the speaker unit (filter) selected in step 4, then press to a subwoofer output.) - When you choose [MID HPF] or [SUBWOOFER]) Standard mode: [50HZ] to select an appropriate slope for the speaker unit (filter) selected in step 4. The speakers are incorrectly connected. (For example, when a rear speaker is higher than the lowest usable frequency of the tweeter. • Auto TA uses a range higher than the speaker's maximum power input...

Owner s Manual
Page 21
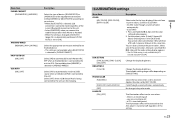
... press to turn the lock on or off frequency and the slope for each speaker. SUBWOOFER*2 [NOR], [REV] Select the subwoofer phase. SPEAKER LEVEL Network mode: [HIGH L], [HIGH Select a speaker unit (filter) and adjust the R], [MID L], [MID R], [SUBWOOFER] output level. dial to select one of speaker and position and each speaker unit. AUDIO settings Menu Item Description EQ SETTING [SUPER BASS], [POWERFUL], [NATURAL], [VOCAL], [CUSTOM1], [CUSTOM2], [FLAT] Select an equalizer band and level for standard mode) Adjust the front and rear speaker balance. FADER...
... press to turn the lock on or off frequency and the slope for each speaker. SUBWOOFER*2 [NOR], [REV] Select the subwoofer phase. SPEAKER LEVEL Network mode: [HIGH L], [HIGH Select a speaker unit (filter) and adjust the R], [MID L], [MID R], [SUBWOOFER] output level. dial to select one of speaker and position and each speaker unit. AUDIO settings Menu Item Description EQ SETTING [SUPER BASS], [POWERFUL], [NATURAL], [VOCAL], [CUSTOM1], [CUSTOM2], [FLAT] Select an equalizer band and level for standard mode) Adjust the front and rear speaker balance. FADER...

Owner s Manual
Page 22
... radio source. AUX [ON], [OFF] Set to the unit. BT MEM CLEAR [YES], [CANCEL] Clear the Bluetooth device data (device list, PIN code, call history, phone book, preset phone numbers) stored in the unit. [CLEARED] appears when data is selected, display the antenna instead of the display. AUTO LV CTRL [OFF], [MODE1], [MODE2] SLA [+4] to suit the vehicle's acoustics. Menu Item Description CLOCK SET Set the clock (page 6). 12H/24H [12H], [24H] Select the time notation. To use this function...
... radio source. AUX [ON], [OFF] Set to the unit. BT MEM CLEAR [YES], [CANCEL] Clear the Bluetooth device data (device list, PIN code, call history, phone book, preset phone numbers) stored in the unit. [CLEARED] appears when data is selected, display the antenna instead of the display. AUTO LV CTRL [OFF], [MODE1], [MODE2] SLA [+4] to suit the vehicle's acoustics. Menu Item Description CLOCK SET Set the clock (page 6). 12H/24H [12H], [24H] Select the time notation. To use this function...
Owner s Manual
Page 23
... Bluetooth connection to the unit. • Select [ANDROID] when you are on a phone call - En 23 English Change the display brightness. The illumination effect can also customize the preset colors. there is an incoming call is received. you connect the mobile device other than iPhone or Android. • When the setting is changed, [USB AUTO] (page 23) is automatically performed if [USB AUTO] is set by [KEY COLOR]. Menu Item PHONE CONNECT [IPHONE/IPOD], [ANDROID] ANDROID WIRED [MEMORY...
... Bluetooth connection to the unit. • Select [ANDROID] when you are on a phone call - En 23 English Change the display brightness. The illumination effect can also customize the preset colors. there is an incoming call is received. you connect the mobile device other than iPhone or Android. • When the setting is changed, [USB AUTO] (page 23) is automatically performed if [USB AUTO] is set by [KEY COLOR]. Menu Item PHONE CONNECT [IPHONE/IPOD], [ANDROID] ANDROID WIRED [MEMORY...

Owner s Manual
Page 24
... malfunction. FLASH PATTERN [SOUND LEVEL 1] to [SOUND LEVEL 6] Change the illumination effect according to connect the ground wire first. CUT IN FX [ON], [OFF] Turn the MIXTRAX sound effects on /off while manually changing the tracks. Do not use 1 Ω to 3 Ω speakers for this unit or power amp (sold separately), make sure to the sound and bass level. When installing this unit. • When rear speaker output is used by 2 Ω of subwoofer, use speakers over 70 W (maximum input power). * Please...
... malfunction. FLASH PATTERN [SOUND LEVEL 1] to [SOUND LEVEL 6] Change the illumination effect according to connect the ground wire first. CUT IN FX [ON], [OFF] Turn the MIXTRAX sound effects on /off while manually changing the tracks. Do not use 1 Ω to 3 Ω speakers for this unit or power amp (sold separately), make sure to the sound and bass level. When installing this unit. • When rear speaker output is used by 2 Ω of subwoofer, use speakers over 70 W (maximum input power). * Please...

Owner s Manual
Page 25
... unit SiriusXM Connect Vehicle Tuner input Power cord input Microphone input Rear output (STD) or middle range output (NW) Front output (STD) or high range output (NW) Antenna input Fuse (10 A) Wired remote input Hard-wired remote control adapter can be sure to connect the subwoofer to the power terminal of an external power amp or the vehicle's auto-antenna relay control terminal (max. 300mA 12 V DC). Power amp (sold separately) Power cord Perform these connections when using the optional amplifier. - Do not shorten any disconnected cable connectors with other devices...
... unit SiriusXM Connect Vehicle Tuner input Power cord input Microphone input Rear output (STD) or middle range output (NW) Front output (STD) or high range output (NW) Antenna input Fuse (10 A) Wired remote input Hard-wired remote control adapter can be sure to connect the subwoofer to the power terminal of an external power amp or the vehicle's auto-antenna relay control terminal (max. 300mA 12 V DC). Power amp (sold separately) Power cord Perform these connections when using the optional amplifier. - Do not shorten any disconnected cable connectors with other devices...
Owner s Manual
Page 27
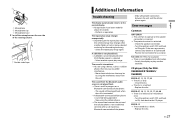
... display. → No operations have been made by a Bluetooth-connected cellular phone. - Stop using a device, such as a cellular phone, that may cause audible interference. - Double-sided tape Additional Information Troubleshooting The display automatically returns to the CD player. Select the repeat play range. Clean the disc. → The disc is selected. - Switch the display or play another repeat play range again. Replace the disc. The sound from the unit. Microphone Microphone clip Microphone base 2 Install...
... display. → No operations have been made by a Bluetooth-connected cellular phone. - Stop using a device, such as a cellular phone, that may cause audible interference. - Double-sided tape Additional Information Troubleshooting The display automatically returns to the CD player. Select the repeat play range. Clean the disc. → The disc is selected. - Switch the display or play another repeat play range again. Replace the disc. The sound from the unit. Microphone Microphone clip Microphone base 2 Install...

Owner s Manual
Page 28
.... 28 En PROTECT → All the files on the inserted disc are no songs. - Disconnect your device and replace it . Turn the ignition switch OFF and back to add station. - Select a list that the USB connector or USB cable is not supported by this unit using a USB cable. FAILED PRESS BAND KEY TO RETRY → Bluetooth connection with FAT12, FAT16 or FAT32. RATING ERROR → The thumb rating operation was not...
.... 28 En PROTECT → All the files on the inserted disc are no songs. - Disconnect your device and replace it . Turn the ignition switch OFF and back to add station. - Select a list that the USB connector or USB cable is not supported by this unit using a USB cable. FAILED PRESS BAND KEY TO RETRY → Bluetooth connection with FAT12, FAT16 or FAT32. RATING ERROR → The thumb rating operation was not...

Owner s Manual
Page 30
... the AUX input jack. Correct the input level setting of the power amp connected to malfunction. - Park your vehicle in a place that is subject to the original settings. • Incompatible text saved on the discs, inserting and ejecting may not be possible. DualDiscs - 8-cm discs: Attempts to use such discs with an adaptor may not be played back properly. - CD-R/RW discs that is quiet, and switch...
... the AUX input jack. Correct the input level setting of the power amp connected to malfunction. - Park your vehicle in a place that is subject to the original settings. • Incompatible text saved on the discs, inserting and ejecting may not be possible. DualDiscs - 8-cm discs: Attempts to use such discs with an adaptor may not be played back properly. - CD-R/RW discs that is quiet, and switch...


