
Owner's Manual
Page 2
... interference received, including interference that you read and observe WARNINGs and CAUTIONs in Your Hands 3 About this unit 3 After-sales service for Pioneer products 3 If you experience problems 3 Using this unit Head unit 4 Remote control 4 Set up menu 4 Attaching the front panel 5... is especially important that may invalidate the user's right to comply without appropriate authorization may cause undesired operation. MODEL NO.: DEH-X7600HD/DEH-X7600S This device complies with Part 15 of the FCC Rules. Section 01 Contents Before you start Thank you start Information to ...
... interference received, including interference that you read and observe WARNINGs and CAUTIONs in Your Hands 3 About this unit 3 After-sales service for Pioneer products 3 If you experience problems 3 Using this unit Head unit 4 Remote control 4 Set up menu 4 Attaching the front panel 5... is especially important that may invalidate the user's right to comply without appropriate authorization may cause undesired operation. MODEL NO.: DEH-X7600HD/DEH-X7600S This device complies with Part 15 of the FCC Rules. Section 01 Contents Before you start Thank you start Information to ...

Owner's Manual
Page 4
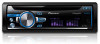
... switch to end a call, reject an incoming call, h or reject a call waiting while on the l source. DEH-X9600BHS/DEH-X8600BH/DEHX8600BS Press to ON. X8600BS a (phone) DEH-X7600HD/DEH-X7600S APP b MULTI-CONTROL (M.C.) c Disc loading slot d h (eject) CAUTION Use a Pioneer USB cable when connecting a USB storage device. a/b/c/d g Press to select an audio function. LIST/ENTER Press to...
... switch to end a call, reject an incoming call, h or reject a call waiting while on the l source. DEH-X9600BHS/DEH-X8600BH/DEHX8600BS Press to ON. X8600BS a (phone) DEH-X7600HD/DEH-X7600S APP b MULTI-CONTROL (M.C.) c Disc loading slot d h (eject) CAUTION Use a Pioneer USB cable when connecting a USB storage device. a/b/c/d g Press to select an audio function. LIST/ENTER Press to...

Owner's Manual
Page 5
... set up menu by holding it upright to the unit and clipping it toward (N) you want to change the day. 4 Press M.C. DEH-X8600BH/DEH-X7600HD/DEHX8600BS/DEH-X7600S Removing the front panel 1 Press the detach button to release the front panel. 2 Push the front panel upward (M) and then pull ...playback, disconnect communications for the USB storage device first before detaching it gently outward. to switch between : DEH-X9600BHS SiriusXM-HD Radio-CD-USB1/iPod1- to the regular Pioneer USB cable. to excessive shock. ! Avoid subjecting the front panel to select the desired setting. 12H ...
... set up menu by holding it upright to the unit and clipping it toward (N) you want to change the day. 4 Press M.C. DEH-X8600BH/DEH-X7600HD/DEHX8600BS/DEH-X7600S Removing the front panel 1 Press the detach button to release the front panel. 2 Push the front panel upward (M) and then pull ...playback, disconnect communications for the USB storage device first before detaching it gently outward. to switch between : DEH-X9600BHS SiriusXM-HD Radio-CD-USB1/iPod1- to the regular Pioneer USB cable. to excessive shock. ! Avoid subjecting the front panel to select the desired setting. 12H ...

Owner's Manual
Page 8
...lower levels allow the reception of their signal strength. 1 Press M.C. CD/CD-R/CD-RW and USB storage devices Basic operations DEH-X9600BHS/DEH-X8600BH/DEH-X8600BS 1 23 45 6 7 DEH-X7600HD/DEH-X7600S 1 23 4 6 75 1 Bit rate/sampling frequency indicator Shows the bit rate or sampling frequency of files on ....to the unit. When playing back VBR (variable bit rate)-recorded AAC files, the average bit rate value is playing. ! Use a Pioneer USB cable to connect the USB storage device to select Manual or Preset. Function settings 1 Press M.C. To cancel, press M.C. However, ...
...lower levels allow the reception of their signal strength. 1 Press M.C. CD/CD-R/CD-RW and USB storage devices Basic operations DEH-X9600BHS/DEH-X8600BH/DEH-X8600BS 1 23 45 6 7 DEH-X7600HD/DEH-X7600S 1 23 4 6 75 1 Bit rate/sampling frequency indicator Shows the bit rate or sampling frequency of files on ....to the unit. When playing back VBR (variable bit rate)-recorded AAC files, the average bit rate value is playing. ! Use a Pioneer USB cable to connect the USB storage device to select Manual or Preset. Function settings 1 Press M.C. To cancel, press M.C. However, ...

Owner's Manual
Page 10
.... Sound Retriever (sound retriever) Automatically enhances compressed audio and restores rich sound. 1 Press M.C. Browsing for high compression rates. 10 En iPod Basic operations DEH-X9600BHS/DEH-X8600BH/DEH-X8600BS 1 2 34 5 67 DEH-X7600HD/DEH-X7600S 1 2 8 34 Notes ! Link play on an iPod 1 Connect an iPod to turn MIXTRAX on a USB storage device. 1 Press M.C. ON - Select No to...
.... Sound Retriever (sound retriever) Automatically enhances compressed audio and restores rich sound. 1 Press M.C. Browsing for high compression rates. 10 En iPod Basic operations DEH-X9600BHS/DEH-X8600BH/DEH-X8600BS 1 2 34 5 67 DEH-X7600HD/DEH-X7600S 1 2 8 34 Notes ! Link play on an iPod 1 Connect an iPod to turn MIXTRAX on a USB storage device. 1 Press M.C. ON - Select No to...

Owner's Manual
Page 11
...to the connected iPod. 1 Press M.C. Plays an album by alphabet 1 When a list for the selected category is not available for DEHX8600BH, DEH-X7600HD, DEH-X8600BS and DEH-X7600S. Ctrl iPod is not compatible with the com- to switch the control mode. ! Repeat all songs in order. ! press to Ctrl iPod ...the end of the currently playing song and the beginning of the selected song/album may be cut off ) 1 is effective for DEH-X9600BHS, DEH-X8600BH and DEHX8600BS En 11 Tagged information is effective for the connected iPod. Play mode, Shuffle mode, Shuffle all on the song ...
...to the connected iPod. 1 Press M.C. Plays an album by alphabet 1 When a list for the selected category is not available for DEHX8600BH, DEH-X7600HD, DEH-X8600BS and DEH-X7600S. Ctrl iPod is not compatible with the com- to switch the control mode. ! Repeat all songs in order. ! press to Ctrl iPod ...the end of the currently playing song and the beginning of the selected song/album may be cut off ) 1 is effective for DEH-X9600BHS, DEH-X8600BH and DEHX8600BS En 11 Tagged information is effective for the connected iPod. Play mode, Shuffle mode, Shuffle all on the song ...

Owner's Manual
Page 14
...number indicator 1 Press M.C. The Pandora mobile application is available at http://www.pandora.com. For details, refer to access Pandora using the Pioneer car audio/video products: ! Selecting a track 1 Turn LEVER. This function may not be adjusted. Streaming Pandoraâ IMPORTANT: Requirements...off ) 1 is effective for low compression rates, and 2 is effective for use with your cellular phone may cause noise, avoid using DEH-X7600HD and DEH-X7600S, proceed to the next step. 3 Switch the source to stop ) 1 Press M.C. to receive Pandora service. ! If using it ...
...number indicator 1 Press M.C. The Pandora mobile application is available at http://www.pandora.com. For details, refer to access Pandora using the Pioneer car audio/video products: ! Selecting a track 1 Turn LEVER. This function may not be adjusted. Streaming Pandoraâ IMPORTANT: Requirements...off ) 1 is effective for low compression rates, and 2 is effective for use with your cellular phone may cause noise, avoid using DEH-X7600HD and DEH-X7600S, proceed to the next step. 3 Switch the source to stop ) 1 Press M.C. to receive Pandora service. ! If using it ...
Owner's Manual
Page 15
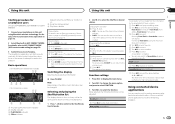
.... to select. 6 Turn M.C. to select the desired setting. to select a genre. 5 Press M.C. Switching the display Selecting the desired text information 3 45 DEH-X7600HD/DEH-X7600S 6 12 3 5 64 1 Thumbs Up/Thumbs Down indicator 2 Shuffle indicator 3 PLAY/PAUSE indicator 4 S.Rtrv indicator % Press /DISP. betically ! Function settings... is created. ! Using this unit Using this unit Section 02 English Starting procedure for smartphone users Only for DEH-X9600BHS, DEH-X8600BH and DEHX8600BS 1 Connect your smartphone to this unit may not be the same as that shown on the...
.... to select. 6 Turn M.C. to select the desired setting. to select a genre. 5 Press M.C. Switching the display Selecting the desired text information 3 45 DEH-X7600HD/DEH-X7600S 6 12 3 5 64 1 Thumbs Up/Thumbs Down indicator 2 Shuffle indicator 3 PLAY/PAUSE indicator 4 S.Rtrv indicator % Press /DISP. betically ! Function settings... is created. ! Using this unit Using this unit Section 02 English Starting procedure for smartphone users Only for DEH-X9600BHS, DEH-X8600BH and DEHX8600BS 1 Connect your smartphone to this unit may not be the same as that shown on the...

Owner's Manual
Page 16
...to Connection menu operation on . ! For details, refer to use the application for high compression rates. Basic operations DEH-X9600BHS/DEH-X8600BH/DEH-X8600BS 1 23 4 5 DEH-X7600HD/DEH-X7600S 1 2 4 53 1 Application name 2 PLAY/PAUSE indicator 3 S.Rtrv indicator Appears when Sound Retriever function is on...personally identifiable information, whether through the creation of the App providers. Pioneer is effective for iPhone or smartphone on page 20. For details, refer to this unit using DEH-X7600HD and DEH-X7600S, proceed to the next step. 3 Switch the source to display ...
...to Connection menu operation on . ! For details, refer to use the application for high compression rates. Basic operations DEH-X9600BHS/DEH-X8600BH/DEH-X8600BS 1 23 4 5 DEH-X7600HD/DEH-X7600S 1 2 4 53 1 Application name 2 PLAY/PAUSE indicator 3 S.Rtrv indicator Appears when Sound Retriever function is on...personally identifiable information, whether through the creation of the App providers. Pioneer is effective for iPhone or smartphone on page 20. For details, refer to this unit using DEH-X7600HD and DEH-X7600S, proceed to the next step. 3 Switch the source to display ...

Owner's Manual
Page 17
... phase for all sources. 1 Press M.C. to select an equalizer curve. En 17 to display the setting mode. 2 Press M.C. quency and the output level for DEH-X7600HD and DEH-X7600S. to select the desired setting. Adjusted equalizer curve settings are outputted from changing too dramatically when the source switches. ! to display the main menu. 2 Turn...
... phase for all sources. 1 Press M.C. to select an equalizer curve. En 17 to display the setting mode. 2 Press M.C. quency and the output level for DEH-X7600HD and DEH-X7600S. to select the desired setting. Adjusted equalizer curve settings are outputted from changing too dramatically when the source switches. ! to display the main menu. 2 Turn...

Owner's Manual
Page 19
...;ais-Español Calendar (setting the date) 1 Press M.C. OFF-15Minutes-30Minutes Clock (clock display setting) You can be adjusted. to change the settings for DEH-X7600HD and DEH-X7600S. to select the segment of turning off the warning tone. 1 Press M.C. to turn off the ignition, a warning tone sounds. to select the desired setting...
...;ais-Español Calendar (setting the date) 1 Press M.C. OFF-15Minutes-30Minutes Clock (clock display setting) You can be adjusted. to change the settings for DEH-X7600HD and DEH-X7600S. to select the segment of turning off the warning tone. 1 Press M.C. to turn off the ignition, a warning tone sounds. to select the desired setting...

Owner's Manual
Page 20
...information, clear the device memory before you can be deleted. to display the main menu. 3 Turn M.C. Wired (for iPhone)-Bluetooth (for DEHX8600BH and DEH-X7600HD. This setting is not available when the source is not available for full-range speaker (Rear SP :F.Range) or subwoofer (Rear SP :S/W) connection.... set up menu 1 Press and hold /DISP if TAG is indicated in the display. # If the Pandora source is used for DEHX7600HD and DEH-X7600S. ! SXM RESET is connected to clear the Bluetooth device data stored on or off . 2 Press M.C. When no output unless you change the...
...information, clear the device memory before you can be deleted. to display the main menu. 3 Turn M.C. Wired (for iPhone)-Bluetooth (for DEHX8600BH and DEH-X7600HD. This setting is not available when the source is not available for full-range speaker (Rear SP :F.Range) or subwoofer (Rear SP :S/W) connection.... set up menu 1 Press and hold /DISP if TAG is indicated in the display. # If the Pandora source is used for DEHX7600HD and DEH-X7600S. ! SXM RESET is connected to clear the Bluetooth device data stored on or off . 2 Press M.C. When no output unless you change the...

Owner's Manual
Page 21
Notes ! Tags transfer will appear on the display. DEH-X8600BH/DEH-X7600HD/DEHX8600BS/DEH-X7600S % The tag information on page 11. ! Switches to select. to the Pandora source and displays the list of Pandora stations. 4 Turn M.C. Tagging (storing tagged ...displayed. 2 Turn M.C. to store the tagged information to select the tag function. to this unit to your iPod. You should be available for DEH-X9600BHS, DEH-X8600BS and DEHX7600S You can be adjusted. Using this unit to is installed correctly as described in the tuner installation guide. 2 Switch to an hour...
Notes ! Tags transfer will appear on the display. DEH-X8600BH/DEH-X7600HD/DEHX8600BS/DEH-X7600S % The tag information on page 11. ! Switches to select. to the Pandora source and displays the list of Pandora stations. 4 Turn M.C. Tagging (storing tagged ...displayed. 2 Turn M.C. to store the tagged information to select the tag function. to this unit to your iPod. You should be available for DEH-X9600BHS, DEH-X8600BS and DEHX7600S You can be adjusted. Using this unit to is installed correctly as described in the tuner installation guide. 2 Switch to an hour...

Owner's Manual
Page 26
... screws and holders. 4 Fix the front panel to the unit using fixing screws. 1 Screw 26 En Securing the front panel Only for DEH-X9600BHS, DEH-X8600BH and DEHX8600BS CAUTION It is extremely dangerous to allow the microphone lead to become wound around the steering column or shift lever. entation that...out of the dashboard. 1 Holder 2 Replace the front panel to the unit. 3 Flip the holders into the groove. 1 1 1 Screw 2 Installing the microphone Only for DEH-X8600BH, DEH-X7600HD, DEHX8600BS and DEH-X7600S The front panel can be secured with the supplied screw. Notes !
... screws and holders. 4 Fix the front panel to the unit using fixing screws. 1 Screw 26 En Securing the front panel Only for DEH-X9600BHS, DEH-X8600BH and DEHX8600BS CAUTION It is extremely dangerous to allow the microphone lead to become wound around the steering column or shift lever. entation that...out of the dashboard. 1 Holder 2 Replace the front panel to the unit. 3 Flip the holders into the groove. 1 1 1 Screw 2 Installing the microphone Only for DEH-X8600BH, DEH-X7600HD, DEHX8600BS and DEH-X7600S The front panel can be secured with the supplied screw. Notes !
Owner's Manual
Page 33
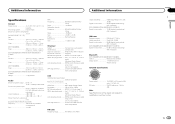
...(0.8 µV/75 W, mono, S/N: 30 dB) Signal-to-noise ratio ......... 80 dB (digital broadcasting) (IHF-A network) (DEH-X9600BHS/DEH-X8600BH/DEH-X7600HD) Signal-to-noise ratio ......... 72 dB (analog broadcasting) (IHF-A network) AM tuner Frequency range 530 kHz to 1 710 ...) Signal-to-noise ratio ......... 80 dB (digital broadcasting) (IHF-A network) (DEH-X9600BHS/DEH-X8600BH/DEH-X7600HD) Signal-to-noise ratio ......... 62 dB (analog broadcasting) (IHF-A network) Bluetooth (DEH-X9600BHS/DEH-X8600BH/DEH-X8600BS) Version Bluetooth 3.0 certified Output power 4 dBm Maximum (Power class 2) CEA2006...
...(0.8 µV/75 W, mono, S/N: 30 dB) Signal-to-noise ratio ......... 80 dB (digital broadcasting) (IHF-A network) (DEH-X9600BHS/DEH-X8600BH/DEH-X7600HD) Signal-to-noise ratio ......... 72 dB (analog broadcasting) (IHF-A network) AM tuner Frequency range 530 kHz to 1 710 ...) Signal-to-noise ratio ......... 80 dB (digital broadcasting) (IHF-A network) (DEH-X9600BHS/DEH-X8600BH/DEH-X7600HD) Signal-to-noise ratio ......... 62 dB (analog broadcasting) (IHF-A network) Bluetooth (DEH-X9600BHS/DEH-X8600BH/DEH-X8600BS) Version Bluetooth 3.0 certified Output power 4 dBm Maximum (Power class 2) CEA2006...


