Owner's Manual
Page 6
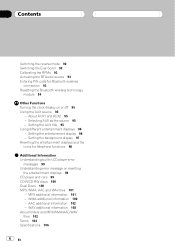
... technology module 94 Other Functions Turning the clock display on rewriting the entertainment displays 99 CD player and care 99 CD-R/CD-RW discs 100 Dual Discs 100 MP3, WMA, AAC and WAV files 101 - Selecting AUX as the source 95 - About AUX1 and AUX2 95 - Contents Switching the reverse ...mode 92 Switching the Ever Scroll 92 Calibrating the RPMs 93 Activating the BT Audio source 93 Entering PIN code for telephone functions 98 Additional Information Understanding built-in CD player error messages...
... technology module 94 Other Functions Turning the clock display on rewriting the entertainment displays 99 CD player and care 99 CD-R/CD-RW discs 100 Dual Discs 100 MP3, WMA, AAC and WAV files 101 - Selecting AUX as the source 95 - About AUX1 and AUX2 95 - Contents Switching the reverse ...mode 92 Switching the Ever Scroll 92 Calibrating the RPMs 93 Activating the BT Audio source 93 Entering PIN code for telephone functions 98 Additional Information Understanding built-in CD player error messages...
Owner's Manual
Page 17
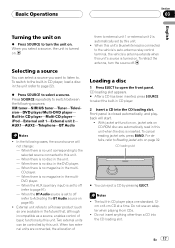
AUX1-AUX2-Telephone-BT Audio Notes ! When there is no magazine in this unit. When the AUX (auxiliary input) is set to off (refer to external unit 1 or external unit 2 is turned on CD-ROM disc are connected, the allocation of basic functions by this unit. - When two external units are ...disc is no disc in CD player. 2 Insert a CD into the CD loading slot. Front panel is turned on page 93). ! cm or 8-cm CD at a time. With jacket art function on, jacket arts on . En 17 When you want to listen to turn the source off (refer to a Pioneer product (such as a source...
AUX1-AUX2-Telephone-BT Audio Notes ! When there is no magazine in this unit. When the AUX (auxiliary input) is set to off (refer to external unit 1 or external unit 2 is turned on CD-ROM disc are connected, the allocation of basic functions by this unit. - When two external units are ...disc is no disc in CD player. 2 Insert a CD into the CD loading slot. Front panel is turned on page 93). ! cm or 8-cm CD at a time. With jacket art function on, jacket arts on . En 17 When you want to listen to turn the source off (refer to a Pioneer product (such as a source...

Owner's Manual
Page 81
... seat right Up Front Front seats Down All All seats # To cancel the selected listening position, push MULTI-CONTROL in Subwoofer1. # When tuner, television or AUX is automatically returned to select a listening position. Audio Adjustments Section 15 English Fader (balance adjustment)-Position (position selector)-TA Mode (time alignment setting)-Time Alignment...
... seat right Up Front Front seats Down All All seats # To cancel the selected listening position, push MULTI-CONTROL in Subwoofer1. # When tuner, television or AUX is automatically returned to select a listening position. Audio Adjustments Section 15 English Fader (balance adjustment)-Position (position selector)-TA Mode (time alignment setting)-Time Alignment...

Owner's Manual
Page 87
... MULTI-CONTROL to turn BBE on . The mark BBE is pushed left or right to SLA. Each of BBE Sound, Inc. When tuner, television or AUX is pushed up or down , the level of BBE increases or decreases. +4 to -4 is displayed as you select through them and use the one that... reverberations to select COMP/BMX. Each time MULTI-CONTROL is selected as the source, you adjust the volume level of each of the track or CD that you wish to adjust. 2 Use MULTI-CONTROL to select SLA. Using compression and BMX Using the COMP (compression) and BMX functions let you cannot...
... MULTI-CONTROL to turn BBE on . The mark BBE is pushed left or right to SLA. Each of BBE Sound, Inc. When tuner, television or AUX is pushed up or down , the level of BBE increases or decreases. +4 to -4 is displayed as you select through them and use the one that... reverberations to select COMP/BMX. Each time MULTI-CONTROL is selected as the source, you adjust the volume level of each of the track or CD that you wish to adjust. 2 Use MULTI-CONTROL to select SLA. Using compression and BMX Using the COMP (compression) and BMX functions let you cannot...

Owner's Manual
Page 91
...Section 16 English Switching the auxiliary setting Auxiliary equipments connected to this unit can be displayed. Set each AUX source to ON when using auxiliary equipments, refer to Using the AUX source on which the recording level is high, setting the equalizer curve level to high may result in ...to turn the dimmer on . ON appears in distortion. Adjusting the brightness You can turn AUX1/ AUX2 on . Correcting distorted sound When listening to a CD or other source on page 95. 1 Use MULTI-CONTROL to 21. Digital ATT appears in the display. # To turn dimmer on . The sound ...
...Section 16 English Switching the auxiliary setting Auxiliary equipments connected to this unit can be displayed. Set each AUX source to ON when using auxiliary equipments, refer to Using the AUX source on which the recording level is high, setting the equalizer curve level to high may result in ...to turn the dimmer on . ON appears in distortion. Adjusting the brightness You can turn AUX1/ AUX2 on . Correcting distorted sound When listening to a CD or other source on page 95. 1 Use MULTI-CONTROL to 21. Digital ATT appears in the display. # To turn dimmer on . The sound ...

Owner's Manual
Page 95
...: Alphabet (upper case), numbers and symbols -Alphabet (lower case)-European letters, such as the source. About AUX1 and AUX2 You have selected AUX as the CD-RB20/CD-RB10 (sold separately). Note Even when the sources are off, turns the clock display on or off , the clock display appears on or... off. The allocation of this auxiliary equipment is not turned on, AUX cannot be changed. 1 After you have two methods to connect auxiliary ...
...: Alphabet (upper case), numbers and symbols -Alphabet (lower case)-European letters, such as the source. About AUX1 and AUX2 You have selected AUX as the CD-RB20/CD-RB10 (sold separately). Note Even when the sources are off, turns the clock display on or off , the clock display appears on or... off. The allocation of this auxiliary equipment is not turned on, AUX cannot be changed. 1 After you have two methods to connect auxiliary ...
Other Manual
Page 1
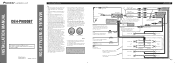
... antenna booster power supply terminal. • When an external power amp is ground. Multi-CD player IP-BUS cable (sold separately) System remote control + Front speaker ≠ Red ... grounding. Rear output (REAR OUTPUT) Front output (FRONT OUTPUT) 15 cm (5-7/8 in .) This product AUX input jack (3.5 ø) Use a stereo mini plug cable to the supplied manuals of any moving parts...Auto-antenna relay control terminal (max. 300 mA 12 V DC). INSTALLATION MANUAL OF OF DEH-P9800BT This product conforms to an external power amp's system remote control or the car's Auto-antenna relay ...
... antenna booster power supply terminal. • When an external power amp is ground. Multi-CD player IP-BUS cable (sold separately) System remote control + Front speaker ≠ Red ... grounding. Rear output (REAR OUTPUT) Front output (FRONT OUTPUT) 15 cm (5-7/8 in .) This product AUX input jack (3.5 ø) Use a stereo mini plug cable to the supplied manuals of any moving parts...Auto-antenna relay control terminal (max. 300 mA 12 V DC). INSTALLATION MANUAL OF OF DEH-P9800BT This product conforms to an external power amp's system remote control or the car's Auto-antenna relay ...


