
Owner's Manual
Page 33
... of the buttons 1 - 6 until the preset number stops flashing. Press NEXT until "1" - Press TA to display "TA". Canceling road traffic flash and transport flash interruptions part way through 1. Press NEXT to turn the road traffic flash and transport flash off 1. FRANÇAIS ITALIANO NEDERLANDS 32
... of the buttons 1 - 6 until the preset number stops flashing. Press NEXT until "1" - Press TA to display "TA". Canceling road traffic flash and transport flash interruptions part way through 1. Press NEXT to turn the road traffic flash and transport flash off 1. FRANÇAIS ITALIANO NEDERLANDS 32

Owner's Manual
Page 52
... compartment or any button. 10.When auto-equalizing is completed, "Complete" is output from the fan in about four minutes. • To cancel auto-equalizing part way through, press any other safe place. Refer to "Using position selector" on the front passenger seat to "Understanding auto-equalizing error messages" on this...
... compartment or any button. 10.When auto-equalizing is completed, "Complete" is output from the fan in about four minutes. • To cancel auto-equalizing part way through, press any other safe place. Refer to "Using position selector" on the front passenger seat to "Understanding auto-equalizing error messages" on this...
Other Manual
Page 1
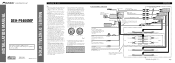
.../white To lighting switch terminal. Black (ground) To vehicle (metal) body. INSTALLATION MANUAL OF OF DEH-P9400MP This product conforms to speakers. Connect the connectors of any moving parts, such as power amps. Red To electric terminal controlled by cutting the insulation of the power supply ...system, do not connect the blue/white lead to use a cellular telephone, connect it should be different colors even if they lie against metal parts. • Route and secure all wiring so it in a recreational vehicle, truck, or bus, check the battery voltage. • To...
.../white To lighting switch terminal. Black (ground) To vehicle (metal) body. INSTALLATION MANUAL OF OF DEH-P9400MP This product conforms to speakers. Connect the connectors of any moving parts, such as power amps. Red To electric terminal controlled by cutting the insulation of the power supply ...system, do not connect the blue/white lead to use a cellular telephone, connect it should be different colors even if they lie against metal parts. • Route and secure all wiring so it in a recreational vehicle, truck, or bus, check the battery voltage. • To...
Other Manual
Page 2
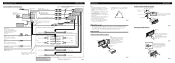
... switch (12 V DC) ON/OFF. For details, refer to ensure proper installation. Black (ground) To vehicle (metal) body. The use of unauthorized parts can be damaged if it .) Insert the supplied extraction keys into the unit, as shown in the figure, until they click into the dashboard, then...and cannot injure the passenger if there is all connected up properly, and the unit and the system work properly. • Use only the parts included with the rubber bush (Fig. 5) Dashboard 182 Holder After inserting the holder into place. Yellow To terminal always supplied with RCA pin plugs...
... switch (12 V DC) ON/OFF. For details, refer to ensure proper installation. Black (ground) To vehicle (metal) body. The use of unauthorized parts can be damaged if it .) Insert the supplied extraction keys into the unit, as shown in the figure, until they click into the dashboard, then...and cannot injure the passenger if there is all connected up properly, and the unit and the system work properly. • Use only the parts included with the rubber bush (Fig. 5) Dashboard 182 Holder After inserting the holder into place. Yellow To terminal always supplied with RCA pin plugs...
Other Manual
Page 3
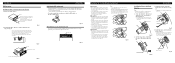
...bracket and the screw holes of the inner holder. (Fig. 16) Fig. 17 4. Fig. 16 Release Section Fig. 18 If other parts are used, this unit may be damaged or could dismount itself, which may obstruct the driver's view. • Since interior layout differs depending... Incursion of a fatal accident. • Avoid installing this unit requires specialized skills and experience. Installation DIN Rear-mount Installation using only the parts supplied with this unit. Fig. 14 Installing the Unit on a right-hand-drive car, the horizontal positions are fitted), and tighten the screws...
...bracket and the screw holes of the inner holder. (Fig. 16) Fig. 17 4. Fig. 16 Release Section Fig. 18 If other parts are used, this unit may be damaged or could dismount itself, which may obstruct the driver's view. • Since interior layout differs depending... Incursion of a fatal accident. • Avoid installing this unit requires specialized skills and experience. Installation DIN Rear-mount Installation using only the parts supplied with this unit. Fig. 14 Installing the Unit on a right-hand-drive car, the horizontal positions are fitted), and tighten the screws...

