Owner's Manual
Page 2
...3 Key Finder 4 Before Using This Product 5 Features 5 About this product 5 About this manual 5 Important 5 Precaution 5 After-sales service for Pioneer products 6 About WMA 6 Switching the DSP setting mode 7 About the XM READY mark 7 Resetting the microprocessor 7 About the demo modes 8 About... basic displays 8 Remote controller and care 9 Using the steering remote controller 10 Detaching and replacing the front panel .......... 11 Basic Operation 12 Turning a source on or off 12 SOFT KEY operation 12 Key guidance indicator 14 Tuner 15 Display and ...
...3 Key Finder 4 Before Using This Product 5 Features 5 About this product 5 About this manual 5 Important 5 Precaution 5 After-sales service for Pioneer products 6 About WMA 6 Switching the DSP setting mode 7 About the XM READY mark 7 Resetting the microprocessor 7 About the demo modes 8 About... basic displays 8 Remote controller and care 9 Using the steering remote controller 10 Detaching and replacing the front panel .......... 11 Basic Operation 12 Turning a source on or off 12 SOFT KEY operation 12 Key guidance indicator 14 Tuner 15 Display and ...
Owner's Manual
Page 8
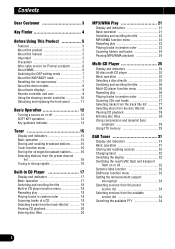
... (STD). XM will use direct satellite-to-receiver broadcasting technology to switch the DSP switch on the front panel of your dealer or nearest authorized Pioneer service station regarding the XM tuner that the Pioneer XM tuner (sold separately) can be controlled using this product. Please inquire of this product indicates that can...
... (STD). XM will use direct satellite-to-receiver broadcasting technology to switch the DSP switch on the front panel of your dealer or nearest authorized Pioneer service station regarding the XM tuner that the Pioneer XM tuner (sold separately) can be controlled using this product. Please inquire of this product indicates that can...

Owner's Manual
Page 12
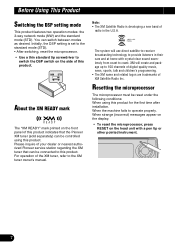
Precaution: • Never use force or grip the display tightly when removing or replacing the front panel. • Avoid subjecting the front panel to excessive shocks. • Keep the front panel out of direct sunlight and high temperatures. • A few seconds after the ignition is turned off , ...this happens, your fingers may be caught, so keep your hands away from the panel. • When removing the front panel, be sure to detach it . Replacing the front panel 1. Note: • You can cancel the warning tone function. (Refer to page 53.) Automatic ...
Precaution: • Never use force or grip the display tightly when removing or replacing the front panel. • Avoid subjecting the front panel to excessive shocks. • Keep the front panel out of direct sunlight and high temperatures. • A few seconds after the ignition is turned off , ...this happens, your fingers may be caught, so keep your hands away from the panel. • When removing the front panel, be sure to detach it . Replacing the front panel 1. Note: • You can cancel the warning tone function. (Refer to page 53.) Automatic ...

Owner's Manual
Page 18
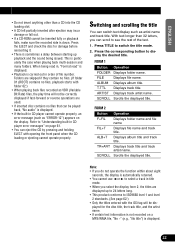
...To retract VOLUME, press it becomes easier to select a track. Pressing 2 once skips to adjust the volume. 5. If the front panel is inserted, the front panel closes automatically. 3. form fast forward or reverse. 6. Press EJECT to the previous track. • If you press and hold ...CD loading slot. Press VOLUME to extend the VOLUME outward. • When you can eject the CD by pressing and holding EJECT with the front panel left partially inserted after removing the CD. Turn VOLUME to the start of an accident. Built-in CD Player Display and indicators FORM 1 q ...
...To retract VOLUME, press it becomes easier to select a track. Pressing 2 once skips to adjust the volume. 5. If the front panel is inserted, the front panel closes automatically. 3. form fast forward or reverse. 6. Press EJECT to the previous track. • If you press and hold ...CD loading slot. Press VOLUME to extend the VOLUME outward. • When you can eject the CD by pressing and holding EJECT with the front panel left partially inserted after removing the CD. Turn VOLUME to the start of an accident. Built-in CD Player Display and indicators FORM 1 q ...

Owner's Manual
Page 22
...will skip to the previous track. • If you press and hold ∞ to return to trun. If the front panel is recorded. • Press and hold 2 or 3, you press VOLUME, it extends outward so that it again. 4. Press...7. Press EJECT to select a track. ing SOURCE when a CD-ROM is open the front panel. 2. When switching between MP3/WMA files and audio data (CD-DA), playback starts with the first track. •...; When the front panel is loaded in this product. • When playing discs with MP3/WMA files and audio data ...
...will skip to the previous track. • If you press and hold ∞ to return to trun. If the front panel is recorded. • Press and hold 2 or 3, you press VOLUME, it extends outward so that it again. 4. Press...7. Press EJECT to select a track. ing SOURCE when a CD-ROM is open the front panel. 2. When switching between MP3/WMA files and audio data (CD-DA), playback starts with the first track. •...; When the front panel is loaded in this product. • When playing discs with MP3/WMA files and audio data ...
Owner's Manual
Page 23
... automatically returned. • You cannot use 2 or 3 to ISO9660 level 1 and level 2 standards. (See page 62.) • Only the titles entered with opening the front panel when the CD loading or ejecting cannot operate properly. Refer to switch the title mode. 2. This is displayed. FILE Displays file name. ENGLISH ESPAÑ...
... automatically returned. • You cannot use 2 or 3 to ISO9660 level 1 and level 2 standards. (See page 62.) • Only the titles entered with opening the front panel when the CD loading or ejecting cannot operate properly. Refer to switch the title mode. 2. This is displayed. FILE Displays file name. ENGLISH ESPAÑ...

Owner's Manual
Page 52
...-equalizing (acoustic characteristics measurement and compensation) begins. • When all speakers are connected, auto- Refer to "Using position selector" on if this product. 3. The front panel opens automatically. • When the source is turned off , you place the microphone. equalizing is completed in the air conditioner or heater may cause distortion...
...-equalizing (acoustic characteristics measurement and compensation) begins. • When all speakers are connected, auto- Refer to "Using position selector" on if this product. 3. The front panel opens automatically. • When the source is turned off , you place the microphone. equalizing is completed in the air conditioner or heater may cause distortion...

Owner's Manual
Page 54
... "20dB ATT". Press MUTE.S to select the warning tone mode. 3. Setting the automatic opening function The automatic opening function opens the front panel to remind you to detach the front panel. (Refer to page 11.) You can turn the automatic opening on . "ON" appears in the display. • Press DT-WRN again...
... "20dB ATT". Press MUTE.S to select the warning tone mode. 3. Setting the automatic opening function The automatic opening function opens the front panel to remind you to detach the front panel. (Refer to page 11.) You can turn the automatic opening on . "ON" appears in the display. • Press DT-WRN again...
Other Manual
Page 3
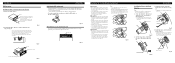
...and experience. Fig. 16 Release Section Fig. 18 Failure to do not operate the Detaching and Replacing the Front Panel Function, use the supplied fixing screws and fix the front panel to remove the frame. (When reattaching the frame, point the side with a groove downwards and attach it ...; Do not install this unit in a traffic accident. Install outer holder on the side of vehicle, the ideal installation location for the front panel If you . Installation DIN Rear-mount Installation using only the parts supplied with this unit. You can switch between modes as may obstruct the driver...
...and experience. Fig. 16 Release Section Fig. 18 Failure to do not operate the Detaching and Replacing the Front Panel Function, use the supplied fixing screws and fix the front panel to remove the frame. (When reattaching the frame, point the side with a groove downwards and attach it ...; Do not install this unit in a traffic accident. Install outer holder on the side of vehicle, the ideal installation location for the front panel If you . Installation DIN Rear-mount Installation using only the parts supplied with this unit. You can switch between modes as may obstruct the driver...
