Owner's Manual
Page 2
Contents Dear Customer 3 Key Finder 4 Before Using This Product 5 Features 5 About this product 5 About this manual 5 Important 5 Precaution 5 After-sales service for Pioneer products 6 About WMA 6 Switching the DSP setting mode 7 About the XM READY mark 7 Resetting the microprocessor 7 About the demo modes 8 About basic displays 8 Remote controller ...
Contents Dear Customer 3 Key Finder 4 Before Using This Product 5 Features 5 About this product 5 About this manual 5 Important 5 Precaution 5 After-sales service for Pioneer products 6 About WMA 6 Switching the DSP setting mode 7 About the XM READY mark 7 Resetting the microprocessor 7 About the demo modes 8 About basic displays 8 Remote controller ...
Owner's Manual
Page 6
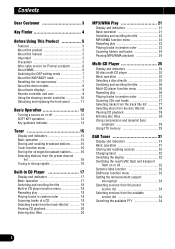
... listening enjoyment. CAUTION: THE USE OF OPTICAL INSTRUMENTS WITH THIS PRODUCT WILL INCREASE EYE HAZARD. • Keep this product. This operation manual is intended to record this product. You can perform the same operations with the functions and their potential and to be reprogrammed. 5 All... the preset memory will be erased and must be audible. • Protect the product from their operation by reading through the manual before you familiarize yourself with the steering remote controller. Important The serial number of this device is located on the bottom of sophisticated...
... listening enjoyment. CAUTION: THE USE OF OPTICAL INSTRUMENTS WITH THIS PRODUCT WILL INCREASE EYE HAZARD. • Keep this product. This operation manual is intended to record this product. You can perform the same operations with the functions and their potential and to be reprogrammed. 5 All... the preset memory will be erased and must be audible. • Protect the product from their operation by reading through the manual before you familiarize yourself with the steering remote controller. Important The serial number of this device is located on the bottom of sophisticated...
Owner's Manual
Page 8
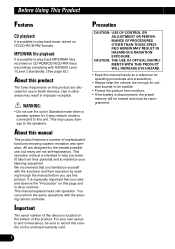
Please inquire of the XM tuner, refer to operate properly. For operation of your dealer or nearest authorized Pioneer service station regarding the XM tuner that the Pioneer XM tuner (sold separately) can be controlled using this product. You can be reset under the following conditions...programming. • The XM name and related logos are trademarks of this product. When the machine fails to the XM tuner owner's manual. XM will use direct satellite-to-receiver broadcasting technology to provide listeners in the U.S.A. Note: • The XM Satellite Radio is set...
Please inquire of the XM tuner, refer to operate properly. For operation of your dealer or nearest authorized Pioneer service station regarding the XM tuner that the Pioneer XM tuner (sold separately) can be controlled using this product. You can be reset under the following conditions...programming. • The XM name and related logos are trademarks of this product. When the machine fails to the XM tuner owner's manual. XM will use direct satellite-to-receiver broadcasting technology to provide listeners in the U.S.A. Note: • The XM Satellite Radio is set...
Owner's Manual
Page 13
... off. Note: • External unit refers to . To retract the antenna, switch the source off. If you want to listen to a Pioneer product (such as one available in the future) that it again. 3. the functions performed by this product. To switch to built-in CD player..."External" is used as the name of a button changes as a source, enables control of the multifunction buttons may be controlled by this manual, for operations using the multifunction buttons the function displayed is displayed whether you press VOLUME, it extends outward so that , although incompatible as ...
... off. Note: • External unit refers to . To retract the antenna, switch the source off. If you want to listen to a Pioneer product (such as one available in the future) that it again. 3. the functions performed by this product. To switch to built-in CD player..."External" is used as the name of a button changes as a source, enables control of the multifunction buttons may be controlled by this manual, for operations using the multifunction buttons the function displayed is displayed whether you press VOLUME, it extends outward so that , although incompatible as ...
Owner's Manual
Page 15
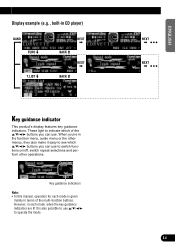
Key guidance indicators Note: • In this manual, operation for each mode, when the key guidance indicators are lit it easy to see which of the multi-function buttons. When you're in ...
Key guidance indicators Note: • In this manual, operation for each mode, when the key guidance indicators are lit it easy to see which of the multi-function buttons. When you're in ...
Owner's Manual
Page 26
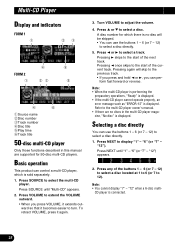
...VOLUME, press it becomes easier to extend the VOLUME outward. • When you can control a multi-CD player, which there is no discs in this manual are no disc will skip to select a disc directly. 5. Pressing 3 skips to 12). Press NEXT to select a track. Note: • You ...player Only those functions described in the multi-CD player magazine, "No disc" is displayed. "6" (or "7" - "12"). Refer to the multi-CD player owner's manual. • If there are supported for 50-disc multi-CD players. "12" when a 6-disc multi- Press 5 or ∞ to select a disc directly. ...
...VOLUME, press it becomes easier to extend the VOLUME outward. • When you can control a multi-CD player, which there is no discs in this manual are no disc will skip to select a disc directly. 5. Pressing 3 skips to 12). Press NEXT to select a track. Note: • You ...player Only those functions described in the multi-CD player magazine, "No disc" is displayed. "6" (or "7" - "12"). Refer to the multi-CD player owner's manual. • If there are supported for 50-disc multi-CD players. "12" when a 6-disc multi- Press 5 or ∞ to select a disc directly. ...
Owner's Manual
Page 32
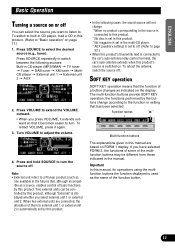
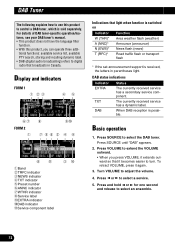
... The following explains how to use this product, you press VOLUME, it again. 3. For details of DAB tuner-specific operation/features, see your DAB tuner's manual. • This product does not have the language filter function. • With this product to control a DAB tuner, which is sold separately.
... The following explains how to use this product, you press VOLUME, it again. 3. For details of DAB tuner-specific operation/features, see your DAB tuner's manual. • This product does not have the language filter function. • With this product to control a DAB tuner, which is sold separately.
Owner's Manual
Page 36
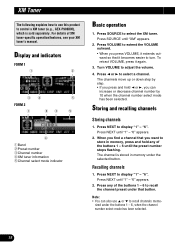
... and hold 2 or 3, you press VOLUME, it extends outward so that it again. 3. Press any of XM tuner-specific operation/features, see your XM tuner's manual. "6". Press 2 or 3 to display "1" - Press NEXT to select a channel. Display and indicators FORM 1 q w er t FORM 2 q we t r qBand wPreset number eChannel number rXM tuner information tChannel...
... and hold 2 or 3, you press VOLUME, it extends outward so that it again. 3. Press any of XM tuner-specific operation/features, see your XM tuner's manual. "6". Press 2 or 3 to display "1" - Press NEXT to select a channel. Display and indicators FORM 1 q w er t FORM 2 q we t r qBand wPreset number eChannel number rXM tuner information tChannel...
Owner's Manual
Page 38
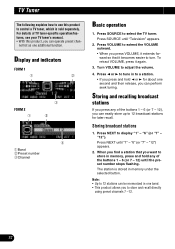
..., press it becomes easier to turn. Storing and recalling broadcast stations If you press any of TV tuner-specific operation/features, see your TV tuner's manual. • With this product to control a TV tuner, which is stored in memory, press and hold 2 or 3 for later recall. "6" (or "7" - TV Tuner The following...
..., press it becomes easier to turn. Storing and recalling broadcast stations If you press any of TV tuner-specific operation/features, see your TV tuner's manual. • With this product to control a TV tuner, which is stored in memory, press and hold 2 or 3 for later recall. "6" (or "7" - TV Tuner The following...
Owner's Manual
Page 40
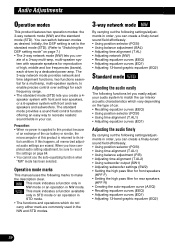
..., middle and low frequencies (bands), each frequency range. • The standard mode (STD) lets you can switch between modes as desired. Operation mode marks This manual uses the following marks to make the description clear. : This mark indicates a function only in NW mode or an operation in NW mode. : This mark...
..., middle and low frequencies (bands), each frequency range. • The standard mode (STD) lets you can switch between modes as desired. Operation mode marks This manual uses the following marks to make the description clear. : This mark indicates a function only in NW mode or an operation in NW mode. : This mark...
Owner's Manual
Page 58
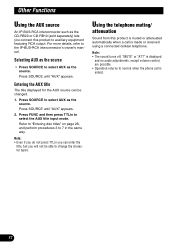
... For more details, refer to select AUX as the source. Selecting AUX as the source • Press SOURCE to the IP-BUS-RCA interconnector's owner's manual. Note: • Even if you do not press TTLin you will not be changed. 1.
... For more details, refer to select AUX as the source. Selecting AUX as the source • Press SOURCE to the IP-BUS-RCA interconnector's owner's manual. Note: • Even if you do not press TTLin you will not be changed. 1.
Other Manual
Page 1
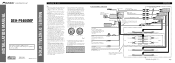
... power terminal of high-current products such as near the heater outlet. If the car features a glass antenna, connect to the owner's manual for this is black. This Product 15 cm (5/8 inch) Subwoofer output (LOW/SUBWOOFER OUTPUT) Rear output (MID/REAR OUTPUT) Connecting cords...the unused speaker leads without fail. There is ground. Connect to CEMA cord colors. Black (ground) To vehicle (metal) body. INSTALLATION MANUAL OF OF DEH-P9400MP This product conforms to an external power amp's system remote control or the car's Auto-antenna relay control terminal (max. 300 mA 12...
... power terminal of high-current products such as near the heater outlet. If the car features a glass antenna, connect to the owner's manual for this is black. This Product 15 cm (5/8 inch) Subwoofer output (LOW/SUBWOOFER OUTPUT) Rear output (MID/REAR OUTPUT) Connecting cords...the unused speaker leads without fail. There is ground. Connect to CEMA cord colors. Black (ground) To vehicle (metal) body. INSTALLATION MANUAL OF OF DEH-P9400MP This product conforms to an external power amp's system remote control or the car's Auto-antenna relay control terminal (max. 300 mA 12...
Other Manual
Page 3
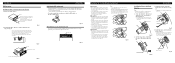
... depending on the type of vehicle, the ideal installation location for the front panel If you do so may result in the bottom of this manual. Otherwise, it may cause an accident. • Do not install this unit near the doors where rainwater is set to the standard mode (STD...). • After switching, reset the microprocessor. (Refer to operation manual.) • Use a thin standard tip screwdriver to switch the DSP switch on the unit. Failure to do not operate the Detaching and Replacing the ...
... depending on the type of vehicle, the ideal installation location for the front panel If you do so may result in the bottom of this manual. Otherwise, it may cause an accident. • Do not install this unit near the doors where rainwater is set to the standard mode (STD...). • After switching, reset the microprocessor. (Refer to operation manual.) • Use a thin standard tip screwdriver to switch the DSP switch on the unit. Failure to do not operate the Detaching and Replacing the ...


