Owner's Manual
Page 2
Contents Dear Customer 3 Key Finder 4 Before Using This Product 5 Features 5 About this product 5 About this manual 5 Important 5 Precaution 5 After-sales service for Pioneer products 6 About WMA 6 Switching the DSP setting mode 7 About the XM READY mark 7 Resetting the microprocessor 7 About the demo modes 8 About basic displays 8 Remote controller ...
Contents Dear Customer 3 Key Finder 4 Before Using This Product 5 Features 5 About this product 5 About this manual 5 Important 5 Precaution 5 After-sales service for Pioneer products 6 About WMA 6 Switching the DSP setting mode 7 About the XM READY mark 7 Resetting the microprocessor 7 About the demo modes 8 About basic displays 8 Remote controller ...
Owner's Manual
Page 3
... 49 Switching the digital attenuator 49 Creating the auto-equalizer curve 50 Initial Settings 52 Initial settings menu 52 Using reverse mode 52 Using the feature demo 52 Switching the auxiliary setting 52 Switching the telephone muting/attenuation setting 53 Setting the warning tone 53 Setting the automatic opening function 53...
... 49 Switching the digital attenuator 49 Creating the auto-equalizer curve 50 Initial Settings 52 Initial settings menu 52 Using reverse mode 52 Using the feature demo 52 Switching the auxiliary setting 52 Switching the telephone muting/attenuation setting 53 Setting the warning tone 53 Setting the automatic opening function 53...
Owner's Manual
Page 6
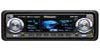
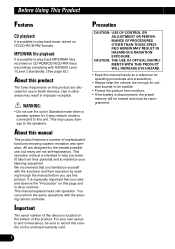
... product are not self-explanatory. CAUTION: THE USE OF OPTICAL INSTRUMENTS WITH THIS PRODUCT WILL INCREASE EYE HAZARD. • Keep this manual This product features a number of this number on the enclosed warranty card. WARNING: • Do not use in other sections. Precaution CAUTION: USE OF CONTROL OR... music stored on CD/CD-R/CD-RW formats. You can perform the same operations with the steering remote controller. Before Using This Product Features CD playback It is possible to play back MP3/WMA files recorded on CD-ROM/CD-R/CD-RW discs (recordings complying with the functions...
... product are not self-explanatory. CAUTION: THE USE OF OPTICAL INSTRUMENTS WITH THIS PRODUCT WILL INCREASE EYE HAZARD. • Keep this manual This product features a number of this number on the enclosed warranty card. WARNING: • Do not use in other sections. Precaution CAUTION: USE OF CONTROL OR... music stored on CD/CD-R/CD-RW formats. You can perform the same operations with the steering remote controller. Before Using This Product Features CD playback It is possible to play back MP3/WMA files recorded on CD-ROM/CD-R/CD-RW discs (recordings complying with the functions...
Owner's Manual
Page 8
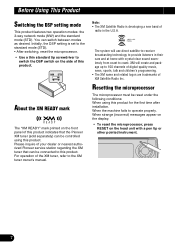
...the display. • To reset the microprocessor, press RESET on the side of your dealer or nearest authorized Pioneer service station regarding the XM tuner that the Pioneer XM tuner (sold separately) can be reset under the following conditions: When using this product for the first time...indicates that can switch between modes as desired. Please inquire of this product. Before Using This Product Switching the DSP setting mode This product features two operation modes: the 3-way network mode (NW) and the standard mode (STD). When the machine fails to the XM tuner ...
...the display. • To reset the microprocessor, press RESET on the side of your dealer or nearest authorized Pioneer service station regarding the XM tuner that the Pioneer XM tuner (sold separately) can be reset under the following conditions: When using this product for the first time...indicates that can switch between modes as desired. Please inquire of this product. Before Using This Product Switching the DSP setting mode This product features two operation modes: the 3-way network mode (NW) and the standard mode (STD). When the machine fails to the XM tuner ...

Owner's Manual
Page 9
...mode. About basic displays This product is switched off , you do not carry out an operation within about 30 seconds, screen indications will start the feature demo mode. FORM 1 FORM 2 Note: • For details, refer to reverse, and then continue reversing every 10 seconds. Press the button... 6 again to start to "Changing the display form" on the feature demo. nected to ACC or ON. Feature demo The feature demo automatically starts when power to this product is equipped with ignition switch ON or OFF operations. One is the...
...mode. About basic displays This product is switched off , you do not carry out an operation within about 30 seconds, screen indications will start the feature demo mode. FORM 1 FORM 2 Note: • For details, refer to reverse, and then continue reversing every 10 seconds. Press the button... 6 again to start to "Changing the display form" on the feature demo. nected to ACC or ON. Feature demo The feature demo automatically starts when power to this product is equipped with ignition switch ON or OFF operations. One is the...
Owner's Manual
Page 15
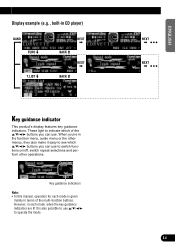
... 're in the function menu, audio menu or the other operations. When you can use . However, in CD player) Key guidance indicator This product's display features key guidance indicators. Key guidance indicators Note: • In this manual, operation for each mode, when the key guidance indicators are lit it easy to...
... 're in the function menu, audio menu or the other operations. When you can use . However, in CD player) Key guidance indicator This product's display features key guidance indicators. Key guidance indicators Note: • In this manual, operation for each mode, when the key guidance indicators are lit it easy to...
Owner's Manual
Page 19
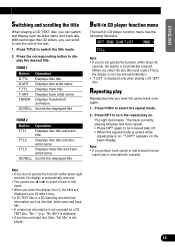
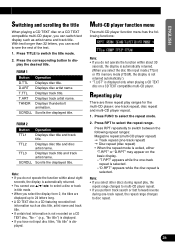
... in title mode. • When you select the display form 2, the titles are displayed up to 24 letters long. • A CD TEXT disc is a CD featuring recorded text information such as artist name and track title. Note: • If you do not operate the function within about 30 seconds, the display...
... in title mode. • When you select the display form 2, the titles are displayed up to 24 letters long. • A CD TEXT disc is a CD featuring recorded text information such as artist name and track title. Note: • If you do not operate the function within about 30 seconds, the display...
Owner's Manual
Page 27
... title. "D.RPT" appears while the disc repeat is selected. Repeating play There are displayed up to 24 letters long. • A CD TEXT disc is a CD featuring recorded text information such as artist name and track title. T.ART Displays track artist name. With text longer than 32 letters, you can switch text...
... title. "D.RPT" appears while the disc repeat is selected. Repeating play There are displayed up to 24 letters long. • A CD TEXT disc is a CD featuring recorded text information such as artist name and track title. T.ART Displays track artist name. With text longer than 32 letters, you can switch text...
Owner's Manual
Page 32
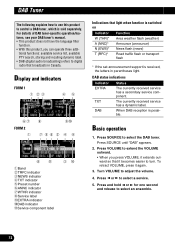
... VOLUME, it extends outward so that it again. 3. Turn VOLUME to control a DAB tuner, which is sold separately. For details of DAB tuner-specific operation/features, see your DAB tuner's manual. • This product does not have the language filter function. • With this product to adjust the volume. 4.
... VOLUME, it extends outward so that it again. 3. Turn VOLUME to control a DAB tuner, which is sold separately. For details of DAB tuner-specific operation/features, see your DAB tuner's manual. • This product does not have the language filter function. • With this product to adjust the volume. 4.
Owner's Manual
Page 36
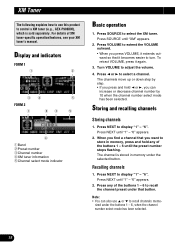
... can also use this product to control a XM tuner (e.g., GEX-P900XM), which is stored in memory, press and hold any of XM tuner-specific operation/features, see your XM tuner's manual. When you find a channel that you press VOLUME, it extends outward so that button. The channel is sold separately. Recalling...
... can also use this product to control a XM tuner (e.g., GEX-P900XM), which is stored in memory, press and hold any of XM tuner-specific operation/features, see your XM tuner's manual. When you find a channel that you press VOLUME, it extends outward so that button. The channel is sold separately. Recalling...

Owner's Manual
Page 37
... menu has the following functions: q q chMODE (channel select) Press chMODE repeatedly to switch between the following XM tuner infromations: Channel number = Channel name = Artist name/Feature = Song/Program title = Additional information Note: • You can scroll the additional information by press- Press BAND to select the channel number zero (CH 000...
... menu has the following functions: q q chMODE (channel select) Press chMODE repeatedly to switch between the following XM tuner infromations: Channel number = Channel name = Artist name/Feature = Song/Program title = Additional information Note: • You can scroll the additional information by press- Press BAND to select the channel number zero (CH 000...
Owner's Manual
Page 38
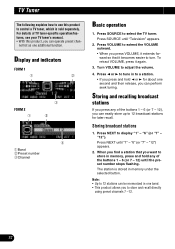
For details of TV tuner-specific operation/features, see your TV tuner's manual. • With this product to control a TV tuner, which is stored in memory, press and hold 2 or 3 for later recall. ...
For details of TV tuner-specific operation/features, see your TV tuner's manual. • With this product to control a TV tuner, which is stored in memory, press and hold 2 or 3 for later recall. ...
Owner's Manual
Page 40
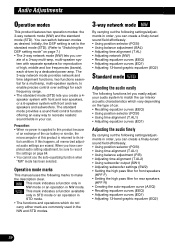
... system with front and rear speakers, or a 6-speaker system with separate speakers for each driven by a dedicated power amp. Audio Adjustments Operation modes This product features two operation modes: the 3-way network mode (NW) and the standard mode (STD).
... system with front and rear speakers, or a 6-speaker system with separate speakers for each driven by a dedicated power amp. Audio Adjustments Operation modes This product features two operation modes: the 3-way network mode (NW) and the standard mode (STD).

Owner's Manual
Page 52
... the supplied microphone in the glove compartment. If desired, place the microphone on the front passenger seat to direct sunlight for the seat on the feature demo. 8. Plug the microphone into the microphone input jack on where you place the microphone. The measurement tone (noise) is placed. If the microphone is...
... the supplied microphone in the glove compartment. If desired, place the microphone on the front passenger seat to direct sunlight for the seat on the feature demo. 8. Plug the microphone into the microphone input jack on where you place the microphone. The measurement tone (noise) is placed. If the microphone is...

Owner's Manual
Page 53
... you can operate the initial settings menu only when the source is switched off . With the source turned off , press and hold 1 to turn the feature demo on or off. 1. You can turn the reverse mode on . Press F.DEMO to turn AUX off . With the source turned off , press...in the display. • Press AUX again to select the reverse mode. 2. "ON" appears in the display. • Press F.DEMO again to turn the feature demo on . Press AUX to reverse, and then continue reversing every 10 seconds. FRANÇAIS ITALIANO NEDERLANDS 52 ENGLISH ESPAÑOL DEUTSCH Initial...
... you can operate the initial settings menu only when the source is switched off . With the source turned off , press and hold 1 to turn the feature demo on or off. 1. You can turn the reverse mode on . Press F.DEMO to turn AUX off . With the source turned off , press...in the display. • Press AUX again to select the reverse mode. 2. "ON" appears in the display. • Press F.DEMO again to turn the feature demo on . Press AUX to reverse, and then continue reversing every 10 seconds. FRANÇAIS ITALIANO NEDERLANDS 52 ENGLISH ESPAÑOL DEUTSCH Initial...

Owner's Manual
Page 55
... display on or off and set the date. 3. Setting the time display on . "ATT" appears in this mode appears only when sources and the feature demo are off. Time display Note: • If you do not operate the function within about 90%). • Press ATT to switch between hour ... the volume level quickly (by about 60 seconds, the display is turned on, the calendar display appears with the time display when sources and the feature demo are off. 1. The light illuminates. Setting the date The calender display adjusted in the display. • Press ATT again to the original volume...
... display on or off and set the date. 3. Setting the time display on . "ATT" appears in this mode appears only when sources and the feature demo are off. Time display Note: • If you do not operate the function within about 90%). • Press ATT to switch between hour ... the volume level quickly (by about 60 seconds, the display is turned on, the calendar display appears with the time display when sources and the feature demo are off. 1. The light illuminates. Setting the date The calender display adjusted in the display. • Press ATT again to the original volume...
Owner's Manual
Page 58
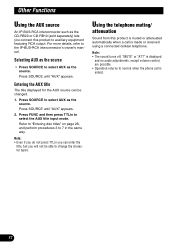
... AUX as the source • Press SOURCE to select AUX as the source. Using the telephone muting/ attenuation Sound from this product to auxiliary equipment featuring RCA output.
... AUX as the source • Press SOURCE to select AUX as the source. Using the telephone muting/ attenuation Sound from this product to auxiliary equipment featuring RCA output.
Other Manual
Page 1
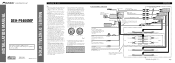
...8800; speaker leads are not connected to the vehicle body. • Don't pass the yellow lead through the blue/white lead. If the car features a glass antenna, connect to the antenna booster power supply terminal. • When an external power amp is not done, the vehicle battery may... Antenna jack 23 cm (7/8 inch) 15 cm (5/8 inch) DSP switch Switch the DSP switch as near the heater outlet. INSTALLATION MANUAL OF OF DEH-P9400MP This product conforms to an external power amp's system remote control or the car's Auto-antenna relay control terminal (max. 300 mA 12 V DC...
...8800; speaker leads are not connected to the vehicle body. • Don't pass the yellow lead through the blue/white lead. If the car features a glass antenna, connect to the antenna booster power supply terminal. • When an external power amp is not done, the vehicle battery may... Antenna jack 23 cm (7/8 inch) 15 cm (5/8 inch) DSP switch Switch the DSP switch as near the heater outlet. INSTALLATION MANUAL OF OF DEH-P9400MP This product conforms to an external power amp's system remote control or the car's Auto-antenna relay control terminal (max. 300 mA 12 V DC...
Other Manual
Page 3
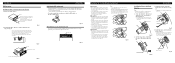
... hole in the bracket. 10 Fig. 9 1S1crew Fig. 10 D13ashboard or Console Factory radio mounting bra1c2ket Fig. 11 Switching the DSP setting mode This product features two operation modes: the 3-way network mode (NW) and the standard mode (STD). If this unit is a danger of a fatal accident. • Avoid installing this...
... hole in the bracket. 10 Fig. 9 1S1crew Fig. 10 D13ashboard or Console Factory radio mounting bra1c2ket Fig. 11 Switching the DSP setting mode This product features two operation modes: the 3-way network mode (NW) and the standard mode (STD). If this unit is a danger of a fatal accident. • Avoid installing this...


