
Operation Manual
Page 2
...titles 20 - Motion demo 8 Protecting your model properly. ( Contents 3 C Thank you have finished rmdmg the insiruclions, put them away in a safe place for Pioneer products 5 Product registration 6 Precautions 6 Features 6 About WMA 6 About the XM READY mark 7 Resetting the microprocessor 7 Display indication 7 About the demo mode 8... tracks of a CD 19 Pausing CD playback 20 Using disc title functions 20 - Before You Start Information to the radio 15 Introduction of advanced tuner operation 16 Storing and recalling broadcast frequencies 16 Tuning in strong signals 16 CD En Storing ...
...titles 20 - Motion demo 8 Protecting your model properly. ( Contents 3 C Thank you have finished rmdmg the insiruclions, put them away in a safe place for Pioneer products 5 Product registration 6 Precautions 6 Features 6 About WMA 6 About the XM READY mark 7 Resetting the microprocessor 7 Display indication 7 About the demo mode 8... tracks of a CD 19 Pausing CD playback 20 Using disc title functions 20 - Before You Start Information to the radio 15 Introduction of advanced tuner operation 16 Storing and recalling broadcast frequencies 16 Tuning in strong signals 16 CD En Storing ...

Operation Manual
Page 7
... in the United States and/or other text information may not operate correctly. Please inquire to your dealer or nearest authorized Pioneer service station regarding the XM tuner that can be connected to the XM tuner owner's manual. Track number that the... this unit for Windows XP. Microsoft, Windows Media, and the Windows logo are trade marks of radio in CD player) Œ) En Notes XM Satellite Radio is developing a new band of XM Satellite Radio lnc.0 m 3 (Q Resetting the microprocessor The microprocessor must be reset under the following conditions: •...
... in the United States and/or other text information may not operate correctly. Please inquire to your dealer or nearest authorized Pioneer service station regarding the XM tuner that can be connected to the XM tuner owner's manual. Track number that the... this unit for Windows XP. Microsoft, Windows Media, and the Windows logo are trade marks of radio in CD player) Œ) En Notes XM Satellite Radio is developing a new band of XM Satellite Radio lnc.0 m 3 (Q Resetting the microprocessor The microprocessor must be reset under the following conditions: •...

Operation Manual
Page 15
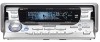
...as you see Tuner displayed. 2 Use VOLUME to select the tuner. Rotate to increase or decrease the volume. 3 Press BAND to operate the radio. The tuner will light.® En Press SOURCE until you release the buttons. m The frequencies move up or down step by pressing either ◄...◄ or ► for about one second and release. More advanced tuner operation is explained starting on . (3) Band indicator Shows which band the radio is tuned to, AM or FM. ® Preset number indicator Shows what preset has been selected. (5) Frequency indicator Shows to which frequency the tuner...
...as you see Tuner displayed. 2 Use VOLUME to select the tuner. Rotate to increase or decrease the volume. 3 Press BAND to operate the radio. The tuner will light.® En Press SOURCE until you release the buttons. m The frequencies move up or down step by pressing either ◄...◄ or ► for about one second and release. More advanced tuner operation is explained starting on . (3) Band indicator Shows which band the radio is tuned to, AM or FM. ® Preset number indicator Shows what preset has been selected. (5) Frequency indicator Shows to which frequency the tuner...

Operation Manual
Page 16
...preset number stops flashing. Local seek sensitivity (e.g., Local 2) appears in memory. Press FUNCTION repeatedly to switch be stored in memory. The selected radio station frequency has been stored in the display. 4 Press ◄ or ► to set the sensitivity. There are four levels of ...9632; To return to the frequency display, press BAND. The next time you press the same preset tun ing button 1-6 the radio station frequency is automatically returned to the frequency display. ® storing and recalling broadcast frequencies If you press any of the preset tuning ...
...preset number stops flashing. Local seek sensitivity (e.g., Local 2) appears in memory. Press FUNCTION repeatedly to switch be stored in memory. The selected radio station frequency has been stored in the display. 4 Press ◄ or ► to set the sensitivity. There are four levels of ...9632; To return to the frequency display, press BAND. The next time you press the same preset tun ing button 1-6 the radio station frequency is automatically returned to the frequency display. ® storing and recalling broadcast frequencies If you press any of the preset tuning ...

Operation Manual
Page 45
... to the next position and then select the next letter. If the set announcement support is stored in memory. 7 Press BAND to return to digital radio that broadcasts in Canada. ® EXTR indicator Shows that the currently received Service has a Secondary Service Component. @ TEXT indicator Shows that described in the reverse...
... to the next position and then select the next letter. If the set announcement support is stored in memory. 7 Press BAND to return to digital radio that broadcasts in Canada. ® EXTR indicator Shows that the currently received Service has a Secondary Service Component. @ TEXT indicator Shows that described in the reverse...

Operation Manual
Page 62
Remove the frame. (Fig. 9) Frame Insert the release pin into the hole in the bracket. Fixing screw Fig. 12 Fig. 10 Factory radio mounting bracket Fig.11 Use either binding screws ( 5 x 6 mm) or flush surface screws ( 5 x 6 mm), depending on each side. Fastening the unit to this unit. Fig. ... you do not operate the removing and attaching the front panel function, use the supplied fixing screws and fix the front panel to the factory radio mounting bracket. (Fig. 10) (Fig. 11) Select a position where the screw holes of the bracket and the screw holes of the unit 1. Installation DIN ...
Remove the frame. (Fig. 9) Frame Insert the release pin into the hole in the bracket. Fixing screw Fig. 12 Fig. 10 Factory radio mounting bracket Fig.11 Use either binding screws ( 5 x 6 mm) or flush surface screws ( 5 x 6 mm), depending on each side. Fastening the unit to this unit. Fig. ... you do not operate the removing and attaching the front panel function, use the supplied fixing screws and fix the front panel to the factory radio mounting bracket. (Fig. 10) (Fig. 11) Select a position where the screw holes of the bracket and the screw holes of the unit 1. Installation DIN ...


