
Operation Manual
Page 6
... reset the microprocessor, remove the front panel as merely playing music. When strange (incorrect) messages appear on next page and in other pointed instrument. We recommend that source, such as described on page 57 and press the RESET button on the head unit with the functions and their potential and to operate...
... reset the microprocessor, remove the front panel as merely playing music. When strange (incorrect) messages appear on next page and in other pointed instrument. We recommend that source, such as described on page 57 and press the RESET button on the head unit with the functions and their potential and to operate...

Operation Manual
Page 10
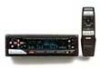
Basic Operation Switching Power ON/OFF • Select the desired source (such as the tuner). .J) c)] E SEEK-1 1 00
Basic Operation Switching Power ON/OFF • Select the desired source (such as the tuner). .J) c)] E SEEK-1 1 00

Operation Manual
Page 16
Note: • RDS service may not be provided by all stations. • RDS functions, like AF (Alternative Frequencies search) and TA (Traffic Announcement standby), are tuned in tuning to a desired station. r 4 SEEK-1 Program Service Name Display With this function, the names of networks/stations providing RDS services replace the frequency on the display a few seconds after they are only active when your radio is tuned to know PTY Information or the frequency of features such as: program service name, program type display, traffic announcement standby, automatic tuning and program ...
Note: • RDS service may not be provided by all stations. • RDS functions, like AF (Alternative Frequencies search) and TA (Traffic Announcement standby), are tuned in tuning to a desired station. r 4 SEEK-1 Program Service Name Display With this function, the names of networks/stations providing RDS services replace the frequency on the display a few seconds after they are only active when your radio is tuned to know PTY Information or the frequency of features such as: program service name, program type display, traffic announcement standby, automatic tuning and program ...
Operation Manual
Page 25
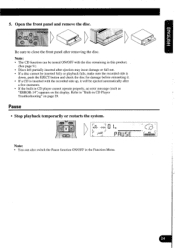
...01:1 Can ETKK n 144 DDI Li I TRK L J E -4suBlif PRL15E Note: • You can be turned ON/OFF with the disc remaining in this product. (See page 9.) • Discs left partially inserted after ejection may incur damage or fall out. • If a disc cannot be inserted fully or playback fails, make sure... after removing the disc. To , Be sure to "Built-in CD player cannot operate properly, an error message (such as "ERROR-14") appears on page 29. Refer to close the front panel after a few moments. • If the built-in CD Player Troubleshooting" on the display. 5.
...01:1 Can ETKK n 144 DDI Li I TRK L J E -4suBlif PRL15E Note: • You can be turned ON/OFF with the disc remaining in this product. (See page 9.) • Discs left partially inserted after ejection may incur damage or fall out. • If a disc cannot be inserted fully or playback fails, make sure... after removing the disc. To , Be sure to "Built-in CD player cannot operate properly, an error message (such as "ERROR-14") appears on page 29. Refer to close the front panel after a few moments. • If the built-in CD Player Troubleshooting" on the display. 5.

Operation Manual
Page 26
...* * You cannot select the "PGM-FUNC" mode when the Hide-away DSP "DEQ-P800" is automatically canceled. See the "Using the PGM/DSP button" on page 86 about 30 seconds, the Function Menu is connected to this function. Entering the Detailed Setting Menu In this menu you do not perform an...
...* * You cannot select the "PGM-FUNC" mode when the Hide-away DSP "DEQ-P800" is automatically canceled. See the "Using the PGM/DSP button" on page 86 about 30 seconds, the Function Menu is connected to this function. Entering the Detailed Setting Menu In this menu you do not perform an...
Operation Manual
Page 28
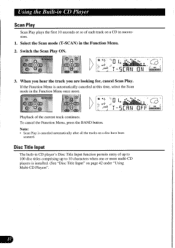
Switch the Scan Play ON. Note: • Scan Play is canceled automatically after all the tracks on page 42 under "Using Multi-CD Players". PIONCEF ( 0 0 BA CZ) L oFF v _J g $g " L•' _J 4"Bil -5E ElN :0U Inatmcmg 3. PIONEEI BA 0 0 C;) 5 "4 U n L 0017 1 E T _J TAN esgE" "EallEE.. ...
Switch the Scan Play ON. Note: • Scan Play is canceled automatically after all the tracks on page 42 under "Using Multi-CD Players". PIONCEF ( 0 0 BA CZ) L oFF v _J g $g " L•' _J 4"Bil -5E ElN :0U Inatmcmg 3. PIONEEI BA 0 0 C;) 5 "4 U n L 0017 1 E T _J TAN esgE" "EallEE.. ...

Operation Manual
Page 35
You cannot switch to this product. See the "Using the PGM/DSP button" on page 86 about this menu you can cancel the Detailed Setting Menu by pressing the FUNCTION button again for 2 seconds Each press of the FUNCTION button ...
You cannot switch to this product. See the "Using the PGM/DSP button" on page 86 about this menu you can cancel the Detailed Setting Menu by pressing the FUNCTION button again for 2 seconds Each press of the FUNCTION button ...

Operation Manual
Page 44
... displayed in a multi-CD player: 1. iN rmonies ra 0 1 - You cannot switch to this display with 6-Disc and 12-Disc type multi-CD players. (Refer to page 45.) Note: • During normal playback in the playback mode display, the elapsed play time) -* Disc Title -÷ Music Group* * Music Group display is displayed...
... displayed in a multi-CD player: 1. iN rmonies ra 0 1 - You cannot switch to this display with 6-Disc and 12-Disc type multi-CD players. (Refer to page 45.) Note: • During normal playback in the playback mode display, the elapsed play time) -* Disc Title -÷ Music Group* * Music Group display is displayed...
Operation Manual
Page 59
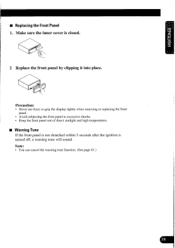
Note: • You can cancel the warning tone function. (See page 61.) • • Make sure the inner cover is turned off, a warning tone will sound. ■ Replacing the Front Panel 1. Precaution: • Never use force ...
Note: • You can cancel the warning tone function. (See page 61.) • • Make sure the inner cover is turned off, a warning tone will sound. ■ Replacing the Front Panel 1. Precaution: • Never use force ...

Operation Manual
Page 61
.... Note: • The tuning step remains set tuning step to 50 kHz in the FM mode, the tuning step changes to "PI Seek Function" on page 17.) 1.
.... Note: • The tuning step remains set tuning step to 50 kHz in the FM mode, the tuning step changes to "PI Seek Function" on page 17.) 1.
Operation Manual
Page 62
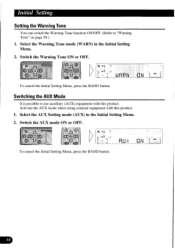
... or OFF. 0 O a 0.4 L oFFG' J -1 L J R :ON To cancel the Initial Setting Menu, press the BAND button. Switching the AUX Mode It is possible to "Warning Tone" on page 58.) 1. Activate the AUX mode when using external equipment with this product. 1. Switch the AUX mode ON or OFF. 61) PIONEEF ( O Sp HU " To cancel...
... or OFF. 0 O a 0.4 L oFFG' J -1 L J R :ON To cancel the Initial Setting Menu, press the BAND button. Switching the AUX Mode It is possible to "Warning Tone" on page 58.) 1. Activate the AUX mode when using external equipment with this product. 1. Switch the AUX mode ON or OFF. 61) PIONEEF ( O Sp HU " To cancel...

Operation Manual
Page 71
... until the last door has been closed . W .) PGM U. otherwise this setting needs to be necessary to reprogram the RFP Alert Menu; The LED indicator on page 57.
... until the last door has been closed . W .) PGM U. otherwise this setting needs to be necessary to reprogram the RFP Alert Menu; The LED indicator on page 57.
Operation Manual
Page 72
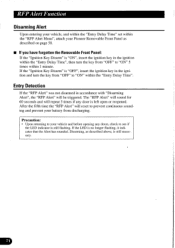
..." is "OFF", insert the ignition key in the ignition and turn the key from "OFF" to "ON" within 1 minute. Disarming, as described on page 58. ■ If you have forgotten the Removable Front Panel: If the "Ignition Key Disarm" is "ON", insert the ignition key in accordance with "...Time". RFP Alert Function Disarming Alert Upon entering your vehicle, and within the "Entry Delay Time" set within the "RFP Alert Menu", attach your Pioneer Removable Front Panel as described above, is still flashing. Precaution: • Upon returning to your vehicle and before opening any door is no longer...
..." is "OFF", insert the ignition key in the ignition and turn the key from "OFF" to "ON" within 1 minute. Disarming, as described on page 58. ■ If you have forgotten the Removable Front Panel: If the "Ignition Key Disarm" is "ON", insert the ignition key in accordance with "...Time". RFP Alert Function Disarming Alert Upon entering your vehicle, and within the "Entry Delay Time" set within the "RFP Alert Menu", attach your Pioneer Removable Front Panel as described above, is still flashing. Precaution: • Upon returning to your vehicle and before opening any door is no longer...

Operation Manual
Page 73
..., and the listening position selector function. The SFC function, reproduces 5 typical sound fields such as if you can be produced in the H/A DSP position. (See page 7.) Digital Signal Processor (DSP) ■ DSP Function The DSP function provides reproduction of the direct sound, initial reflection and reverberation highly vary. The Parametric Equalizer...
..., and the listening position selector function. The SFC function, reproduces 5 typical sound fields such as if you can be produced in the H/A DSP position. (See page 7.) Digital Signal Processor (DSP) ■ DSP Function The DSP function provides reproduction of the direct sound, initial reflection and reverberation highly vary. The Parametric Equalizer...

Operation Manual
Page 78
... (User curves) can be selected only by direct recall. The user curves can select your desired curves after storing them. ("Storing the Equalizer Curve" on page 83.) • When the user curves are two ways to recall parametric equalizer curve.
... (User curves) can be selected only by direct recall. The user curves can select your desired curves after storing them. ("Storing the Equalizer Curve" on page 83.) • When the user curves are two ways to recall parametric equalizer curve.

Operation Manual
Page 80
...stored the adjusted equalizer curve. Note: • You can cancel the DSP Menu by pressing the BAND button when you want to adjust. (See page 77.) 3. Adjustment can be made by either using Nuance Control Equalizer (N.C.E.) or 3-Band Parametric Equalizer Adjustment. Using the Digital Signal Processor (DSP) USER... you don't store the adjusted equalizer curve. MODE mi 79 Select the Parametric Equalizer mode (ROCK 0) in the DSP Menu. (See page 83.) You can be stored. Note: • The adjusted equalizer curve will also be stored with adjusted level of its bass/treble will...
...stored the adjusted equalizer curve. Note: • You can cancel the DSP Menu by pressing the BAND button when you want to adjust. (See page 77.) 3. Adjustment can be made by either using Nuance Control Equalizer (N.C.E.) or 3-Band Parametric Equalizer Adjustment. Using the Digital Signal Processor (DSP) USER... you don't store the adjusted equalizer curve. MODE mi 79 Select the Parametric Equalizer mode (ROCK 0) in the DSP Menu. (See page 83.) You can be stored. Note: • The adjusted equalizer curve will also be stored with adjusted level of its bass/treble will...

Operation Manual
Page 81
... k [Hz] Frequency point: 20 Hz to 20 kHz (a total of 16 frequency points at intervals of 2/3 octave) Level adjustment range: -12 dB to adjust. (See page 77.) 3. PUN • MI CI Hold for 2 seconds Hold for 2 seconds r . 4 • About 3-Band Parametric Equalizer The front and rear speakers can be separately adjusted...
... k [Hz] Frequency point: 20 Hz to 20 kHz (a total of 16 frequency points at intervals of 2/3 octave) Level adjustment range: -12 dB to adjust. (See page 77.) 3. PUN • MI CI Hold for 2 seconds Hold for 2 seconds r . 4 • About 3-Band Parametric Equalizer The front and rear speakers can be separately adjusted...

Operation Manual
Page 82
..., if another equalizer curve is selected. 10. To store the adjusted equalizer curve, select the Parametric Bass/Treble mode (F 0 125) in the DSP Menu. (See page 83.) You can store the adjusted equalizer curve only when you don't store the adjusted equalizer curve. 81 Repeat steps 4-8 above for the other Front...
..., if another equalizer curve is selected. 10. To store the adjusted equalizer curve, select the Parametric Bass/Treble mode (F 0 125) in the DSP Menu. (See page 83.) You can store the adjusted equalizer curve only when you don't store the adjusted equalizer curve. 81 Repeat steps 4-8 above for the other Front...

Operation Manual
Page 90
...; Selecting the AUX mode • Select AUX. r oull ' T.:...T T. Other Functions Using the AUX Mode It is possible. L ,asuerlt L 89 Refer to "Disc Title Input" on page 42, and perform procedures 3 to normal when the phone connection is ended. A I ' ::71-:- r- Activate the AUX mode when using a cellular telephone connected to this product...
...; Selecting the AUX mode • Select AUX. r oull ' T.:...T T. Other Functions Using the AUX Mode It is possible. L ,asuerlt L 89 Refer to "Disc Title Input" on page 42, and perform procedures 3 to normal when the phone connection is ended. A I ' ::71-:- r- Activate the AUX mode when using a cellular telephone connected to this product...
