Owner's Manual
Page 2
...setting. ! ferred to higher volumes of sound, so what 's around you can hear it comfortably and clearly, without affecting your volume control at a safe level-a level that may cause undesired operation. Section 01 Contents Before You Start Information to User 2 For Canadian model... About this unit 2 After-sales service for Pioneer products 3 In case of trouble 3 Visit our website 3 Demo mode 3 Reverse mode 3 About this manual 3 Operating this unit Head unit 4 Remote control 4 Basic Operations 4 Use and care of the remote control 5 Menu operations identical for function settings/audio ...
...setting. ! ferred to higher volumes of sound, so what 's around you can hear it comfortably and clearly, without affecting your volume control at a safe level-a level that may cause undesired operation. Section 01 Contents Before You Start Information to User 2 For Canadian model... About this unit 2 After-sales service for Pioneer products 3 In case of trouble 3 Visit our website 3 Demo mode 3 Reverse mode 3 About this manual 3 Operating this unit Head unit 4 Remote control 4 Basic Operations 4 Use and care of the remote control 5 Menu operations identical for function settings/audio ...
Owner's Manual
Page 4
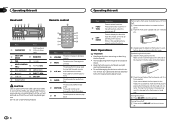
... 5 Remote control 67 g fedcba 98 Part Part 1 CLK/DISP OFF AUX input jack 9 (3.5 mm stereo jack) 2 S.Rtrv/SAT MODE 3 TAG a BAND/ESC b (list) 4 MULTI-CONTROL c (M.C.) (iPod)/LOC 5 Disc loading slot d (random) 6 h (eject) 7 USB port e DISP/ /SCRL f SRC/OFF 8 Detach button CAUTION Use an optional Pioneer USB ... make sure that you . 3 Always keep the detached front panel in a protection device such as any cables and devices attached to control functions. h MUTE Press to increase or decrease volume. Part m FUNC- While in damage to insert the tabs on the front panel....
... 5 Remote control 67 g fedcba 98 Part Part 1 CLK/DISP OFF AUX input jack 9 (3.5 mm stereo jack) 2 S.Rtrv/SAT MODE 3 TAG a BAND/ESC b (list) 4 MULTI-CONTROL c (M.C.) (iPod)/LOC 5 Disc loading slot d (random) 6 h (eject) 7 USB port e DISP/ /SCRL f SRC/OFF 8 Detach button CAUTION Use an optional Pioneer USB ... make sure that you . 3 Always keep the detached front panel in a protection device such as any cables and devices attached to control functions. h MUTE Press to increase or decrease volume. Part m FUNC- While in damage to insert the tabs on the front panel....
Owner's Manual
Page 5
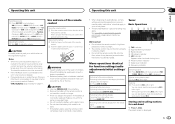
... Notes ! If the HD Radio tuner is connected to this unit's blue/white lead is con- Use and care of the remote control Using the remote control 1 Point the remote control in direct sunlight. ! When using USB input)-Pandora (Pandora)-EXT (external unit 1)-EXT (external unit 2)-AUX1 (AUX1)-AUX2 (...' rules that apply in high tem- special handling may not function properly in the direction of explosion if the battery is displayed. The remote control may 1 2 3 45 6 7 apply. left or right. left or right. Storing and recalling stations for function settings/audio adjustments/...
... Notes ! If the HD Radio tuner is connected to this unit's blue/white lead is con- Use and care of the remote control Using the remote control 1 Point the remote control in direct sunlight. ! When using USB input)-Pandora (Pandora)-EXT (external unit 1)-EXT (external unit 2)-AUX1 (AUX1)-AUX2 (...' rules that apply in high tem- special handling may not function properly in the direction of explosion if the battery is displayed. The remote control may 1 2 3 45 6 7 apply. left or right. left or right. Storing and recalling stations for function settings/audio adjustments/...

Owner's Manual
Page 13
...Bluetooth audio player to another source while listening to select FUNCTION. 3 Turn M.C. Basic Operations 1 Important ! AVRCP profile (Audio/Video Remote Control Profile): You can enjoy entertainment displays while listening to each sound source. 1 Press M.C. Operations may not operate correctly depending on this... procedures to display the main menu. 2 Turn M.C. left or right. A2DP profile (Advanced Audio Distribution Profile): You can control Bluetooth audio players via Bluetooth wireless technology. Refer to a song (such as this manual while operating your audio player and...
...Bluetooth audio player to another source while listening to select FUNCTION. 3 Turn M.C. Basic Operations 1 Important ! AVRCP profile (Audio/Video Remote Control Profile): You can enjoy entertainment displays while listening to each sound source. 1 Press M.C. Operations may not operate correctly depending on this... procedures to display the main menu. 2 Turn M.C. left or right. A2DP profile (Advanced Audio Distribution Profile): You can control Bluetooth audio players via Bluetooth wireless technology. Refer to a song (such as this manual while operating your audio player and...

Owner's Manual
Page 21
... to the engine compartment. - Do not connect the yellow cable to the battery by passing it to the system remote control of an external power amp or the vehicle's auto-antenna relay control terminal (max. 300 mA 12 V DC). Do not shorten any disconnected cable connectors with other device must be sure...-play unit's manuals. Place all cables away from moving parts, such as near the heater outlet. - Select a track 1 Push M.C. When installing this function, a Pioneer SIRIUS bus interface (e.g. Ground wire POWER AMP Other devices Metal parts of the rating prescribed. -
... to the engine compartment. - Do not connect the yellow cable to the battery by passing it to the system remote control of an external power amp or the vehicle's auto-antenna relay control terminal (max. 300 mA 12 V DC). Do not shorten any disconnected cable connectors with other device must be sure...-play unit's manuals. Place all cables away from moving parts, such as near the heater outlet. - Select a track 1 Push M.C. When installing this function, a Pioneer SIRIUS bus interface (e.g. Ground wire POWER AMP Other devices Metal parts of the rating prescribed. -

Owner's Manual
Page 22
...laser will be connected (sold separately). 6 Front output 7 Rear output 8 Subwoofer output 9 IP-BUS cable (sold separately) a Pioneer IP-BUS accessories (sold separately) 4 To Rear output 5 Rear speaker 6 To Front output 7 Front speaker DIN Front-mount 1...SW b 1 R 3 8 9 c d 1 Antenna input 2 IP-BUS input (blue) 3 Fuse (10 A) 4 Power cord input 5 Wired remote input Hard-wired remote control adaptor can be properly installed using a subwoofer of 70 W (2 Ω), be sure to connect the subwoofer to the green and green/ black leads. L 1 R 2 3 ...
...laser will be connected (sold separately). 6 Front output 7 Rear output 8 Subwoofer output 9 IP-BUS cable (sold separately) a Pioneer IP-BUS accessories (sold separately) 4 To Rear output 5 Rear speaker 6 To Front output 7 Front speaker DIN Front-mount 1...SW b 1 R 3 8 9 c d 1 Antenna input 2 IP-BUS input (blue) 3 Fuse (10 A) 4 Power cord input 5 Wired remote input Hard-wired remote control adaptor can be properly installed using a subwoofer of 70 W (2 Ω), be sure to connect the subwoofer to the green and green/ black leads. L 1 R 2 3 ...


