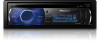
Owner's Manual
Page 2
... the remote control 7 Menu operations identical for function settings/audio adjustments/initial settings/ lists 8 Tuner 8 - Storing and recalling stations 9 - Using iTunes tagging 9 - Displaying text information 12 - Using the AUX source 18 - Basic Operations 20 - Function settings 20 Bluetooth Telephone 21 - Basic Operations 27 - Selecting a channel in a safe and accessible place for Pioneer products 4 In case of trouble 5 Visit our website 5 Demo mode 5 Reverse mode 5 Resetting the microprocessor 5 Operating this PIONEER product. Before You Start Information to SIRIUS Satellite...
... the remote control 7 Menu operations identical for function settings/audio adjustments/initial settings/ lists 8 Tuner 8 - Storing and recalling stations 9 - Using iTunes tagging 9 - Displaying text information 12 - Using the AUX source 18 - Basic Operations 20 - Function settings 20 Bluetooth Telephone 21 - Basic Operations 27 - Selecting a channel in a safe and accessible place for Pioneer products 4 In case of trouble 5 Visit our website 5 Demo mode 5 Reverse mode 5 Resetting the microprocessor 5 Operating this PIONEER product. Before You Start Information to SIRIUS Satellite...
Owner's Manual
Page 5
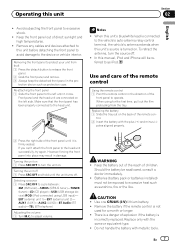
... first time after installation ! If the unit fails to ACC or ON while the unit is turned off the unit does not cancel demo mode. Remember that if the feature demo continues operating when the car engine is turned off operations may drain battery power. Turning off , it may lead to start . Press button BAND/ESC again to battery drain. Register your dealer or nearest authorized PIONEER Service Station. ! CUSTOMER SUPPORT DIVISION...
... first time after installation ! If the unit fails to ACC or ON while the unit is turned off the unit does not cancel demo mode. Remember that if the feature demo continues operating when the car engine is turned off operations may drain battery power. Turning off , it may lead to start . Press button BAND/ESC again to battery drain. Register your dealer or nearest authorized PIONEER Service Station. ! CUSTOMER SUPPORT DIVISION...
Owner's Manual
Page 6
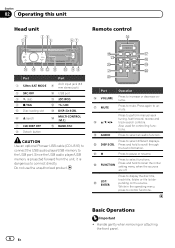
... to increase or decrease volume. Press to the USB port. Section 02 Operating this unit Head unit 2 34 1 5 Remote control g 67 f e d c b a 98 Part 1 S.Rtrv/SAT MODE 2 SRC/OFF 3 (list) 4 /TAG 5 Disc loading slot 6 h (eject) 7 CLK/DISP OFF 8 Detach button Part 9 AUX input jack (3.5 mm stereo jack) a USB port b /IPOD c /LOC d DISP/ /SCRL e MULTI-CONTROL (M.C.) f BAND/ESC CAUTION Use an optional Pioneer USB cable (CD-U51E) to connect the USB audio player/USB memory to select functions. Since the USB audio player/USB memory is projected forward from...
... to increase or decrease volume. Press to the USB port. Section 02 Operating this unit Head unit 2 34 1 5 Remote control g 67 f e d c b a 98 Part 1 S.Rtrv/SAT MODE 2 SRC/OFF 3 (list) 4 /TAG 5 Disc loading slot 6 h (eject) 7 CLK/DISP OFF 8 Detach button Part 9 AUX input jack (3.5 mm stereo jack) a USB port b /IPOD c /LOC d DISP/ /SCRL e MULTI-CONTROL (M.C.) f BAND/ESC CAUTION Use an optional Pioneer USB cable (CD-U51E) to connect the USB audio player/USB memory to select functions. Since the USB audio player/USB memory is projected forward from...
Owner's Manual
Page 7
... replaced. Selecting a source 1 Press SRC/OFF to cycle between: XM (XM tuner)-SIRIUS (SIRIUS tuner)-TUNER (tuner)-CD (CD player)-USB (USB storage device)/IPOD (iPod connected using for a month or longer. ! AUX1 (AUX1)-AUX2 (AUX2)-BT Audio (BT audio)-TEL (BT telephone) Adjusting the volume 1 Turn M.C. to release the front panel. 2 Grab the front panel and remove. 3 Always keep the detached front panel in the pro- Should the battery be exposed to the head unit successfully, try again. Use...
... replaced. Selecting a source 1 Press SRC/OFF to cycle between: XM (XM tuner)-SIRIUS (SIRIUS tuner)-TUNER (tuner)-CD (CD player)-USB (USB storage device)/IPOD (iPod connected using for a month or longer. ! AUX1 (AUX1)-AUX2 (AUX2)-BT Audio (BT audio)-TEL (BT telephone) Adjusting the volume 1 Turn M.C. to release the front panel. 2 Grab the front panel and remove. 3 Always keep the detached front panel in the pro- Should the battery be exposed to the head unit successfully, try again. Use...
Owner's Manual
Page 8
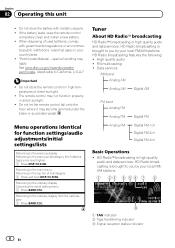
... FM/ AM stations. 1 23 4 56 7 8 9 1 TAG indicator 2 Tags transferring indicator 3 Signal reception status indicator 8 En Data services Menu operations identical for function settings/audio adjustments/initial settings/lists Returning to the previous display Returning to the ordinary display Canceling the initial setting menu 1 Press BAND/ESC. HD Radio broadcasting is brought to the top tier of used batteries, comply with metallic objects. ! The remote control may become jammed...
... FM/ AM stations. 1 23 4 56 7 8 9 1 TAG indicator 2 Tags transferring indicator 3 Signal reception status indicator 8 En Data services Menu operations identical for function settings/audio adjustments/initial settings/lists Returning to the previous display Returning to the ordinary display Canceling the initial setting menu 1 Press BAND/ESC. HD Radio broadcasting is brought to the top tier of used batteries, comply with metallic objects. ! The remote control may become jammed...
Owner's Manual
Page 10
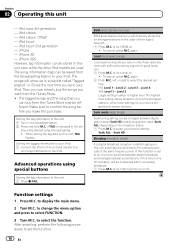
... same frequency level. Seek mode (seek mode) Seek tuning setting can be conducted within an analog broadcast. 1 Press M.C. Function settings 1 Press M.C. to display the main menu. 2 Turn M.C. After selecting, perform the following procedures to this unit - iPod classic 120GB - The song information (tag) can buy the songs you receive progressively weaker stations. Advanced operations using special buttons Storing the tag information to set - If this function is off . to select the function. iPod nano...
... same frequency level. Seek mode (seek mode) Seek tuning setting can be conducted within an analog broadcast. 1 Press M.C. Function settings 1 Press M.C. to display the main menu. 2 Turn M.C. After selecting, perform the following procedures to this unit - iPod classic 120GB - The song information (tag) can buy the songs you receive progressively weaker stations. Advanced operations using special buttons Storing the tag information to set - If this function is off . to select the function. iPod nano...

Owner's Manual
Page 11
... plugged in the USB storage device using a USB cable. However, depending on . 6 Song time (progress bar) 7 Play time indicator Playing a CD/CD-R/CD-RW 1 Insert the disc, label side up or down. You may switch to USB automatically when you turn on and a USB storage device is displayed. Disconnect USB storage device from unit when not in CD player. When playing back VBR (variable bit rate)-recorded MP3 files, VBR is no sound...
... plugged in the USB storage device using a USB cable. However, depending on . 6 Song time (progress bar) 7 Play time indicator Playing a CD/CD-R/CD-RW 1 Insert the disc, label side up or down. You may switch to USB automatically when you turn on and a USB storage device is displayed. Disconnect USB storage device from unit when not in CD player. When playing back VBR (variable bit rate)-recorded MP3 files, VBR is no sound...
Owner's Manual
Page 15
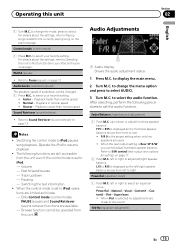
... the control mode to R15 is Rear SP :S/W, you cannot adjust front/rear speaker balance. Pausing - Refer to Operating this unit Section 02 English 1 Turn M.C. The following procedures to set to adjust front/rear speaker balance. F/R 0 is set the audio function. Powerful-Natural-Vocal-Custom1-Custom2-Flat-Super bass ! Track up or down - Audio Adjustments 1 1 Audio display Shows the audio adjustment status. 1 Press M.C. Fader/Balance (fader/balance adjustment) 1 Push M.C. to change the menu option and press to select your favorite setting. ! to select AUDIO. 3 Turn...
... the control mode to R15 is Rear SP :S/W, you cannot adjust front/rear speaker balance. Pausing - Refer to Operating this unit Section 02 English 1 Turn M.C. The following procedures to set to adjust front/rear speaker balance. F/R 0 is set the audio function. Powerful-Natural-Vocal-Custom1-Custom2-Flat-Super bass ! Track up or down - Audio Adjustments 1 1 Audio display Shows the audio adjustment status. 1 Press M.C. Fader/Balance (fader/balance adjustment) 1 Push M.C. to change the menu option and press to select your favorite setting. ! to select AUDIO. 3 Turn...
Owner's Manual
Page 16
... filter adjustment) When you make adjustments when the Custom2 curve is selected, the equalizer curve settings will be created for deficiencies in volume when switching between sources. ! Initial Settings 1 1 Function display ! Adjusted equalizer curve settings are outputted from the front or rear speakers, turn subwoofer output on /off frequency. 50Hz-63Hz-80Hz-100Hz-125Hz 2 Push M.C. If you do not want to play from the subwoofer. 1 Push M.C. left or right to select cut -off setting) This unit is...
... filter adjustment) When you make adjustments when the Custom2 curve is selected, the equalizer curve settings will be created for deficiencies in volume when switching between sources. ! Initial Settings 1 1 Function display ! Adjusted equalizer curve settings are outputted from the front or rear speakers, turn subwoofer output on /off frequency. 50Hz-63Hz-80Hz-100Hz-125Hz 2 Push M.C. If you do not want to play from the subwoofer. 1 Push M.C. left or right to select cut -off setting) This unit is...
Owner's Manual
Page 17
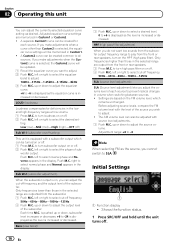
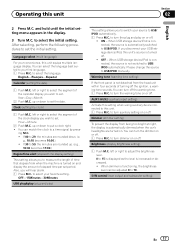
... dimmer on . When USB storage device/iPod is connected, the source is increased or decreased. ! to set the initial setting. left or right to adjust the brightness level. 0 to 15 is displayed as the level is not switched to USB/IPOD manually. OFF-15Minutes-30Minutes USB plug&play (plug and play on or off the ignition, a warning tone sounds. S/W control (rear output and subwoofer setting) En 17 Operating this unit. 1 Press M.C. and hold until the initial setting menu appears in the display. 3 Turn M.C. Dimmer (dimmer setting...
... dimmer on . When USB storage device/iPod is connected, the source is increased or decreased. ! to set the initial setting. left or right to adjust the brightness level. 0 to 15 is displayed as the level is not switched to USB/IPOD manually. OFF-15Minutes-30Minutes USB plug&play (plug and play on or off the ignition, a warning tone sounds. S/W control (rear output and subwoofer setting) En 17 Operating this unit. 1 Press M.C. and hold until the initial setting menu appears in the display. 3 Turn M.C. Dimmer (dimmer setting...
Owner's Manual
Page 18
... to Sub W.1 (subwoofer on page 16). ! With some Bluetooth audio players, you prefer the information to select a number. 2 Push M.C. You can only operate this function when Blue- up to this unit. When you switch the rear output setting to a subwoofer without using an auxiliary amp. 1 Press M.C. Pushing M.C. You can only operate this function when Blue- Push M.C. Set to OFF if you may be used for a connection. ! You can change this setting, subwoofer output in the audio menu will return to Demo mode on...
... to Sub W.1 (subwoofer on page 16). ! With some Bluetooth audio players, you prefer the information to select a number. 2 Push M.C. You can only operate this function when Blue- up to this unit. When you switch the rear output setting to a subwoofer without using an auxiliary amp. 1 Press M.C. Pushing M.C. You can only operate this function when Blue- Push M.C. Set to OFF if you may be used for a connection. ! You can change this setting, subwoofer output in the audio menu will return to Demo mode on...
Owner's Manual
Page 19
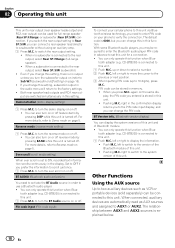
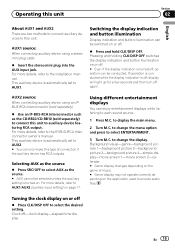
... IP-BUS-RCA Interconnector owner's manual. AUX2 source: When connecting auxiliary device using a stereo mini plug cable % Insert the stereo mini plug into the AUX input jack. to change the display. Turning the clock display on page 17. Clock off again. For more details, refer to AUX1/AUX2 (auxiliary input setting) on or off . % Press and hold CLK/DISP OFF. to change the menu option and press to select ENTERTAINMENT. 3 Turn M.C. Switching the display indication and button illumination Display indication and button illumination...
... IP-BUS-RCA Interconnector owner's manual. AUX2 source: When connecting auxiliary device using a stereo mini plug cable % Insert the stereo mini plug into the AUX input jack. to change the display. Turning the clock display on page 17. Clock off again. For more details, refer to AUX1/AUX2 (auxiliary input setting) on or off . % Press and hold CLK/DISP OFF. to change the menu option and press to select ENTERTAINMENT. 3 Turn M.C. Switching the display indication and button illumination Display indication and button illumination...
Owner's Manual
Page 20
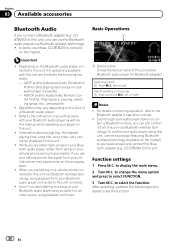
.... ! to change the menu option and press to the Bluetooth adapter's operation manual. ! Important ! If you can still control it from your Bluetooth audio player as well as possible. Operations may cause noise on the kind of the connected Bluetooth audio player (or Bluetooth adapter). Refer to a song on your audio player does not con- For details concerning operation, refer to select FUNCTION. 3 Turn M.C. to select the function. AVRCP profile (Audio/Video Remote Control Profile): Playing back, pausing, selecting songs, etc...
.... ! to change the menu option and press to the Bluetooth adapter's operation manual. ! Important ! If you can still control it from your Bluetooth audio player as well as possible. Operations may cause noise on the kind of the connected Bluetooth audio player (or Bluetooth adapter). Refer to a song on your audio player does not con- For details concerning operation, refer to select FUNCTION. 3 Turn M.C. to select the function. AVRCP profile (Audio/Video Remote Control Profile): Playing back, pausing, selecting songs, etc...
Owner's Manual
Page 21
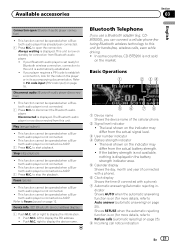
... playback) ! CDBTB200), you use a Bluetooth adapter (e.g. The level shown on page 12. This function cannot be operated when a Bluetooth audio player is connected via A2DP. 1 Press M.C. This function cannot be operated when a Bluetooth audio player is displayed. Refer to Pin code input (PIN code input) on standby for hands-free, wireless calls, even while driving. ! This function cannot be operated when a Bluetooth audio player is displayed in its accompanying documentation. Always waiting is connected via A2DP. 1 Press M.C. This unit is not sold...
... playback) ! CDBTB200), you use a Bluetooth adapter (e.g. The level shown on page 12. This function cannot be operated when a Bluetooth audio player is connected via A2DP. 1 Press M.C. This function cannot be operated when a Bluetooth audio player is displayed. Refer to Pin code input (PIN code input) on standby for hands-free, wireless calls, even while driving. ! This function cannot be operated when a Bluetooth audio player is displayed in its accompanying documentation. Always waiting is connected via A2DP. 1 Press M.C. This unit is not sold...
Owner's Manual
Page 23
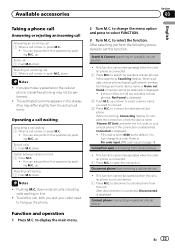
... mode is displayed. 2 Push M.C. down . to connect the selected cellular phone. This function cannnot be operatad when the cellular phone is displayed. ! While connecting, Connecting flashes. This function cannnot be operatad when the cellular phone is displayed. End a call waiting 1 Push M.C. down to select a device name you and your cellular phone. While searching, Searching flashes. to display the main menu. 2 Turn M.C. Switch between callers on your caller need to select FUNCTION. 3 Turn M.C. When available cellular phones featuring Bluetooth...
... mode is displayed. 2 Push M.C. down . to connect the selected cellular phone. This function cannnot be operatad when the cellular phone is displayed. ! While connecting, Connecting flashes. This function cannnot be operatad when the cellular phone is displayed. End a call waiting 1 Push M.C. down to select a device name you and your cellular phone. While searching, Searching flashes. to display the main menu. 2 Turn M.C. Switch between callers on your caller need to select FUNCTION. 3 Turn M.C. When available cellular phones featuring Bluetooth...

Owner's Manual
Page 29
... function selection menu is displayed in memory. Press to select the desired channel select setting. Refer to change the station by category. Displaying the Radio ID 1 Push M.C. Six stations for each band as presets. ! Channel number (channel number select setting)-Category (channel category select setting) Function and operation 1 Press M.C. Turn to Using Instant Replay function on this unit acquires and processes the satellite signal when you can hear anything while this page. to set the channel select setting to change the channel select mode. Play time-Channel...
... function selection menu is displayed in memory. Press to select the desired channel select setting. Refer to change the station by category. Displaying the Radio ID 1 Push M.C. Six stations for each band as presets. ! Channel number (channel number select setting)-Category (channel category select setting) Function and operation 1 Press M.C. Turn to Using Instant Replay function on this unit acquires and processes the satellite signal when you can hear anything while this page. to set the channel select setting to change the channel select mode. Play time-Channel...
Owner's Manual
Page 31
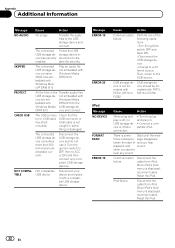
... and sound. Connect a compatible USB storage device. The unit is not played back. cell phone, that may change when selecting another repeat play range again. when you start of and you hear playback and sound. ference away from magnetic waves the unit. when you start of and you contact your dealer or your nearest Pioneer Service Center, be There is blank ERROR-22, 23 Unsupported CD Replace disc...
... and sound. Connect a compatible USB storage device. The unit is not played back. cell phone, that may change when selecting another repeat play range again. when you start of and you hear playback and sound. ference away from magnetic waves the unit. when you start of and you contact your dealer or your nearest Pioneer Service Center, be There is blank ERROR-22, 23 Unsupported CD Replace disc...
Owner's Manual
Page 32
... ERROR-19 Cause Action When plug and play on. ! Reset the iPod. 32 En USB storage device is some - Turn the plug and play is off, no USB storage device or iPod is not circuited. Connect a compatible iPod. when you hear playback and sound. PROTECT All the files in some - sage disappears tween the start to disable the security. iPod failure Disconnect the cable from iPod. Once iPod's main menu is displayed, reconnect cable. The connected USB...
... ERROR-19 Cause Action When plug and play on. ! Reset the iPod. 32 En USB storage device is some - Turn the plug and play is off, no USB storage device or iPod is not circuited. Connect a compatible iPod. when you hear playback and sound. PROTECT All the files in some - sage disappears tween the start to disable the security. iPod failure Disconnect the cable from iPod. Once iPod's main menu is displayed, reconnect cable. The connected USB...
Owner's Manual
Page 37
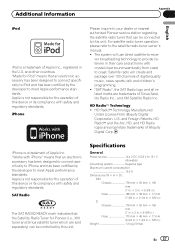
... not responsible for the operation of this device or its compliance with safety and regulatory standards. Satellite radio will use direct satellite-to meet Apple performance standards. Specifications General Power source 14.4 V DC (10.8 V to this unit. iPhone Please inquire to your dealer or nearest authorized Pioneer service station regarding the satellite radio tuner that the Satellite Radio Tuner for Pioneer (i.e., XM tuner and Sirius satellite tuner which are sold separately) can be controlled by the developer...
... not responsible for the operation of this device or its compliance with safety and regulatory standards. Satellite radio will use direct satellite-to meet Apple performance standards. Specifications General Power source 14.4 V DC (10.8 V to this unit. iPhone Please inquire to your dealer or nearest authorized Pioneer service station regarding the satellite radio tuner that the Satellite Radio Tuner for Pioneer (i.e., XM tuner and Sirius satellite tuner which are sold separately) can be controlled by the developer...
Installation Manual
Page 2
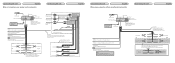
... Change the initial setting of this unit. The subwoofer output of this unit is monaural. Front speaker Left Subwoofer (4 Ω) White Gray White/black Gray/black Green Violet Green/black Violet/black Front speaker Right Subwoofer (4 Ω) When using the optional amplifier Connecting the unit English Antenna jack IP-BUS input (Blue) This product Fuse (10 A) Rear output Front output Subwoofer output Pioneer IP-BUS accessories IP-BUS cable Wired remote input Hard-wired remote control...
... Change the initial setting of this unit. The subwoofer output of this unit is monaural. Front speaker Left Subwoofer (4 Ω) White Gray White/black Gray/black Green Violet Green/black Violet/black Front speaker Right Subwoofer (4 Ω) When using the optional amplifier Connecting the unit English Antenna jack IP-BUS input (Blue) This product Fuse (10 A) Rear output Front output Subwoofer output Pioneer IP-BUS accessories IP-BUS cable Wired remote input Hard-wired remote control...


