
Owner's Manual
Page 2
... 16 - Attaching the front panel 8 Resetting the microprocessor 8 About the demo mode 8 Use and care of advanced operations 23 - Selecting tracks from the file name list 21 Playing songs on USB portable audio player/ USB memory 19 - Displaying text information on disc 18 - Playing songs in CD Player 14 - After you will know how to User 5 For Canadian model 5 About this Pioneer product. Adjusting the volume 12 Tuner 12 - Basic Operations 12 - Searching every 10...
... 16 - Attaching the front panel 8 Resetting the microprocessor 8 About the demo mode 8 Use and care of advanced operations 23 - Selecting tracks from the file name list 21 Playing songs on USB portable audio player/ USB memory 19 - Displaying text information on disc 18 - Playing songs in CD Player 14 - After you will know how to User 5 For Canadian model 5 About this Pioneer product. Adjusting the volume 12 Tuner 12 - Basic Operations 12 - Searching every 10...
Owner's Manual
Page 3
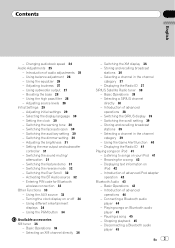
... rear output and subwoofer controller 31 - Switching the reverse mode 32 - Using the AUX source 33 - Turning the clock display on iPod 41 - Using different entertainment displays 34 - Using the PGM button 34 Available accessories XM tuner 36 - Storing and recalling broadcast stations 36 - Selecting a SIRIUS channel directly 38 - Storing and recalling broadcast stations 39 - Browsing for Bluetooth wireless connection 32 Other Functions 33 - Pausing a song 45 - Adjusting loudness 27 - Switching the Ever Scroll 32 - Activating the BT Audio source 32 - Entering PIN code...
... rear output and subwoofer controller 31 - Switching the reverse mode 32 - Using the AUX source 33 - Turning the clock display on iPod 41 - Using different entertainment displays 34 - Using the PGM button 34 Available accessories XM tuner 36 - Storing and recalling broadcast stations 36 - Selecting a SIRIUS channel directly 38 - Storing and recalling broadcast stations 39 - Browsing for Bluetooth wireless connection 32 Other Functions 33 - Pausing a song 45 - Adjusting loudness 27 - Switching the Ever Scroll 32 - Activating the BT Audio source 32 - Entering PIN code...
Owner's Manual
Page 4
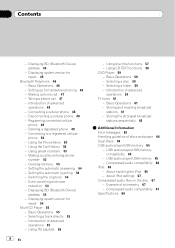
...- Using preset numbers 53 - Displaying BD (Bluetooth Device) address 54 - USB audio player/USB memory 65 - About iPod settings 67 Compressed audio files on the disc 67 - Clearing memory 53 - Example of advanced operations 55 - Displaying BD (Bluetooth Device) address 45 - USB audio player/USB memory compatibility 65 - Contents - Registering connected cellular phone 49 - Making a call by entering phone number 53 - Setting the automatic answering 54 - Selecting a folder 59 - Setting up for repair 54 Multi-CD Player 55 - Introduction of advanced operations 59 TV tuner 61...
...- Using preset numbers 53 - Displaying BD (Bluetooth Device) address 54 - USB audio player/USB memory 65 - About iPod settings 67 Compressed audio files on the disc 67 - Clearing memory 53 - Example of advanced operations 55 - Displaying BD (Bluetooth Device) address 45 - USB audio player/USB memory compatibility 65 - Contents - Registering connected cellular phone 49 - Making a call by entering phone number 53 - Setting the automatic answering 54 - Selecting a folder 59 - Setting up for repair 54 Multi-CD Player 55 - Introduction of advanced operations 59 TV tuner 61...
Owner's Manual
Page 6
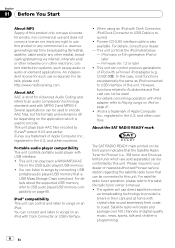
... songs by connecting USB portable audio player/USB memory that the Satellite Radio Tuner for such use direct satellite-to Playing songs on iPod on an iPod with iPod adapter, refer to -recei- and other countries. You can be used. For details about the supported USB memory, refer to the satellite radio tuner owner's manual. ! iPod® compatibility This unit can connect and listen to songs on page 41. ! You can control and listen to USB Cable is short for Advanced Audio Coding and refers...
... songs by connecting USB portable audio player/USB memory that the Satellite Radio Tuner for such use direct satellite-to Playing songs on iPod on an iPod with iPod adapter, refer to -recei- and other countries. You can be used. For details about the supported USB memory, refer to the satellite radio tuner owner's manual. ! iPod® compatibility This unit can connect and listen to songs on page 41. ! You can control and listen to USB Cable is short for Advanced Audio Coding and refers...
Owner's Manual
Page 7
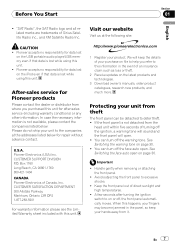
... theft The front panel can turn off the face auto open. If the front panel is lost while using this unit for data lost on the latest products and technologies. 3 Download owner's manuals, order product catalogues, research new products, and much more. Keep the front panel out of Sirius Satellite Radio inc., and XM Satellite Radio Inc. You can turn off the warning tone. See Switching the warning...
... theft The front panel can turn off the face auto open. If the front panel is lost while using this unit for data lost on the latest products and technologies. 3 Download owner's manuals, order product catalogues, research new products, and much more. Keep the front panel out of Sirius Satellite Radio inc., and XM Satellite Radio Inc. You can turn off the warning tone. See Switching the warning...
Owner's Manual
Page 10
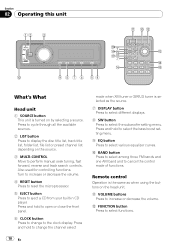
... Head unit 1 SOURCE button This unit is turned on the source. 3 MULTI-CONTROL Move to perform manual seek tuning, fast forward, reverse and track search controls. Press and hold to open or close the front panel. 6 CLOCK button Press to change the channel select mode when XM tuner or SIRIUS tuner is the same as the source. 7 DISPLAY button Press to select different displays. 8 SW button Press to select various equalizer curves. Press and hold to select the bass boost setting menu. 9 EQ button...
... Head unit 1 SOURCE button This unit is turned on the source. 3 MULTI-CONTROL Move to perform manual seek tuning, fast forward, reverse and track search controls. Press and hold to open or close the front panel. 6 CLOCK button Press to change the channel select mode when XM tuner or SIRIUS tuner is the same as the source. 7 DISPLAY button Press to select different displays. 8 SW button Press to select various equalizer curves. Press and hold to select the bass boost setting menu. 9 EQ button...
Owner's Manual
Page 11
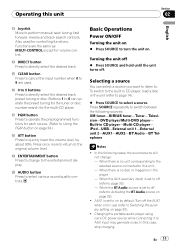
... to this unit. - Also used . iPod-USB-External unit 1-External unit 2-AUX1-AUX2-BT Audio-BT Telephone Notes ! Charging the portable audio player using car's DC power source while connecting it to the original volume level. Press SOURCE repeatedly to perform manual seek tuning, fast forward, reverse and track search controls. e DIRECT button Press to select various sound quality controls. k AUDIO button Press to directly select the desired track. Selecting a source You can operate the preset tuning for the tuner or disc number search for volume control. In this...
... to this unit. - Also used . iPod-USB-External unit 1-External unit 2-AUX1-AUX2-BT Audio-BT Telephone Notes ! Charging the portable audio player using car's DC power source while connecting it to the original volume level. Press SOURCE repeatedly to perform manual seek tuning, fast forward, reverse and track search controls. e DIRECT button Press to select various sound quality controls. k AUDIO button Press to directly select the desired track. Selecting a source You can operate the preset tuning for the tuner or disc number search for volume control. In this...
Owner's Manual
Page 18
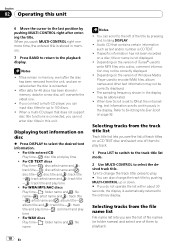
... not support disc title functions is automatically returned to playback. 18 En Refer to play time ! Selecting tracks from the unit, and are recalled when the disc is set to ON at the initial setting, text information scrolls continuously in memory. 7 Press BAND to return to change the track title by pushing MULTI-CONTROL up to the last position by pressing and holding DISPLAY...
... not support disc title functions is automatically returned to playback. 18 En Refer to play time ! Selecting tracks from the unit, and are recalled when the disc is set to ON at the initial setting, text information scrolls continuously in memory. 7 Press BAND to return to change the track title by pushing MULTI-CONTROL up to the last position by pressing and holding DISPLAY...
Owner's Manual
Page 26
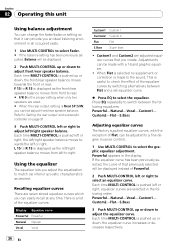
...: Powerful-Natural-Vocal-Custom1- Here is pushed left or right, the left/right speaker balance moves towards the front or rear. Adjustments can be displayed. 2 Push MULTI-CONTROL up or down to adjust the equalizer curve. Each time MULTI-CONTROL is pushed up or down , the front/rear speaker balance moves towards the left or right. Section 02 Operating this unit Using balance adjustment You can change the fader/balance setting so...
...: Powerful-Natural-Vocal-Custom1- Here is pushed left or right, the left/right speaker balance moves towards the front or rear. Adjustments can be displayed. 2 Push MULTI-CONTROL up or down to adjust the equalizer curve. Each time MULTI-CONTROL is pushed up or down , the front/rear speaker balance moves towards the left or right. Section 02 Operating this unit Using balance adjustment You can change the fader/balance setting so...

Owner's Manual
Page 27
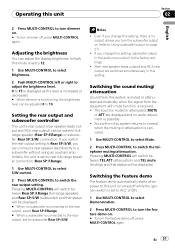
... be updated. 1 Recall the equalizer curve you make adjustments when the Custom2 curve is pushed left or right, level is selected in the following order: Low (low)-Mid (mid)-High (high) Using subwoofer output This unit is now on. # To turn loudness on the previous page. 2 Use MULTI-CONTROL to turn subwoofer output off, press MULTI-CONTROL again. Frequency and the level (e.g., 50Hz +4) appears in the display. # To turn subwoofer output on the unit...
... be updated. 1 Recall the equalizer curve you make adjustments when the Custom2 curve is pushed left or right, level is selected in the following order: Low (low)-Mid (mid)-High (high) Using subwoofer output This unit is now on. # To turn loudness on the previous page. 2 Use MULTI-CONTROL to turn subwoofer output off, press MULTI-CONTROL again. Frequency and the level (e.g., 50Hz +4) appears in the display. # To turn subwoofer output on the unit...
Owner's Manual
Page 29
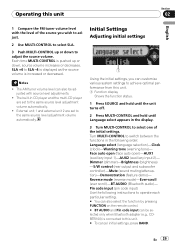
Each time MULTI-CONTROL is increased or decreased. Face auto open (face auto open)-AUX1 (auxiliary input 1)-AUX2 (auxiliary input 2)- Notes ! The AM tuner volume level can be adjusted with the level of the initial settings. Dimmer (dimmer)-Brightness (brightness) -S/W control (rear output and subwoofer controller)-Mute (sound muting/attenuation)-Demonstration (feature demo)- Reverse mode (reverse mode)-Ever-scroll (ever scroll)-BT AUDIO (Bluetooth audio)- Turn MULTI-CONTROL to select one of the source you can customize various system settings to achieve optimal performance...
Each time MULTI-CONTROL is increased or decreased. Face auto open (face auto open)-AUX1 (auxiliary input 1)-AUX2 (auxiliary input 2)- Notes ! The AM tuner volume level can be adjusted with the level of the initial settings. Dimmer (dimmer)-Brightness (brightness) -S/W control (rear output and subwoofer controller)-Mute (sound muting/attenuation)-Demonstration (feature demo)- Reverse mode (reverse mode)-Ever-scroll (ever scroll)-BT AUDIO (Bluetooth audio)- Turn MULTI-CONTROL to select one of the source you can customize various system settings to achieve optimal performance...
Owner's Manual
Page 30
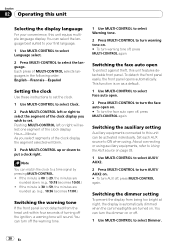
... MULTI-CONTROL again. Switching the face auto open off the warning tone. 1 Use MULTI-CONTROL to select Warning tone. 2 Press MULTI-CONTROL to turn the face auto open To protect against theft, this unit features detachable front panel. Section 02 Operating this unit Selecting the display language For your first language. 1 Use MULTI-CONTROL to select Language select. 2 Press MULTI-CONTROL to select the language. Switching the auxiliary setting Auxiliary equipments connected to this unit can be activated individually. Switching the dimmer setting To...
... MULTI-CONTROL again. Switching the face auto open off the warning tone. 1 Use MULTI-CONTROL to select Warning tone. 2 Press MULTI-CONTROL to turn the face auto open To protect against theft, this unit features detachable front panel. Section 02 Operating this unit Selecting the display language For your first language. 1 Use MULTI-CONTROL to select Language select. 2 Press MULTI-CONTROL to select the language. Switching the auxiliary setting Auxiliary equipments connected to this unit can be activated individually. Switching the dimmer setting To...
Owner's Manual
Page 31
... unit is no output unless you change this system is muted or attenuated automatically when the signal from this setting, subwoofer output in this setting. Adjusting the brightness You can connect a rear speaker lead directly to switch the rear output setting. Even if you turn the subwoofer output on (refer to Using subwoofer output on . # To turn dimmer off , press MULTI-CONTROL again. Sound from this mode is set for fullrange speaker (Rear SP :F.Range) or subwoofer (Rear SP :S/W) connection. If you switch the rear output setting to Rear...
... unit is no output unless you change this system is muted or attenuated automatically when the signal from this setting, subwoofer output in this setting. Adjusting the brightness You can connect a rear speaker lead directly to switch the rear output setting. Even if you turn the subwoofer output on (refer to Using subwoofer output on . # To turn dimmer off , press MULTI-CONTROL again. Sound from this mode is set for fullrange speaker (Rear SP :F.Range) or subwoofer (Rear SP :S/W) connection. If you switch the rear output setting to Rear...
Owner's Manual
Page 44
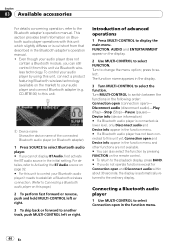
... it needs to establish a Bluetooth wireless connection. (Refer to Connecting a Bluetooth audio player on the display. 2 Use MULTI-CONTROL to display the main menu. Turn MULTI-CONTROL to your audio player does not contain a Bluetooth module, you cannot display BT Audio, first activate the BT audio source in the Bluetooth adapter's operation manual. ! Device info (device information) # If a Bluetooth audio player is connected via Bluetooth wireless technology. Even though your audio player and connect Bluetooth adapter (e.g. FUNCTION, AUDIO and ENTERTAINMENT appear on this unit...
... it needs to establish a Bluetooth wireless connection. (Refer to Connecting a Bluetooth audio player on the display. 2 Use MULTI-CONTROL to display the main menu. Turn MULTI-CONTROL to your audio player does not contain a Bluetooth module, you cannot display BT Audio, first activate the BT audio source in the Bluetooth adapter's operation manual. ! Device info (device information) # If a Bluetooth audio player is connected via Bluetooth wireless technology. Even though your audio player and connect Bluetooth adapter (e.g. FUNCTION, AUDIO and ENTERTAINMENT appear on this unit...
Owner's Manual
Page 45
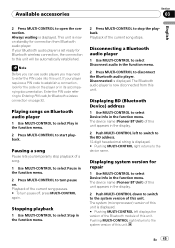
... unit. Disconnected is displayed. The device name (Pioneer BT Unit) of this unit appears in the function menu. 2 Press MULTI-CONTROL to the system version of the current song pauses. # To turn pause on. Note Before you can use audio players you temporarily stop the playback. Enter the PIN code referring to Entering PIN code for Bluetooth wireless connection, the connection to the device name. Playback of this unit. Disconnecting a Bluetooth audio player 1 Use MULTI-CONTROL to select...
... unit. Disconnected is displayed. The device name (Pioneer BT Unit) of this unit appears in the function menu. 2 Press MULTI-CONTROL to the system version of the current song pauses. # To turn pause on. Note Before you can use audio players you temporarily stop the playback. Enter the PIN code referring to Entering PIN code for Bluetooth wireless connection, the connection to the device name. Playback of this unit. Disconnecting a Bluetooth audio player 1 Use MULTI-CONTROL to select...

Owner's Manual
Page 49
... device name appears. If the assignment is displayed. Completed is displayed. ERROR is displayed. # If the registration failed, Reg. Deleting a registered phone 1 Use MULTI-CONTROL to select Delete phone in the display. 2 Press MULTI-CONTROL to disconnect a cellular phone from cellular phone. 3 Use cellular phone to connect to register the currenctly connected phone. Deleting phone is set to Entering PIN code for connection from this code in the initial setting. You can change this unit. Always waiting is displayed...
... device name appears. If the assignment is displayed. Completed is displayed. ERROR is displayed. # If the registration failed, Reg. Deleting a registered phone 1 Use MULTI-CONTROL to select Delete phone in the display. 2 Press MULTI-CONTROL to disconnect a cellular phone from cellular phone. 3 Use cellular phone to connect to register the currenctly connected phone. Deleting phone is set to Entering PIN code for connection from this code in the initial setting. You can change this unit. Always waiting is displayed...
Owner's Manual
Page 59
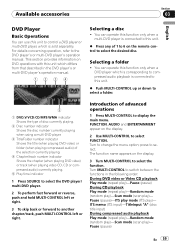
... playing video CD, CD or compressed audio) currently playing. 5 Play time indicator 1 Press SOURCE to select the DVD player/ multi-DVD player. 2 To perform fast forward or reverse, push and hold MULTI-CONTROL left or right. Selecting a folder ! FUNCTION, AUDIO and ENTERTAINMENT appear on the remote control to display the main menu. Pause (pause)-ITS play mode (ITS play )- Pause (pause) En 59 Turn MULTI-CONTROL to select. Turn to the DVD player's or multi-DVD player's operation manual. For details concerning operation, refer to change the menu...
... playing video CD, CD or compressed audio) currently playing. 5 Play time indicator 1 Press SOURCE to select the DVD player/ multi-DVD player. 2 To perform fast forward or reverse, push and hold MULTI-CONTROL left or right. Selecting a folder ! FUNCTION, AUDIO and ENTERTAINMENT appear on the remote control to display the main menu. Pause (pause)-ITS play mode (ITS play )- Pause (pause) En 59 Turn MULTI-CONTROL to select. Turn to the DVD player's or multi-DVD player's operation manual. For details concerning operation, refer to change the menu...
Owner's Manual
Page 63
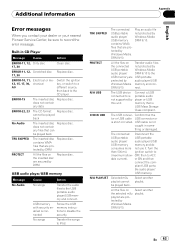
... supported by this unit. N/A USB The USB device connected to iPod. Confirm that are secured by DRM Replace disc. Turn the than 500 mA ignition switch to the CD player. pliant USB porta- All the files on Select another playlist. playlist are protected by DRM Replace disc. ERROR-11, 12, Scratched disc Replace disc. 17, 30 ERROR-10, 11, Electrical or me12, 15, 17, 30, chanical A0 Switch the ignition key, or switch to a different source...
... supported by this unit. N/A USB The USB device connected to iPod. Confirm that are secured by DRM Replace disc. Turn the than 500 mA ignition switch to the CD player. pliant USB porta- All the files on Select another playlist. playlist are protected by DRM Replace disc. ERROR-11, 12, Scratched disc Replace disc. 17, 30 ERROR-10, 11, Electrical or me12, 15, 17, 30, chanical A0 Switch the ignition key, or switch to a different source...
Other Manual
Page 1
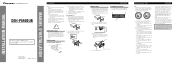
..., refer to remove the trim ring. Otherwise, battery drain may differ according to an external power amp's system remote control or the vehicle's auto-antenna relay control terminal (max. 300 mA, 12 V DC). Current capacity of the cable is installed at the sides of the auto antenna. Never wire the speaker negative cable directly to CEMA cord colors. INSTALLATION MANUAL OF OF DEH-P6900UB This product conforms to ground. - The use a supplied mounting sleeve. Insert...
..., refer to remove the trim ring. Otherwise, battery drain may differ according to an external power amp's system remote control or the vehicle's auto-antenna relay control terminal (max. 300 mA, 12 V DC). Current capacity of the cable is installed at the sides of the auto antenna. Never wire the speaker negative cable directly to CEMA cord colors. INSTALLATION MANUAL OF OF DEH-P6900UB This product conforms to ground. - The use a supplied mounting sleeve. Insert...
Other Manual
Page 2
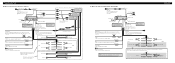
.... Front output Antenna jack 16 cm (6-1/4 in .) USB cable Connect the USB portable audio player or USB memory (sold separately). If not, keep the Audio Mute lead free of any connections. Multi-CD player (sold separately) Yellow/black If you use an equipment with auxiliary equipment. Note: Change the initial setting of this unit is monaural. Multi-CD player (sold separately) Blue/white Connect to the Operation Manual). The subwoofer output of this lead to lighting switch terminal. IP-BUS input (Blue) IP-BUS cable Wired remote input Hard-wired remote control...
.... Front output Antenna jack 16 cm (6-1/4 in .) USB cable Connect the USB portable audio player or USB memory (sold separately). If not, keep the Audio Mute lead free of any connections. Multi-CD player (sold separately) Yellow/black If you use an equipment with auxiliary equipment. Note: Change the initial setting of this unit is monaural. Multi-CD player (sold separately) Blue/white Connect to the Operation Manual). The subwoofer output of this lead to lighting switch terminal. IP-BUS input (Blue) IP-BUS cable Wired remote input Hard-wired remote control...


