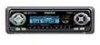
Owner's Manual
Page 2
... Selection 25 - Disc Title Input (TITLE) - Head Unit - Eject Basic Operation of Tuner 12 - Best Stations Memory (BSM) Using the Built-in CD Player .......... 13 - Random Play (RDM) - Selecting Discs by Disc Title List (T.LIST) - Title Display Switching - Warning Tone Basic Operation 10 To Listen to Music 10 Basic Operation of Multi-CD Player 15 - Disc Number Search (for Pioneer Products .......... 6 When using the 50-Disc Type Multi-CD Player 6 About the XM READY Mark 7 Remote Controller and Care 8 Using the Remote Controller 8 Battery...
... Selection 25 - Disc Title Input (TITLE) - Head Unit - Eject Basic Operation of Tuner 12 - Best Stations Memory (BSM) Using the Built-in CD Player .......... 13 - Random Play (RDM) - Selecting Discs by Disc Title List (T.LIST) - Title Display Switching - Warning Tone Basic Operation 10 To Listen to Music 10 Basic Operation of Multi-CD Player 15 - Disc Number Search (for Pioneer Products .......... 6 When using the 50-Disc Type Multi-CD Player 6 About the XM READY Mark 7 Remote Controller and Care 8 Using the Remote Controller 8 Battery...
Owner's Manual
Page 3
... Input (TITLE) Using the Telephone Muting/Attenuation and Handsfree Telephoning Function 49 - Dynamic Label Function CD Player and Care 55 Precaution 55 Built-in CD Player's Error Message 56 Specifications 57 FRANÇAIS ITALIANO NEDERLANDS 2 About the Custom Curves Entering the Audio Menu 33 Audio Menu Functions 33 - Setting the Time (CLOCK) - Switching the Telephone Muting/Attenuation (TEL 2) - Selecting the AUX Source - About This Product's Indications - Available PTY Function - Subwoofer Output (Sub-W1) - Setting the Rear Output and Subwoofer Controller...
... Input (TITLE) Using the Telephone Muting/Attenuation and Handsfree Telephoning Function 49 - Dynamic Label Function CD Player and Care 55 Precaution 55 Built-in CD Player's Error Message 56 Specifications 57 FRANÇAIS ITALIANO NEDERLANDS 2 About the Custom Curves Entering the Audio Menu 33 Audio Menu Functions 33 - Setting the Time (CLOCK) - Switching the Telephone Muting/Attenuation (TEL 2) - Selecting the AUX Source - About This Product's Indications - Available PTY Function - Subwoofer Output (Sub-W1) - Setting the Rear Output and Subwoofer Controller...
Owner's Manual
Page 6
... the easiest possible use in North America. This operation manual is switched OFF, it may be sure to ACC or ON. Important The serial number of this device is set to record this is the Feature Demo mode. Pressing button 5 when power to a terminal coupled with the remote controller. Feature Demo The Feature Demo automatically starts when power to this product should be connected to this product...
... the easiest possible use in North America. This operation manual is switched OFF, it may be sure to ACC or ON. Important The serial number of this device is set to record this is the Feature Demo mode. Pressing button 5 when power to a terminal coupled with the remote controller. Feature Demo The Feature Demo automatically starts when power to this product should be connected to this product...
Owner's Manual
Page 8
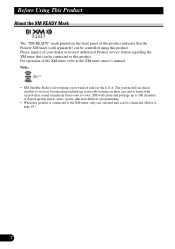
... up to 100 channels of your dealer or nearest authorized Pioneer service station regarding the XM tuner that the Pioneer XM tuner (sold separately) can be connected. (Refer to page 10.) 7 Please inquire of digital-quality music, news, sports, talk and children's programming. • When this product. Note: • XM Satellite Radio is connected to the XM tuner owner's manual. For operation of radio in their cars and at...
... up to 100 channels of your dealer or nearest authorized Pioneer service station regarding the XM tuner that the Pioneer XM tuner (sold separately) can be connected. (Refer to page 10.) 7 Please inquire of digital-quality music, news, sports, talk and children's programming. • When this product. Note: • XM Satellite Radio is connected to the XM tuner owner's manual. For operation of radio in their cars and at...
Owner's Manual
Page 11
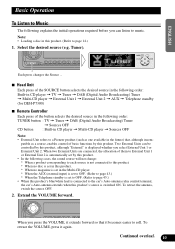
... changes the Source ... 7 Head Unit Each press of the SOURCE button selects the desired source in the following order: Built-in CD player = TV = Tuner = DAB (Digital Audio Broadcasting) Tuner = Multi-CD player = External Unit 1 = External Unit 2 = AUX = Telephone standby (for DEH-P7300) 7 Remote Controller Each press of the button selects the desired source in the following explains the initial operations required before you can be controlled by this product, although "External" is switched ON. Select...
... changes the Source ... 7 Head Unit Each press of the SOURCE button selects the desired source in the following order: Built-in CD player = TV = Tuner = DAB (Digital Audio Broadcasting) Tuner = Multi-CD player = External Unit 1 = External Unit 2 = AUX = Telephone standby (for DEH-P7300) 7 Remote Controller Each press of the button selects the desired source in the following explains the initial operations required before you can be controlled by this product, although "External" is switched ON. Select...
Owner's Manual
Page 14
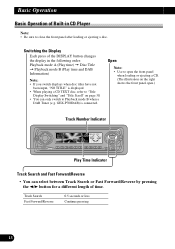
... pressing 13 Basic Operation Basic Operation of Built-in the following order: Playback mode A (Play time) = Disc Title = Playback mode B (Play time and DAB Information) Note: • If you switch displays when disc titles have not been input, "NO TITLE" is connected. Switching the Display Each press of the DISPLAY button changes the display in CD Player Note: • Be sure to open .) Track Number Indicator EQ SOURCE DISP 1 2 3 4 5 6 SELECT SFEQ E B FUNC AUDIO Play Time Indicator Track...
... pressing 13 Basic Operation Basic Operation of Built-in the following order: Playback mode A (Play time) = Disc Title = Playback mode B (Play time and DAB Information) Note: • If you switch displays when disc titles have not been input, "NO TITLE" is connected. Switching the Display Each press of the DISPLAY button changes the display in CD Player Note: • Be sure to open .) Track Number Indicator EQ SOURCE DISP 1 2 3 4 5 6 SELECT SFEQ E B FUNC AUDIO Play Time Indicator Track...
Owner's Manual
Page 16
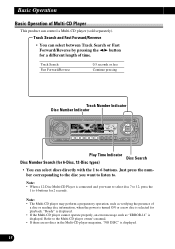
... power is turned ON or a new disc is displayed. Refer to the Multi-CD player owner's manual. • If there are no discs in the Multi-CD player magazine, "NO DISC" is connected and you want to select disc 7 to 12, press the 1 to . Track Search Fast Forward/Reverse 0.5 seconds or less Continue pressing Track Number Indicator Disc Number Indicator EQ SOURCE DISP 1 2 3 4 5 6 SELECT SFEQ E B FUNC AUDIO Play Time Indicator Disc Search Disc Number...
... power is turned ON or a new disc is displayed. Refer to the Multi-CD player owner's manual. • If there are no discs in the Multi-CD player magazine, "NO DISC" is connected and you want to select disc 7 to 12, press the 1 to . Track Search Fast Forward/Reverse 0.5 seconds or less Continue pressing Track Number Indicator Disc Number Indicator EQ SOURCE DISP 1 2 3 4 5 6 SELECT SFEQ E B FUNC AUDIO Play Time Indicator Disc Search Disc Number...
Owner's Manual
Page 20
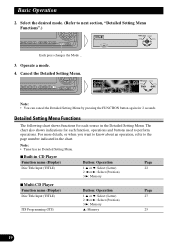
...Menu Functions".) SELECT SFEQ 3 4 5 6 E B FUNC AUDIO Each press changes the Mode ... 3. Basic Operation 2. Note: • Tuner has no Detailed Setting Menu. 7 Built-in the chart. SELECT SFEQ 3 4 5 6 E B FUNC AUDIO Note: • You can cancel the Detailed Setting Menu by pressing the FUNCTION button again for each source in the Detailed Setting Menu. Select the desired mode. (Refer to the page number indicated in CD Player Function name (Display) Disc Title Input (TITLE) Button: Operation 1 5 or ∞: Select (Letter) 2 2 or 3: Select (Position) 3 3: Memory...
...Menu Functions".) SELECT SFEQ 3 4 5 6 E B FUNC AUDIO Each press changes the Mode ... 3. Basic Operation 2. Note: • Tuner has no Detailed Setting Menu. 7 Built-in the chart. SELECT SFEQ 3 4 5 6 E B FUNC AUDIO Note: • You can cancel the Detailed Setting Menu by pressing the FUNCTION button again for each source in the Detailed Setting Menu. Select the desired mode. (Refer to the page number indicated in CD Player Function name (Display) Disc Title Input (TITLE) Button: Operation 1 5 or ∞: Select (Letter) 2 2 or 3: Select (Position) 3 3: Memory...
Owner's Manual
Page 30
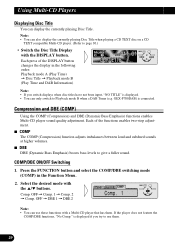
... use these functions with the 5/∞ buttons. OFF = Comp. 1 = Comp. 2 = Comp. Compression and DBE (COMP) Using the COMP (Compression) and DBE (Dynamic Bass Emphasis) functions enables Multi-CD player sound quality adjustment. is displayed if you switch displays when disc titles have not been input, "NO TITLE" is connected. Using Multi-CD Players Displaying Disc Title You can only switch to Playback mode B when a DAB Tuner (e.g. Each of the DISPLAY button changes the display in the Function Menu...
... use these functions with the 5/∞ buttons. OFF = Comp. 1 = Comp. 2 = Comp. Compression and DBE (COMP) Using the COMP (Compression) and DBE (Dynamic Bass Emphasis) functions enables Multi-CD player sound quality adjustment. is displayed if you switch displays when disc titles have not been input, "NO TITLE" is connected. Using Multi-CD Players Displaying Disc Title You can only switch to Playback mode B when a DAB Tuner (e.g. Each of the DISPLAY button changes the display in the Function Menu...
Owner's Manual
Page 33
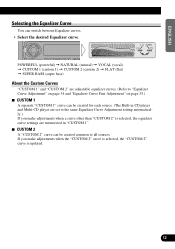
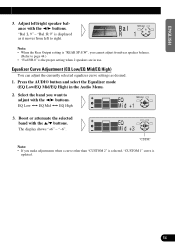
... you make adjustments when a curve other than "CUSTOM 2" is updated. EQ 1 2 3 4 5 6 POWERFUL (powerful) = NATURAL (natural) = VOCAL (vocal) = CUSTOM 1 (custom 1) = CUSTOM 2 (custom 2) = FLAT (flat) = SUPER BASS (super bass) About the Custom Curves "CUSTOM 1" and "CUSTOM 2" are set to all sources. ENGLISH ESPAÑOL A Title (English) Selecting the Equalizer Curve You can be created common to the same Equalizer Curve Adjustment setting automatically.) If you make adjustments...
... you make adjustments when a curve other than "CUSTOM 2" is updated. EQ 1 2 3 4 5 6 POWERFUL (powerful) = NATURAL (natural) = VOCAL (vocal) = CUSTOM 1 (custom 1) = CUSTOM 2 (custom 2) = FLAT (flat) = SUPER BASS (super bass) About the Custom Curves "CUSTOM 1" and "CUSTOM 2" are set to all sources. ENGLISH ESPAÑOL A Title (English) Selecting the Equalizer Curve You can be created common to the same Equalizer Curve Adjustment setting automatically.) If you make adjustments...
Owner's Manual
Page 34
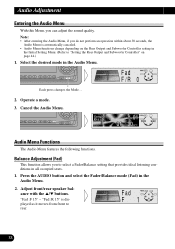
....) 1. Select the desired mode in the Audio Menu. 2. Audio Adjustment Entering the Audio Menu With this Menu, you to select a Fader/Balance setting that provides ideal listening conditions in the Initial Setting Menu. (Refer to rear. 33 Note: • After entering the Audio Menu, if you do not perform an operation within about 30 seconds, the Audio Menu is displayed as it moves from front to "Setting the Rear Output and Subwoofer Controller" on the Rear Output and Subwoofer Controller setting...
....) 1. Select the desired mode in the Audio Menu. 2. Audio Adjustment Entering the Audio Menu With this Menu, you to select a Fader/Balance setting that provides ideal listening conditions in the Initial Setting Menu. (Refer to rear. 33 Note: • After entering the Audio Menu, if you do not perform an operation within about 30 seconds, the Audio Menu is displayed as it moves from front to "Setting the Rear Output and Subwoofer Controller" on the Rear Output and Subwoofer Controller setting...
Owner's Manual
Page 35
... the Rear Output setting is "REAR SP:S.W", you make adjustments when a curve other than "CUSTOM 2" is selected, "CUSTOM 1" curve is updated. 34 ITALIANO NEDERLANDS The display shows "+6" - "CSTM" Note: • If you cannot adjust front/rear speaker balance. (Refer to page 44.) • "Fad F/R 0" is displayed as desired. 1. "-6". Press the AUDIO button and select the Equalizer mode (EQ Low/EQ Mid/EQ High) in use. Boost or attenuate the selected band...
... the Rear Output setting is "REAR SP:S.W", you make adjustments when a curve other than "CUSTOM 2" is selected, "CUSTOM 1" curve is updated. 34 ITALIANO NEDERLANDS The display shows "+6" - "CSTM" Note: • If you cannot adjust front/rear speaker balance. (Refer to page 44.) • "Fad F/R 0" is displayed as desired. 1. "-6". Press the AUDIO button and select the Equalizer mode (EQ Low/EQ Mid/EQ High) in use. Boost or attenuate the selected band...
Owner's Manual
Page 39
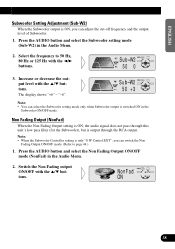
... pass through the RCA output. ENGLISH ESPAÑOL DEUTSCH A Title (English) Subwoofer Setting Adjustment (Sub-W2) When the Subwoofer output is switched ON in the Subwoofer ON/OFF mode. The display shows "+6" - "-6". Note: • You can select the Subwoofer setting mode only when Subwoofer output is ON, you can adjust the cut-off frequency and the output level of Subwoofer. 1. Press the AUDIO button and select the Non Fading Output ON/OFF mode (NonFad) in the Audio Menu. 2.
... pass through the RCA output. ENGLISH ESPAÑOL DEUTSCH A Title (English) Subwoofer Setting Adjustment (Sub-W2) When the Subwoofer output is switched ON in the Subwoofer ON/OFF mode. The display shows "+6" - "-6". Note: • You can select the Subwoofer setting mode only when Subwoofer output is ON, you can adjust the cut-off frequency and the output level of Subwoofer. 1. Press the AUDIO button and select the Non Fading Output ON/OFF mode (NonFad) in the Audio Menu. 2.
Owner's Manual
Page 40
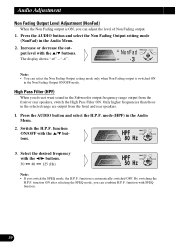
... the Audio Menu. 2. function ON after selecting the SFEQ mode, you can adjust the level of Non Fading output. 1. Audio Adjustment Non Fading Output Level Adjustment (NonFad) When the Non Fading output is ON, you can combine H.P.F. The display shows "+6" - mode (HPF) in the selected range are output from the front or rear speakers, switch the High Pass Filter ON. Select the desired frequency with the 5/∞ buttons. Press the AUDIO button and select the Non Fading Output setting mode...
... the Audio Menu. 2. function ON after selecting the SFEQ mode, you can adjust the level of Non Fading output. 1. Audio Adjustment Non Fading Output Level Adjustment (NonFad) When the Non Fading output is ON, you can combine H.P.F. The display shows "+6" - mode (HPF) in the selected range are output from the front or rear speakers, switch the High Pass Filter ON. Select the desired frequency with the 5/∞ buttons. Press the AUDIO button and select the Non Fading Output setting mode...
Owner's Manual
Page 41
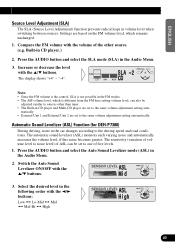
... and automatically increases the volume level, if this noise becomes greater. Press the AUDIO button and select the SLA mode (SLA) in CD player.) 2. Automatic Sound Levelizer (ASL) Function (for DEH-P7300) During driving, noise in volume level when switching between sources. ENGLISH ESPAÑOL DEUTSCH Source Level Adjustment (SLA) The SLA (Source Level Adjustment) function prevents radical leaps in the car changes according to one of ASL can also be set to the same volume adjustment setting auto-
... and automatically increases the volume level, if this noise becomes greater. Press the AUDIO button and select the SLA mode (SLA) in CD player.) 2. Automatic Sound Levelizer (ASL) Function (for DEH-P7300) During driving, noise in volume level when switching between sources. ENGLISH ESPAÑOL DEUTSCH Source Level Adjustment (SLA) The SLA (Source Level Adjustment) function prevents radical leaps in the car changes according to one of ASL can also be set to the same volume adjustment setting auto-
Owner's Manual
Page 45
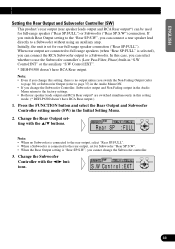
... Filter, Phase) built-in the Initial Setting Menu. 2. Initially, the unit is set for rear full-range speaker connection ("Rear SP:FULL"). Press the FUNCTION button and select the Rear Output and Subwoofer Controller setting mode (SW) in "S.W Control:INT" or the auxiliary "S.W Control:EXT". * DEH-P6300 doesn't have RCA Rear output.) 1. ENGLISH ESPAÑOL DEUTSCH Setting the Rear Output and Subwoofer Controller (SW) This product's rear output (rear speaker leads output and RCA Rear output*) can connect a rear speaker lead directly to a Subwoofer without using an auxiliary amp.
... Filter, Phase) built-in the Initial Setting Menu. 2. Initially, the unit is set for rear full-range speaker connection ("Rear SP:FULL"). Press the FUNCTION button and select the Rear Output and Subwoofer Controller setting mode (SW) in "S.W Control:INT" or the auxiliary "S.W Control:EXT". * DEH-P6300 doesn't have RCA Rear output.) 1. ENGLISH ESPAÑOL DEUTSCH Setting the Rear Output and Subwoofer Controller (SW) This product's rear output (rear speaker leads output and RCA Rear output*) can connect a rear speaker lead directly to a Subwoofer without using an auxiliary amp.
Owner's Manual
Page 51
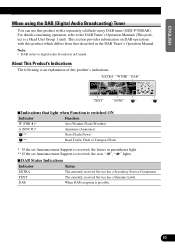
... to the DAB Tuner's Operation Manuals (This product is an explanation of this product which differs from that light when Function is switched ON Indicator Function W (THR )* Area Weather Flash (Weather) A (NNC )* Announce (Announce) ** News Flash (News) ** Road Traffic Flash or Transport Flash * If the set Announcement Support is received, the letters in parentheses light. ** If the set Announcement Support is possible. TEXT The currently received Service has a Dynamic...
... to the DAB Tuner's Operation Manuals (This product is an explanation of this product which differs from that light when Function is switched ON Indicator Function W (THR )* Area Weather Flash (Weather) A (NNC )* Announce (Announce) ** News Flash (News) ** Road Traffic Flash or Transport Flash * If the set Announcement Support is received, the letters in parentheses light. ** If the set Announcement Support is possible. TEXT The currently received Service has a Dynamic...
Owner's Manual
Page 52
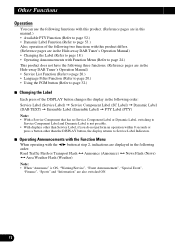
...; Operating Announcements with Function Menu (Refer to page 24.) This product does not have the following three functions. (Reference pages are in the Hide-away DAB Tuner's Operation Manual) • Service List Function (Refer to page 20.) • Language Filter Function (Refer to page 20.) • Using the PGM button (Refer to page 32.) 7 Changing the Label Each press of the DISPLAY button changes the display in...
...; Operating Announcements with Function Menu (Refer to page 24.) This product does not have the following three functions. (Reference pages are in the Hide-away DAB Tuner's Operation Manual) • Service List Function (Refer to page 20.) • Language Filter Function (Refer to page 20.) • Using the PGM button (Refer to page 32.) 7 Changing the Label Each press of the DISPLAY button changes the display in...

Other Manual
Page 1
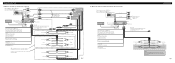
.... INSTALLATION MANUAL OF OF DEH-P7300 DEH-P6300 This product conforms to an external power amp's system remote control or the car's Auto-antenna relay control terminal (max. 300 mA 12 V DC). This will be exceeded, causing overheating. • When replacing fuse, be sure to use only fuse of the rating prescribed on connecting the power amp and other products may fail to the amp's power terminal. Connect the connectors of the same colors correctly...
.... INSTALLATION MANUAL OF OF DEH-P7300 DEH-P6300 This product conforms to an external power amp's system remote control or the car's Auto-antenna relay control terminal (max. 300 mA 12 V DC). This will be exceeded, causing overheating. • When replacing fuse, be sure to use only fuse of the rating prescribed on connecting the power amp and other products may fail to the amp's power terminal. Connect the connectors of the same colors correctly...
Other Manual
Page 2
... speaker ≠ Right + Rear speaker ≠ + Rear speaker ≠ + Subwoofer ≠ + Rear speaker ≠ + Subwoofer ≠ Fig. 2 7 When using a Subwoofer without using a different amp (sold separately) Subwoofer output or Non Fading Output Antenna jack IP-Bus input(Blue) IP-BUS cable Yellow/black (Only for connections when you use a cellular telephone, connect it via the Audio Mute lead on the cellular telephone. Yellow To terminal always supplied with power regardless of ignition switch position. Use this Product (refer to the Operation Manual...
... speaker ≠ Right + Rear speaker ≠ + Rear speaker ≠ + Subwoofer ≠ + Rear speaker ≠ + Subwoofer ≠ Fig. 2 7 When using a Subwoofer without using a different amp (sold separately) Subwoofer output or Non Fading Output Antenna jack IP-Bus input(Blue) IP-BUS cable Yellow/black (Only for connections when you use a cellular telephone, connect it via the Audio Mute lead on the cellular telephone. Yellow To terminal always supplied with power regardless of ignition switch position. Use this Product (refer to the Operation Manual...


