Operation Manual
Page 2
... Track Selection 22 - Disc Title Input (TITLE IN) - Band Basic Operation of Tuner 11 - Random Play (RANDOM) - Local Seek Tuning (LOCAL) - Best Stations Memory (BSM) Using the Built-in CD Player 9 - Random Play (RANDOM) - Erase a Disc Program Disc Title 24 - Selecting Discs by Disc Title List (TITLE LIST) - ITS Programming (ITS) - Displaying Disc Title Compression and DBE (COMP 26 - Title Display Switching - Eject Basic Operation of Multi-CD Player 12 - Manual and Seek Tuning - ITS Play (ITS-P) - Disc Search - Remote Controller (CD...
... Track Selection 22 - Disc Title Input (TITLE IN) - Band Basic Operation of Tuner 11 - Random Play (RANDOM) - Local Seek Tuning (LOCAL) - Best Stations Memory (BSM) Using the Built-in CD Player 9 - Random Play (RANDOM) - Erase a Disc Program Disc Title 24 - Selecting Discs by Disc Title List (TITLE LIST) - ITS Programming (ITS) - Displaying Disc Title Compression and DBE (COMP 26 - Title Display Switching - Eject Basic Operation of Multi-CD Player 12 - Manual and Seek Tuning - ITS Play (ITS-P) - Disc Search - Remote Controller (CD...
Operation Manual
Page 3
... CD Player's Error Message 51 Specifications 52 DEUTSCH FRANÇAIS ITALIANO NEDERLANDS 2 Setting the Rear Speaker Lead and Subwoofer Controller (REAR SP) DFS Alarm Function 40 Activating the DFS Alarm Feature 40 Setting Entry Delay Time 40 Activating Internal Speaker ON/OFF 41 - ENGLISH ESPAÑOL Audio Adjustment 28 Selecting the Equalizer Curve 28 Entering the Audio Menu 28 Audio Menu Functions 29 - Equalizer Curve Fine Adjustment - Source Level Adjustment (SLA) Detaching and Replacing the Front Panel 35 Theft Protection...
... CD Player's Error Message 51 Specifications 52 DEUTSCH FRANÇAIS ITALIANO NEDERLANDS 2 Setting the Rear Speaker Lead and Subwoofer Controller (REAR SP) DFS Alarm Function 40 Activating the DFS Alarm Feature 40 Setting Entry Delay Time 40 Activating Internal Speaker ON/OFF 41 - ENGLISH ESPAÑOL Audio Adjustment 28 Selecting the Equalizer Curve 28 Entering the Audio Menu 28 Audio Menu Functions 29 - Equalizer Curve Fine Adjustment - Source Level Adjustment (SLA) Detaching and Replacing the Front Panel 35 Theft Protection...
Operation Manual
Page 4
... Listening For A Lifetime Used wisely, your volume control at two feet. Selecting fine audio equipment such as the unit you've just purchased is too late, this manufacturer and the Electronic Industries Association's Consumer Electronics Group recommend you avoid prolonged exposure to excessive noise. So what sounds "normal" can hear it there. To establish a safe level: • Start...
... Listening For A Lifetime Used wisely, your volume control at two feet. Selecting fine audio equipment such as the unit you've just purchased is too late, this manufacturer and the Electronic Industries Association's Consumer Electronics Group recommend you avoid prolonged exposure to excessive noise. So what sounds "normal" can hear it there. To establish a safe level: • Start...
Operation Manual
Page 7
... Service, Inc. When using the 50-Disc Type Multi-CD Player The available functions of Canada, Inc. After-sales Service for Pioneer Products Please contact the dealer or distributor from moisture. • If the battery is not available, please contact the companies listed below: Please do not ship your product. In case the necessary information is disconnected, the preset memory...
... Service, Inc. When using the 50-Disc Type Multi-CD Player The available functions of Canada, Inc. After-sales Service for Pioneer Products Please contact the dealer or distributor from moisture. • If the battery is not available, please contact the companies listed below: Please do not ship your product. In case the necessary information is disconnected, the preset memory...
Operation Manual
Page 8
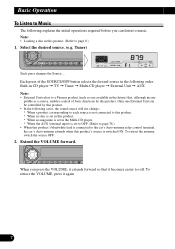
... this product's source is connected to page 9.) 1. To retract the antenna, switch the source OFF. 2. patible as one External Unit can listen to music. Select the desired source. (e.g. Note: • Loading a disc in CD player = TV = Tuner = Multi-CD player = External Unit = AUX Note: • External Unit refers to a Pioneer product (such as a source, enables control of the SOURCE/OFF button selects the desired source in the following cases, the sound source will not change: * When...
... this product's source is connected to page 9.) 1. To retract the antenna, switch the source OFF. 2. patible as one External Unit can listen to music. Select the desired source. (e.g. Note: • Loading a disc in CD player = TV = Tuner = Multi-CD player = External Unit = AUX Note: • External Unit refers to a Pioneer product (such as a source, enables control of the SOURCE/OFF button selects the desired source in the following cases, the sound source will not change: * When...
Operation Manual
Page 13
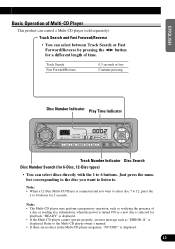
... can select discs directly with the 1 to the Multi-CD player owner's manual. • If there are no discs in the Multi-CD player magazine, "NO DISC" is selected for 2 seconds. ENGLISH ESPAÑOL Basic Operation of a disc or reading disc information, when the power is turned ON or a new disc is displayed. 12 Note: • The Multi-CD player may perform a preparatory operation, such as "ERROR-14" is connected...
... can select discs directly with the 1 to the Multi-CD player owner's manual. • If there are no discs in the Multi-CD player magazine, "NO DISC" is selected for 2 seconds. ENGLISH ESPAÑOL Basic Operation of a disc or reading disc information, when the power is turned ON or a new disc is displayed. 12 Note: • The Multi-CD player may perform a preparatory operation, such as "ERROR-14" is connected...

Operation Manual
Page 29
... DEUTSCH Audio Adjustment Selecting the Equalizer Curve You can adjust the sound quality. Equalizer curve POWERFUL Ô NATURAL Ô VOCAL Ô CUSTOM Ô EQ FLAT Ô SUPER BASS Note: • "CUSTOM" stores an equalizer curve you can switch between Equalizer curves. • Rotate the EQ selector up or down to "Setting the Rear Speaker Lead and Subwoofer Controller" on page 39.) 1. Each press changes the Mode ... 2. Select the desired mode in...
... DEUTSCH Audio Adjustment Selecting the Equalizer Curve You can adjust the sound quality. Equalizer curve POWERFUL Ô NATURAL Ô VOCAL Ô CUSTOM Ô EQ FLAT Ô SUPER BASS Note: • "CUSTOM" stores an equalizer curve you can switch between Equalizer curves. • Rotate the EQ selector up or down to "Setting the Rear Speaker Lead and Subwoofer Controller" on page 39.) 1. Each press changes the Mode ... 2. Select the desired mode in...
Operation Manual
Page 30
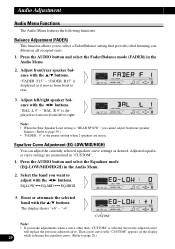
Press the AUDIO button and select the Fader/Balance mode (FADER) in "CUSTOM". 1. "FADER :R15" is the proper setting when 2 speakers are memorized in the Audio Menu. 2. Note: • When the Rear Speaker Lead setting is "REAR SP:S/W", you make adjustments when a curve other than "CUSTOM" is displayed as it moves from left /right speaker balance with the 2/3 buttons. "-6". "FADER :F15" - Adjust left to right. Adjusted equalizer curve settings are in use. EQ-LOW += EQ...
Press the AUDIO button and select the Fader/Balance mode (FADER) in "CUSTOM". 1. "FADER :R15" is the proper setting when 2 speakers are memorized in the Audio Menu. 2. Note: • When the Rear Speaker Lead setting is "REAR SP:S/W", you make adjustments when a curve other than "CUSTOM" is displayed as it moves from left /right speaker balance with the 2/3 buttons. "-6". "FADER :F15" - Adjust left to right. Adjusted equalizer curve settings are in use. EQ-LOW += EQ...
Operation Manual
Page 32
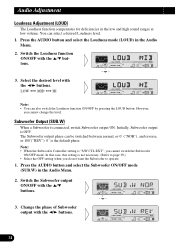
...: • You can select a desired Loudness level. 1. Press the AUDIO button and select the Subwoofer ON/OFF mode (SUB.W) in the low and high sound ranges at low volume. Switch the Loudness function ON/OFF with the 5/∞ buttons. 3. Initially, Subwoofer output is connected, switch Subwoofer output ON. Change the phase of Subwoofer output with the 2/3 buttons. Select the desired level with the 2/3 buttons. Press the AUDIO button and select the Loudness mode (LOUD) in the Audio Menu. 2. The Subwoofer output phase can be...
...: • You can select a desired Loudness level. 1. Press the AUDIO button and select the Subwoofer ON/OFF mode (SUB.W) in the low and high sound ranges at low volume. Switch the Loudness function ON/OFF with the 5/∞ buttons. 3. Initially, Subwoofer output is connected, switch Subwoofer output ON. Change the phase of Subwoofer output with the 2/3 buttons. Select the desired level with the 2/3 buttons. Press the AUDIO button and select the Loudness mode (LOUD) in the Audio Menu. 2. The Subwoofer output phase can be...
Operation Manual
Page 33
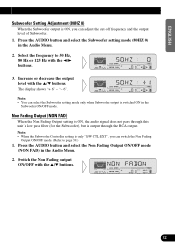
... the AUDIO button and select the Subwoofer setting mode (80HZ 0) in the Subwoofer ON/OFF mode. Increase or decrease the output level with the 5/∞ buttons. 32 FRANÇAIS ITALIANO NEDERLANDS The display shows "+ 6" - Note: • You can select the Subwoofer setting mode only when Subwoofer output is switched ON in the Audio Menu. 2. Note: • When the Subwoofer Controller setting is only "S/W CTL:EXT", you can adjust the cut-off frequency and the output level of Subwoofer. 1. Switch...
... the AUDIO button and select the Subwoofer setting mode (80HZ 0) in the Subwoofer ON/OFF mode. Increase or decrease the output level with the 5/∞ buttons. 32 FRANÇAIS ITALIANO NEDERLANDS The display shows "+ 6" - Note: • You can select the Subwoofer setting mode only when Subwoofer output is switched ON in the Audio Menu. 2. Note: • When the Subwoofer Controller setting is only "S/W CTL:EXT", you can adjust the cut-off frequency and the output level of Subwoofer. 1. Switch...
Operation Manual
Page 34
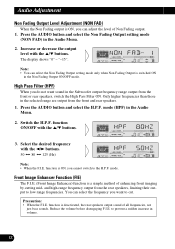
... can adjust the level of enhancing front imaging by cutting mid- High Pass Filter (HPF) When you do not want to the H.P.F. mode (HPF) in the Audio Menu. 2. Front Image Enhancer Function (FIE) The F.I .E. "-15". Switch the H.P.F. Reduce the volume before disengaging F.I .E. to low-range frequencies. Press the AUDIO button and select the H.P.F. mode. The display shows "0" - Only higher frequencies than those in the Subwoofer output frequency range output...
... can adjust the level of enhancing front imaging by cutting mid- High Pass Filter (HPF) When you do not want to the H.P.F. mode (HPF) in the Audio Menu. 2. Front Image Enhancer Function (FIE) The F.I .E. "-15". Switch the H.P.F. Reduce the volume before disengaging F.I .E. to low-range frequencies. Press the AUDIO button and select the H.P.F. mode. The display shows "0" - Only higher frequencies than those in the Subwoofer output frequency range output...
Operation Manual
Page 35
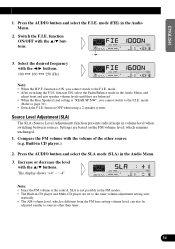
... FM volume with the 5/∞ buttons. 3. "-4". mode (FIE) in CD player.) 2. mode. (Refer to sources other source. (e.g. Built-in the Audio Menu. 2. function ON, select the Fader/Balance mode in CD player and Multi-CD player are based on the FM volume level, which is different from the FM base setting volume level, can also be adjusted similar to page 39.) • Switch the F.I .E. function is "REAR SP:S/W", you cannot switch to the F.I .E. The display shows...
... FM volume with the 5/∞ buttons. 3. "-4". mode (FIE) in CD player.) 2. mode. (Refer to sources other source. (e.g. Built-in the Audio Menu. 2. function ON, select the Fader/Balance mode in CD player and Multi-CD player are based on the FM volume level, which is different from the FM base setting volume level, can also be adjusted similar to page 39.) • Switch the F.I .E. function is "REAR SP:S/W", you cannot switch to the F.I .E. The display shows...
Operation Manual
Page 38
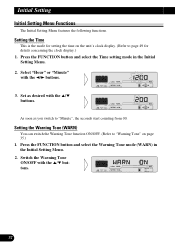
...; buttons. 37 Setting the Time This is the mode for setting the time on page 35.) 1. Press the FUNCTION button and select the Time setting mode in the Initial Setting Menu. 2. Set as you switch to page 49 for details concerning the clock display.) 1. Switch the Warning Tone ON/OFF with the 2/3 buttons. 3. Press the FUNCTION button and select the Warning Tone mode (WARN) in the Initial Setting Menu. 2. Initial Setting Initial Setting Menu Functions The Initial Setting Menu features the following functions...
...; buttons. 37 Setting the Time This is the mode for setting the time on page 35.) 1. Press the FUNCTION button and select the Time setting mode in the Initial Setting Menu. 2. Set as you switch to page 49 for details concerning the clock display.) 1. Switch the Warning Tone ON/OFF with the 2/3 buttons. 3. Press the FUNCTION button and select the Warning Tone mode (WARN) in the Initial Setting Menu. 2. Initial Setting Initial Setting Menu Functions The Initial Setting Menu features the following functions...
Operation Manual
Page 39
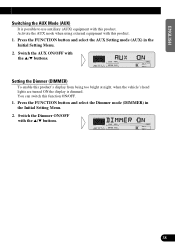
...'s head lights are turned ON the display is possible to use auxiliary (AUX) equipment with this product. 1. Activate the AUX mode when using external equipment with this product. Switch the AUX ON/OFF with the 5/∞ buttons. 38 FRANÇAIS ITALIANO NEDERLANDS Switch the Dimmer ON/OFF with the 5/∞ buttons. Press the FUNCTION button and select the AUX Setting mode (AUX) in the Initial Setting Menu. 2. Setting the Dimmer (DIMMER) To enable this function ON/OFF. 1. Press the FUNCTION button...
...'s head lights are turned ON the display is possible to use auxiliary (AUX) equipment with this product. 1. Activate the AUX mode when using external equipment with this product. Switch the AUX ON/OFF with the 5/∞ buttons. 38 FRANÇAIS ITALIANO NEDERLANDS Switch the Dimmer ON/OFF with the 5/∞ buttons. Press the FUNCTION button and select the AUX Setting mode (AUX) in the Initial Setting Menu. 2. Setting the Dimmer (DIMMER) To enable this function ON/OFF. 1. Press the FUNCTION button...
Operation Manual
Page 40
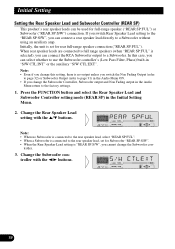
..., Subwoofer output and Non Fading output in the Audio Menu return to a Subwoofer. Change the Subwoofer controller with the 5/∞ buttons. Initial Setting Setting the Rear Speaker Lead and Subwoofer Controller (REAR SP) This product's rear speaker leads can be used for rear full-range speaker connection ("REAR SP:FUL"). troller. 3. If you switch Rear Speaker Lead setting to the "REAR SP:S/W", you can connect the RCA Subwoofer output to the factory settings. 1. Initially, the unit is set for Subwoofer "REAR SP:S/W". • When the Rear Speaker Lead setting is selected...
..., Subwoofer output and Non Fading output in the Audio Menu return to a Subwoofer. Change the Subwoofer controller with the 5/∞ buttons. Initial Setting Setting the Rear Speaker Lead and Subwoofer Controller (REAR SP) This product's rear speaker leads can be used for rear full-range speaker connection ("REAR SP:FUL"). troller. 3. If you switch Rear Speaker Lead setting to the "REAR SP:S/W", you can connect the RCA Subwoofer output to the factory settings. 1. Initially, the unit is set for Subwoofer "REAR SP:S/W". • When the Rear Speaker Lead setting is selected...
Operation Manual
Page 41
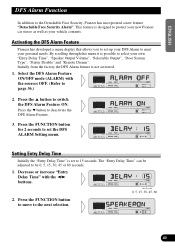
... ON/OFF mode (ALARM) with the 2/3 buttons. 2. Press the ∞ button to the Detachable Face Security, Pioneer has incorporated a new feature "Detachable Face Security Alarm". ENGLISH ESPAÑOL DEUTSCH DFS Alarm Function In addition to deactivate the DFS Alarm Feature. 3. Press the FUNCTION button for 2 seconds to protect your new Pioneer car stereo as well as your own "Entry Delay Time", "Speaker Output Volume", "Selectable Output", "Door System...
... ON/OFF mode (ALARM) with the 2/3 buttons. 2. Press the ∞ button to the Detachable Face Security, Pioneer has incorporated a new feature "Detachable Face Security Alarm". ENGLISH ESPAÑOL DEUTSCH DFS Alarm Function In addition to deactivate the DFS Alarm Feature. 3. Press the FUNCTION button for 2 seconds to protect your new Pioneer car stereo as well as your own "Entry Delay Time", "Speaker Output Volume", "Selectable Output", "Door System...
Operation Manual
Page 42
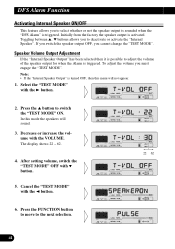
... MODE". Press the 5 button to adjust the volume of the speaker output for when the Alarm is possible to switch the "TEST MODE" ON. Decrease or increase the volume with the 3 button. 2. Speaker Volume Output Adjustment If the "Internal Speaker Output" has been selected then it is triggered. In this menu will sound. 3. The display shows 22 - 62. 4. Toggling between 5, ∞ buttons allows you to deactivate or activate the "Internal Speaker". After setting volume, switch the...
... MODE". Press the 5 button to adjust the volume of the speaker output for when the Alarm is possible to switch the "TEST MODE" ON. Decrease or increase the volume with the 3 button. 2. Speaker Volume Output Adjustment If the "Internal Speaker Output" has been selected then it is triggered. In this menu will sound. 3. The display shows 22 - 62. 4. Toggling between 5, ∞ buttons allows you to deactivate or activate the "Internal Speaker". After setting volume, switch the...
Operation Manual
Page 46
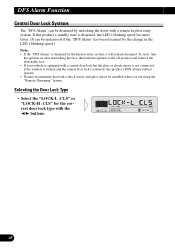
...lock type with a remote keyless entry system. To reset, turn the ignition on after reattaching the face, then turn the ignition to the off position and remove the detachable face. • If your vehicle is equipped with a central door lock but the glass or shock sensor is not connected, if the window... is broken and the central door lock is disarmed by unlocking the doors with the 2/3 buttons. 45 If this product's standby state is disarmed, the LED's blinking speed becomes faster. (It can be installed when you are using the "Remote Disarming" feature....
...lock type with a remote keyless entry system. To reset, turn the ignition on after reattaching the face, then turn the ignition to the off position and remove the detachable face. • If your vehicle is equipped with a central door lock but the glass or shock sensor is not connected, if the window... is broken and the central door lock is disarmed by unlocking the doors with the 2/3 buttons. 45 If this product's standby state is disarmed, the LED's blinking speed becomes faster. (It can be installed when you are using the "Remote Disarming" feature....
Operation Manual
Page 48
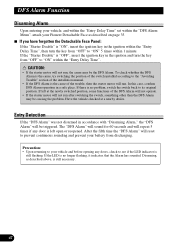
... of the switch installed according to the "Avoiding Trouble" section of the installation manual. • If the DFS Alarm is the cause of the DFS Alarm will not operate. • If the starter motor will not run, the cause may be causing the problem. Disarming, as described on page 35. 7 If you have forgotten the Detachable Face Panel: If...
... of the switch installed according to the "Avoiding Trouble" section of the installation manual. • If the DFS Alarm is the cause of the DFS Alarm will not operate. • If the starter motor will not run, the cause may be causing the problem. Disarming, as described on page 35. 7 If you have forgotten the Detachable Face Panel: If...
Operation Manual
Page 51
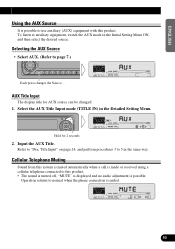
... 2. Select the AUX Title Input mode (TITLE IN) in the same way. Hold for AUX source can be changed. 1. Input the AUX Title. Operation returns to use auxiliary (AUX) equipment with this product. Selecting the AUX Source • Select AUX. (Refer to this system is muted automatically when a call is possible. Cellular Telephone Muting Sound from this product. • The sound is turned off, "MUTE" is displayed and no audio adjustment is made or received using a cellular telephone connected to...
... 2. Select the AUX Title Input mode (TITLE IN) in the same way. Hold for AUX source can be changed. 1. Input the AUX Title. Operation returns to use auxiliary (AUX) equipment with this product. Selecting the AUX Source • Select AUX. (Refer to this system is muted automatically when a call is possible. Cellular Telephone Muting Sound from this product. • The sound is turned off, "MUTE" is displayed and no audio adjustment is made or received using a cellular telephone connected to...


