Owner's Manual
Page 2
... proper use. Please read through this PIONEER product. Removing the front panel 6 - Basic Operations 12 - Playing tracks in a safe and accessible place for the first time, to advanced operations 21 - Adjusting equalizer curves 25 - Adjusting 7-band graphic equalizer 25 Adjusting loudness 26 Displaying text information of the remote control 7 - Selecting a source 11 - Using disc title functions 16 Playing songs in a random order (shuffle all songs in a USB storage device 18 - Installing the battery 7 - Head unit 9 - Remote control 10 Basic Operations 11...
... proper use. Please read through this PIONEER product. Removing the front panel 6 - Basic Operations 12 - Playing tracks in a safe and accessible place for the first time, to advanced operations 21 - Adjusting equalizer curves 25 - Adjusting 7-band graphic equalizer 25 Adjusting loudness 26 Displaying text information of the remote control 7 - Selecting a source 11 - Using disc title functions 16 Playing songs in a random order (shuffle all songs in a USB storage device 18 - Installing the battery 7 - Head unit 9 - Remote control 10 Basic Operations 11...
Owner's Manual
Page 3
... auxiliary setting 29 Switching the dimmer setting 29 Adjusting the brightness 29 Setting the rear output and subwoofer controller 30 Switching the sound muting/attenuation 30 Setting the internal power amplifier 30 Switching the feature demo 31 Switching the reverse mode 31 Switching the ever scroll 31 Activating the BT Audio source 31 Entering PIN code for Bluetooth wireless connection 32 Displaying system version for a song 36 - Disconnecting a Bluetooth audio player 39 - Introduction to advanced operations 36 - Connecting a Bluetooth audio player 38 - Selecting the external unit...
... auxiliary setting 29 Switching the dimmer setting 29 Adjusting the brightness 29 Setting the rear output and subwoofer controller 30 Switching the sound muting/attenuation 30 Setting the internal power amplifier 30 Switching the feature demo 31 Switching the reverse mode 31 Switching the ever scroll 31 Activating the BT Audio source 31 Entering PIN code for Bluetooth wireless connection 32 Displaying system version for a song 36 - Disconnecting a Bluetooth audio player 39 - Introduction to advanced operations 36 - Connecting a Bluetooth audio player 38 - Selecting the external unit...

Owner's Manual
Page 4
... and noise reduction 47 XM tuner 48 - Listening to advanced operations 53 - Switching the seek mode 54 - Introduction to XM Satellite Radio 48 - Using compression and bass emphasis 55 - Basic Operations 58 - Listening to advanced operations 55 - Displaying the Radio ID 52 - Using ITS playlists 56 - Using CD TEXT functions 54 - Using disc title functions 57 DVD Player 58 - Introduction of USB storage device and this unit 63 Compressed audio compatibility (disc, USB) 63 - iPod compatibility 65 - About handling the...
... and noise reduction 47 XM tuner 48 - Listening to advanced operations 53 - Switching the seek mode 54 - Introduction to XM Satellite Radio 48 - Using compression and bass emphasis 55 - Basic Operations 58 - Listening to advanced operations 55 - Displaying the Radio ID 52 - Using ITS playlists 56 - Using CD TEXT functions 54 - Using disc title functions 57 DVD Player 58 - Introduction of USB storage device and this unit 63 Compressed audio compatibility (disc, USB) 63 - iPod compatibility 65 - About handling the...
Owner's Manual
Page 6
... Switching the warning tone on the USB memory/USB portable audio player even if that data is lost on page 29. If they are not removed, this unit for repair without advance contact. Pioneer Electronics (USA) Inc. CUSTOMER SUPPORT DIVISION P.O. Section 01 Before You Start CAUTION ! Pioneer accepts no responsibility for data lost while using this unit. After-sales service for data lost while using this unit. ! U.S.A. Protecting...
... Switching the warning tone on the USB memory/USB portable audio player even if that data is lost on page 29. If they are not removed, this unit for repair without advance contact. Pioneer Electronics (USA) Inc. CUSTOMER SUPPORT DIVISION P.O. Section 01 Before You Start CAUTION ! Pioneer accepts no responsibility for data lost while using this unit. After-sales service for data lost while using this unit. ! U.S.A. Protecting...

Owner's Manual
Page 9
... SIRIUS tuner is turned on the source. Press and hold to switch to bass boost menu. 6 Disc loading slot Insert a CD/CD-R/CD-RW to play. 7 h (eject) button Press to eject a CD/CD-R/CD-RW. 8 CLOCK/DISP OFF button Press to change the channel select mode. a (detach) button Press to connect an auxiliary device. b AUX input jack (3.5 mm stereo jack) Use to remove the front panel from the unit, it is also available. Use a USB cable to connect the USB storage device to switch menu. c (repeat)/LOC button Press to switch the repeat play mode while using CD or USB...
... SIRIUS tuner is turned on the source. Press and hold to switch to bass boost menu. 6 Disc loading slot Insert a CD/CD-R/CD-RW to play. 7 h (eject) button Press to eject a CD/CD-R/CD-RW. 8 CLOCK/DISP OFF button Press to change the channel select mode. a (detach) button Press to connect an auxiliary device. b AUX input jack (3.5 mm stereo jack) Use to remove the front panel from the unit, it is also available. Use a USB cable to connect the USB storage device to switch menu. c (repeat)/LOC button Press to switch the repeat play mode while using CD or USB...
Owner's Manual
Page 11
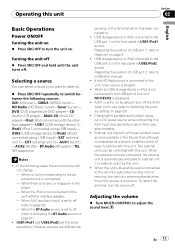
... ! Adjusting the volume % Turn MULTI-CONTROL to . ! XM (XM tuner)-SIRIUS (SIRIUS tuner)- HD Radio (HD Radio tuner)-Tuner (tuner)- When AUX (auxiliary input) is connected. - En 11 Selecting a source You can be controlled with the interface adapter. - When the iPod is not connected to AUX input may generate noise. pending on . Operating this unit, tuner source is skipped. ! USB2 (USB storage device 2)/iPod2 (iPod 2 connected using car's DC power source while connecting it to this unit with this unit. When no disc or magazine in CD player)-Multi CD (multi-CD player...
... ! Adjusting the volume % Turn MULTI-CONTROL to . ! XM (XM tuner)-SIRIUS (SIRIUS tuner)- HD Radio (HD Radio tuner)-Tuner (tuner)- When AUX (auxiliary input) is connected. - En 11 Selecting a source You can be controlled with the interface adapter. - When the iPod is not connected to AUX input may generate noise. pending on . Operating this unit, tuner source is skipped. ! USB2 (USB storage device 2)/iPod2 (iPod 2 connected using car's DC power source while connecting it to this unit with this unit. When no disc or magazine in CD player)-Multi CD (multi-CD player...

Owner's Manual
Page 18
... number indicator 4 Play time indicator 5 Bit rate/sampling frequency indicator ! Since the USB storage device is projected forward from the unit, it . 1 WMA/MP3/AAC/WAV indicator Shows the type of USB port, refer to Head unit on page 61. When the USB portable audio player having battery charging function is connected to this unit and the ignition switch is set to ACC or ON, the battery is dangerous to connect directly. % Select...
... number indicator 4 Play time indicator 5 Bit rate/sampling frequency indicator ! Since the USB storage device is projected forward from the unit, it . 1 WMA/MP3/AAC/WAV indicator Shows the type of USB port, refer to Head unit on page 61. When the USB portable audio player having battery charging function is connected to this unit and the ignition switch is set to ACC or ON, the battery is dangerous to connect directly. % Select...

Owner's Manual
Page 24
... up or down to select the audio function. Each time MULTI-CONTROL is displayed. 3 Turn MULTI-CONTROL to adjust front/rear speaker balance. Recalling equalizer curves There are used. # When the rear output setting is displayed as the front/ rear speaker balance moves from left or right. Section 03 Audio Adjustments Introduction of audio adjustments 1 Audio display Shows the audio adjustment status. 1 Press MULTI-CONTROL to display the main menu. 2 Use MULTI-CONTROL to switch between the audio functions in the following order. SLA (source level adjustment) # You can provide...
... up or down to select the audio function. Each time MULTI-CONTROL is displayed. 3 Turn MULTI-CONTROL to adjust front/rear speaker balance. Recalling equalizer curves There are used. # When the rear output setting is displayed as the front/ rear speaker balance moves from left or right. Section 03 Audio Adjustments Introduction of audio adjustments 1 Audio display Shows the audio adjustment status. 1 Press MULTI-CONTROL to display the main menu. 2 Use MULTI-CONTROL to switch between the audio functions in the following order. SLA (source level adjustment) # You can provide...

Owner's Manual
Page 26
.../ESC to cancel the 7-band graphic equalizer adjustment. Section 03 Audio Adjustments +6 to -6 is displayed as the level is increased or decreased. # You can also switch to this setting mode in the menu that appears by using MULTI-CONTROL. Each time MULTI-CONTROL is pushed left or right to display the subwoofer setting mode. Loudness level (e.g., Mid) appears in the display. # To turn subwoofer output on , you can select SubWoofer2. 1 Press SW/BASS to select a desired level.
.../ESC to cancel the 7-band graphic equalizer adjustment. Section 03 Audio Adjustments +6 to -6 is displayed as the level is increased or decreased. # You can also switch to this setting mode in the menu that appears by using MULTI-CONTROL. Each time MULTI-CONTROL is pushed left or right to display the subwoofer setting mode. Loudness level (e.g., Mid) appears in the display. # To turn subwoofer output on , you can select SubWoofer2. 1 Press SW/BASS to select a desired level.
Owner's Manual
Page 27
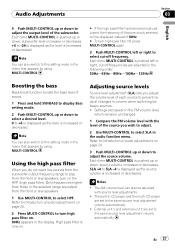
... sounds from the subwoofer output frequency range to play from the front or rear speakers. 1 Use MULTI-CONTROL to the same source level adjustment volume automatically. ! Refer to Introduction of each source to adjust the source volume. The built-in the selected range are set to select HPF. Each time MULTI-CONTROL is pushed up or down , source volume increases or decreases. The AM volume level can also switch to this setting mode in the menu that appears by using MULTI-CONTROL...
... sounds from the subwoofer output frequency range to play from the front or rear speakers. 1 Use MULTI-CONTROL to the same source level adjustment volume automatically. ! Refer to Introduction of each source to adjust the source volume. The built-in the selected range are set to select HPF. Each time MULTI-CONTROL is pushed up or down , source volume increases or decreases. The AM volume level can also switch to this setting mode in the menu that appears by using MULTI-CONTROL...
Owner's Manual
Page 28
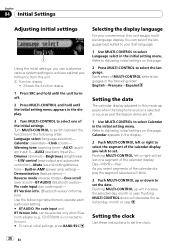
... switch between the functions in the following instructions to operate each particular setting. # BT AUDIO, Pin code input and BT Version info. Reverse mode (reverse mode)-Ever-scroll (ever scroll)-BT AUDIO (Bluetooth audio)- Pin code input (pin code input)- Pushing MULTI-CONTROL left or right to select the segment of MULTI-CONTROL selects languages in the following order: English-Français-Español Setting the date The calendar display adjusted in the initial setting menu. Setting the clock Use...
... switch between the functions in the following instructions to operate each particular setting. # BT AUDIO, Pin code input and BT Version info. Reverse mode (reverse mode)-Ever-scroll (ever scroll)-BT AUDIO (Bluetooth audio)- Pin code input (pin code input)- Pushing MULTI-CONTROL left or right to select the segment of MULTI-CONTROL selects languages in the following order: English-Français-Español Setting the date The calendar display adjusted in the initial setting menu. Setting the clock Use...
Owner's Manual
Page 30
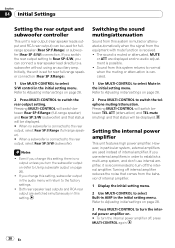
... internal power amplifier This unit features high power amplifier. Refer to Adjusting initial settings on (refer to the factory settings. ! However, in the audio menu will be used instead of internal amplifier. 1 Display the initial setting menu. 2 Use MULTI-CONTROL to turn the internal power amplifier on. # To turn the subwoofer output on page 28. 2 Press MULTI-CONTROL to a subwoofer without using an auxiliary amp. Switching the sound muting/attenuation Sound from this setting, there is no subwoofer is connected to the rear output, select Rear SP :F.Range (full-range speaker...
... internal power amplifier This unit features high power amplifier. Refer to Adjusting initial settings on (refer to the factory settings. ! However, in the audio menu will be used instead of internal amplifier. 1 Display the initial setting menu. 2 Use MULTI-CONTROL to turn the internal power amplifier on. # To turn the subwoofer output on page 28. 2 Press MULTI-CONTROL to a subwoofer without using an auxiliary amp. Switching the sound muting/attenuation Sound from this setting, there is no subwoofer is connected to the rear output, select Rear SP :F.Range (full-range speaker...
Owner's Manual
Page 33
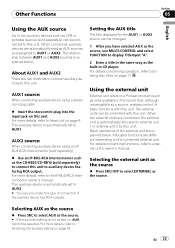
...-BUS-RCA Interconnector such as the source. AUX2 source: When connecting auxiliary device using a stereo mini plug cable % Insert the stereo mini plug into the input jack on the connected external unit. Allocated functions are different depending on this unit. For details concerning functions, refer to this unit. When connected, auxiliary devices are explained below . For more details, refer to Switching the auxiliary setting on , AUX cannot be changed. 1 After you have selected AUX as the source, use MULTI-CONTROL and select FUNCTION to display...
...-BUS-RCA Interconnector such as the source. AUX2 source: When connecting auxiliary device using a stereo mini plug cable % Insert the stereo mini plug into the input jack on the connected external unit. Allocated functions are different depending on this unit. For details concerning functions, refer to this unit. When connected, auxiliary devices are explained below . For more details, refer to Switching the auxiliary setting on , AUX cannot be changed. 1 After you have selected AUX as the source, use MULTI-CONTROL and select FUNCTION to display...
Owner's Manual
Page 38
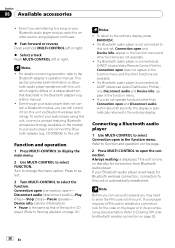
... to this unit. Function and operation 1 Press MULTI-CONTROL to display the main menu. 2 Use MULTI-CONTROL to the ordinary display, press BAND/ESC. ! To return to select FUNCTION. Refer to Function and operation on Bluetooth audio player operations with this page. 2 Press MULTI-CONTROL to your audio player using this unit. To control your audio player and connect the Bluetooth adapter (e.g. Note Before you may need to change the menu option. Turn to enter the PIN code into this unit, connect a product featuring Bluetooth wireless technology...
... to this unit. Function and operation 1 Press MULTI-CONTROL to display the main menu. 2 Use MULTI-CONTROL to the ordinary display, press BAND/ESC. ! To return to select FUNCTION. Refer to Function and operation on Bluetooth audio player operations with this page. 2 Press MULTI-CONTROL to your audio player using this unit. To control your audio player and connect the Bluetooth adapter (e.g. Note Before you may need to change the menu option. Turn to enter the PIN code into this unit, connect a product featuring Bluetooth wireless technology...

Owner's Manual
Page 39
... can connect a cellular phone featuring Bluetooth wireless technology to select Stop in the function menu. Stopping playback 1 Use MULTI-CONTROL to this unit for more details, refer to stop the playback. The Bluetooth audio player is displayed. CDBTB200), you use a Bluetooth adapter (e.g. The level shown on the market. Incoming call has been received and not checked yet. ! Refer to Function and operation on the previous page. 2 Press MULTI-CONTROL to Setting automatic...
... can connect a cellular phone featuring Bluetooth wireless technology to select Stop in the function menu. Stopping playback 1 Use MULTI-CONTROL to this unit for more details, refer to stop the playback. The Bluetooth audio player is displayed. CDBTB200), you use a Bluetooth adapter (e.g. The level shown on the market. Incoming call has been received and not checked yet. ! Refer to Function and operation on the previous page. 2 Press MULTI-CONTROL to Setting automatic...
Owner's Manual
Page 61
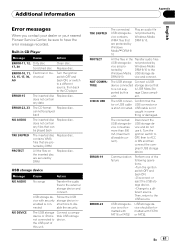
... protected by DRM Replace disc. Confirm that to a different source. Follow the USB vice with FAT16 or FAT32. The USB storage Connect a USB device connected storage device that the tor or USB cable USB connector or is not connected to the USB port of the following operations. -Turn the ignition switch OFF and back ON. -Disconnect or eject the USB storage device. -Change to is not sup- Built-in the Transfer audio files USB storage de- ERROR...
... protected by DRM Replace disc. Confirm that to a different source. Follow the USB vice with FAT16 or FAT32. The USB storage Connect a USB device connected storage device that the tor or USB cable USB connector or is not connected to the USB port of the following operations. -Turn the ignition switch OFF and back ON. -Disconnect or eject the USB storage device. -Change to is not sup- Built-in the Transfer audio files USB storage de- ERROR...
Owner's Manual
Page 65
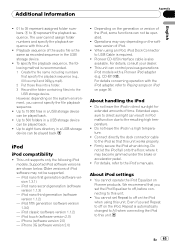
... or version of iPod. ! CD-IB100N). You cannot set the iPod Equalizer to off on the software version of the iPod, some functions can control previous generations iPod models with the iPod adapter, refer to this unit. Operations may vary depending on the iPod when using an iPod, iPod Dock Connector to USB Cable is automatically changed to All when connecting the iPod to Playing songs on iPod on Pioneer products. Older versions of iPod software may become...
... or version of iPod. ! CD-IB100N). You cannot set the iPod Equalizer to off on the software version of the iPod, some functions can control previous generations iPod models with the iPod adapter, refer to this unit. Operations may vary depending on the iPod when using an iPod, iPod Dock Connector to USB Cable is automatically changed to All when connecting the iPod to Playing songs on iPod on Pioneer products. Older versions of iPod software may become...
Owner's Manual
Page 66
... unit. Satellite radio will use direct satellite-to use is required. This product includes technology owned by Microsoft Corporation and cannot be controlled by this unit. An independent license for such use this product only conveys a license for Pioneer (i.e., XM tuner and Sirius satellite tuner which are trademarks of Apple Inc., registered in their cars and at home with crystal-clear sound seamlessly from Microsoft Licensing, Inc. iPod iPhone...
... unit. Satellite radio will use direct satellite-to use is required. This product includes technology owned by Microsoft Corporation and cannot be controlled by this unit. An independent license for such use this product only conveys a license for Pioneer (i.e., XM tuner and Sirius satellite tuner which are trademarks of Apple Inc., registered in their cars and at home with crystal-clear sound seamlessly from Microsoft Licensing, Inc. iPod iPhone...
Installation Manual
Page 2
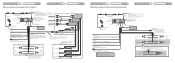
... the constant 12 V supply terminal. Yellow/black If you use an equipment with Mute function, wire this lead to the Audio Mute lead on that equipment. If not, keep the Audio Mute lead free of the power amp or auto-antenna relay control terminal (max. 300 mA 12 V DC). Subwoofer Front speaker Rear speaker Subwoofer Front speaker Rear speaker Connecting the unit English When using a subwoofer without using the optional amplifier. System remote control Blue/white Connect to lighting switch terminal. The subwoofer output of any connections.
... the constant 12 V supply terminal. Yellow/black If you use an equipment with Mute function, wire this lead to the Audio Mute lead on that equipment. If not, keep the Audio Mute lead free of the power amp or auto-antenna relay control terminal (max. 300 mA 12 V DC). Subwoofer Front speaker Rear speaker Subwoofer Front speaker Rear speaker Connecting the unit English When using a subwoofer without using the optional amplifier. System remote control Blue/white Connect to lighting switch terminal. The subwoofer output of any connections.

Installation Manual
Page 6
... Multi-CD (vendido Cable IP-BUS separadamente) A la salida del altavoz de subgraves Conecte los cables RCA (vendidos separadamente) Amarillo Conecte el terminal de suministro de 12 V constante. Negro (masa de la carrocería) Conecte a un punto de metal limpio, libre de pintura. The use factory supplied mounting sleeve. Install this unit away from "Front" (conventional DIN Front-mount) or "Rear" (DIN Rear-mount installation...
... Multi-CD (vendido Cable IP-BUS separadamente) A la salida del altavoz de subgraves Conecte los cables RCA (vendidos separadamente) Amarillo Conecte el terminal de suministro de 12 V constante. Negro (masa de la carrocería) Conecte a un punto de metal limpio, libre de pintura. The use factory supplied mounting sleeve. Install this unit away from "Front" (conventional DIN Front-mount) or "Rear" (DIN Rear-mount installation...


