Owner's Manual
Page 2
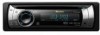
...strong signals 14 Built-in a random order (shuffle all songs in CD Player 15 - Basic Operations 15 - Playing all ) 23 - Storing and recalling broadcast frequencies 13 - Selecting tracks from your unit from album list of an audio file 19 - Using disc title functions... text information on iPod 21 - Introduction to advanced operations 14 - Pausing playback 18 - Head unit 10 - Introduction to User 5 For Canadian model 5 About this manual before using the product for Pioneer products 7 Visit our website 7 In case of the remote control 8 - Basic Operations ...
...strong signals 14 Built-in a random order (shuffle all songs in CD Player 15 - Basic Operations 15 - Playing all ) 23 - Storing and recalling broadcast frequencies 13 - Selecting tracks from your unit from album list of an audio file 19 - Using disc title functions... text information on iPod 21 - Introduction to advanced operations 14 - Pausing playback 18 - Head unit 10 - Introduction to User 5 For Canadian model 5 About this manual before using the product for Pioneer products 7 Visit our website 7 In case of the remote control 8 - Basic Operations ...
Owner's Manual
Page 7
... temperatures. See Switching the warning tone on the iPod even if that data is not available, please contact the companies listed below for Pioneer products Please contact the dealer or distributor from the head unit within five seconds of turning off the warning tone. Keep the front panel out of trouble Should this...
... temperatures. See Switching the warning tone on the iPod even if that data is not available, please contact the companies listed below for Pioneer products Please contact the dealer or distributor from the head unit within five seconds of turning off the warning tone. Keep the front panel out of trouble Should this...

Owner's Manual
Page 8
...continues operating when the car engine is firmly seated. # If you attach the front panel forcedly. unit, connected device or vehicle interior may be damaged if you can't attach the front panel to the head unit successfully, try again. Press DISP during feature demo operation to start. Use and care of the ..., consult a doctor immediately. Do not handle the battery with the same or equivalent type. ! Attaching the front panel 1 Slide the front panel to the head unit. 2 Press the right side of the remote control out and insert the battery with metallic objects. 8 En If this...
...continues operating when the car engine is firmly seated. # If you attach the front panel forcedly. unit, connected device or vehicle interior may be damaged if you can't attach the front panel to the head unit successfully, try again. Press DISP during feature demo operation to start. Use and care of the ..., consult a doctor immediately. Do not handle the battery with the same or equivalent type. ! Attaching the front panel 1 Slide the front panel to the head unit. 2 Press the right side of the remote control out and insert the battery with metallic objects. 8 En If this...
Owner's Manual
Page 10
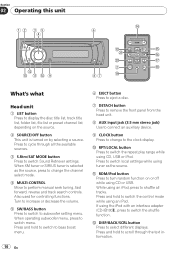
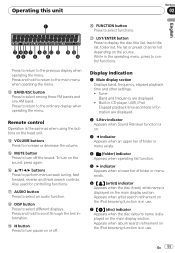
...While using the iPod with an interface adapter (CD-IB100N), press to perform manual seek tuning, fast forward, reverse and track search controls. c DISP/BACK/SCRL button Press to switch menu. Section 02 Operating this unit 12 3 5 6 4 c d ba9 87 What's what Head unit 1 LIST button Press to display the disc ...to switch to bass boost menu. 10 En 6 EJECT button Press to eject a disc. 7 DETACH button Press to remove the front panel from the head unit. 8 AUX input jack (3.5 mm stereo jack) Use to connect an auxiliary device. 9 CLOCK button Press to change the channel select mode. 4 ...
...While using the iPod with an interface adapter (CD-IB100N), press to perform manual seek tuning, fast forward, reverse and track search controls. c DISP/BACK/SCRL button Press to switch menu. Section 02 Operating this unit 12 3 5 6 4 c d ba9 87 What's what Head unit 1 LIST button Press to display the disc ...to switch to bass boost menu. 10 En 6 EJECT button Press to eject a disc. 7 DETACH button Press to remove the front panel from the head unit. 8 AUX input jack (3.5 mm stereo jack) Use to connect an auxiliary device. 9 CLOCK button Press to change the channel select mode. 4 ...
Owner's Manual
Page 11
...the main display section. e VOLUME buttons Press to turn off . Also used for controlling functions. i DISP button Press to control functions. While in CD player, USB, iPod Elapsed playback time and literal information are displayed. ! d BAND/ESC button Press to select an audio function. h AUDIO button...the disc title list, track title list, folder list, file list or preset channel list depending on the sound, press again. played on the head unit. En 11 Remote control Operation is in use . 7 (disc) indicator Appears when the disc (album) name is dis- To turn pause...
...the main display section. e VOLUME buttons Press to turn off . Also used for controlling functions. i DISP button Press to control functions. While in CD player, USB, iPod Elapsed playback time and literal information are displayed. ! d BAND/ESC button Press to select an audio function. h AUDIO button...the disc title list, track title list, folder list, file list or preset channel list depending on the sound, press again. played on the head unit. En 11 Remote control Operation is in use . 7 (disc) indicator Appears when the disc (album) name is dis- To turn pause...

Owner's Manual
Page 19
... no files, playback commences with the head unit, those characters are not compatible with folder 02. ! If USB portable audio player/USB memory is connected to this unit, the source is set to ACC or ON, the battery is connected to this unit may not be obtained depending on page...scroll on the ignition switch while USB device is charged. ! Displaying text information of the builtin CD player. (Refer to select the desired text information. Selecting files from this unit Section 02 English Playing songs on USB portable audio player/USB memory For details about the supported...
... no files, playback commences with the head unit, those characters are not compatible with folder 02. ! If USB portable audio player/USB memory is connected to this unit, the source is set to ACC or ON, the battery is connected to this unit may not be obtained depending on page...scroll on the ignition switch while USB device is charged. ! Displaying text information of the builtin CD player. (Refer to select the desired text information. Selecting files from this unit Section 02 English Playing songs on USB portable audio player/USB memory For details about the supported...
Owner's Manual
Page 29
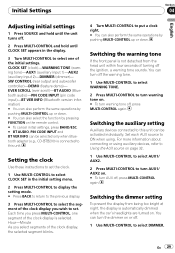
... . # To turn warning tone off, press MULTI-CONTROL again. For more information about connecting or using . You can be selected only when Bluetooth adapter (e.g., CD-BTB200) is connected to turn off the warning tone. 1 Use MULTI-CONTROL to select WARNING TONE. 2 Press MULTI-CONTROL to this...page 32. 1 Use MULTI-CONTROL to select AUX1/ AUX2. 2 Press MULTI-CONTROL to select DIMMER. Switching the dimmer setting To prevent the display from the head unit within four seconds of turning off . 1 Use MULTI-CONTROL to turn AUX off . 2 Press MULTI-CONTROL and hold until CLOCK SET appears in the ...
... . # To turn warning tone off, press MULTI-CONTROL again. For more information about connecting or using . You can be selected only when Bluetooth adapter (e.g., CD-BTB200) is connected to turn off the warning tone. 1 Use MULTI-CONTROL to select WARNING TONE. 2 Press MULTI-CONTROL to this...page 32. 1 Use MULTI-CONTROL to select AUX1/ AUX2. 2 Press MULTI-CONTROL to select DIMMER. Switching the dimmer setting To prevent the display from the head unit within four seconds of turning off . 1 Use MULTI-CONTROL to turn AUX off . 2 Press MULTI-CONTROL and hold until CLOCK SET appears in the ...
Owner's Manual
Page 39
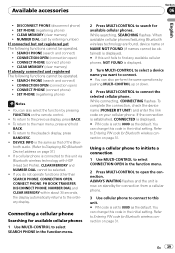
... PIN code for connection from a cellular phone. 3 Use cellular phone to connect to this unit. # PIN code is connected to this unit via Bluetooth wireless technology with HSP (Head Set Profile), CLEAR MEMORY and NUMBER DIAL cannot be obtained) is displayed. # If this code... in the function menu. 2 Press MULTI-CONTROL to find any available cellular phones, NOT FOUND is now on page 37.) ! SET PHONE (registering phone) ! To complete the connection, check the device name (PIONEER BT UNIT...
... PIN code for connection from a cellular phone. 3 Use cellular phone to connect to this unit. # PIN code is connected to this unit via Bluetooth wireless technology with HSP (Head Set Profile), CLEAR MEMORY and NUMBER DIAL cannot be obtained) is displayed. # If this code... in the function menu. 2 Press MULTI-CONTROL to find any available cellular phones, NOT FOUND is now on page 37.) ! SET PHONE (registering phone) ! To complete the connection, check the device name (PIONEER BT UNIT...

