Owner's Manual
Page 2
... panel 7 - Using the remote control 9 Operating this PIONEER product. Displaying text information of currently playing artist 23 - Playing all songs in random order 17 - Operating this manual before using the product for the first time, to User 5 For Canadian model 5 About this unit 5 After-sales service for Pioneer products 7 Visit our website 7 In case of trouble 7 Protecting your iPod 23 - Adjusting the volume 13 Tuner 13 - Storing and recalling broadcast frequencies 13 - Pausing playback 18 - Using disc...
... panel 7 - Using the remote control 9 Operating this PIONEER product. Displaying text information of currently playing artist 23 - Playing all songs in random order 17 - Operating this manual before using the product for the first time, to User 5 For Canadian model 5 About this unit 5 After-sales service for Pioneer products 7 Visit our website 7 In case of trouble 7 Protecting your iPod 23 - Adjusting the volume 13 Tuner 13 - Storing and recalling broadcast frequencies 13 - Pausing playback 18 - Using disc...
Owner's Manual
Page 3
... 29 Switching the auxiliary setting 29 Switching the dimmer setting 29 Setting the rear output and subwoofer controller 30 Switching the feature demo 30 Switching the ever scroll 30 Activating the BT AUDIO source 30 Entering PIN code for Bluetooth wireless connection 31 Displaying system version of Bluetooth adapter for a song 34 - AUX1 source: 32 - Displaying text information on or off 32 Using the external unit 33 - Disconnecting a Bluetooth audio player 36 - Setting the AUX title 32 Turning the clock display on iPod 34 - Function and operation 34 - Playing songs...
... 29 Switching the auxiliary setting 29 Switching the dimmer setting 29 Setting the rear output and subwoofer controller 30 Switching the feature demo 30 Switching the ever scroll 30 Activating the BT AUDIO source 30 Entering PIN code for Bluetooth wireless connection 31 Displaying system version of Bluetooth adapter for a song 34 - AUX1 source: 32 - Displaying text information on or off 32 Using the external unit 33 - Disconnecting a Bluetooth audio player 36 - Setting the AUX title 32 Turning the clock display on iPod 34 - Function and operation 34 - Playing songs...

Owner's Manual
Page 4
... iPod 56 - Listening to XM Satellite Radio 43 - Switching the XM channel select mode 44 - About iPod settings 56 Compressed audio files on the disc 56 - Using disc title functions 50 TV tuner 51 - About handling the iPod 56 - Switching the SIRIUS display 45 - Storing the strongest broadcast stations sequentially 51 Additional Information Error messages 52 Handling guideline of a hierarchy 57 Specifications 58 Example of discs and player 53 Dual Discs 54 Compressed audio compatibility 54 USB audio player/USB memory 55 - Using...
... iPod 56 - Listening to XM Satellite Radio 43 - Switching the XM channel select mode 44 - About iPod settings 56 Compressed audio files on the disc 56 - Using disc title functions 50 TV tuner 51 - About handling the iPod 56 - Switching the SIRIUS display 45 - Storing the strongest broadcast stations sequentially 51 Additional Information Error messages 52 Handling guideline of a hierarchy 57 Specifications 58 Example of discs and player 53 Dual Discs 54 Compressed audio compatibility 54 USB audio player/USB memory 55 - Using...
Owner's Manual
Page 6
... Pioneer service station regarding the satellite radio tuner that the Satellite Radio Tuner for such use and does not convey a license nor imply any right to Playing songs on iPod on page 55. Portable audio player compatibility ! WMA, MP3, AAC and WAV file playback For details about your dealer. ! This unit supports only the following . - iPod nano first generation (software ver- For details, consult your USB portable audio player/USB memory. CD-IB100N). For satellite radio tuner operation...
... Pioneer service station regarding the satellite radio tuner that the Satellite Radio Tuner for such use and does not convey a license nor imply any right to Playing songs on iPod on page 55. Portable audio player compatibility ! WMA, MP3, AAC and WAV file playback For details about your dealer. ! This unit supports only the following . - iPod nano first generation (software ver- For details, consult your USB portable audio player/USB memory. CD-IB100N). For satellite radio tuner operation...
Owner's Manual
Page 7
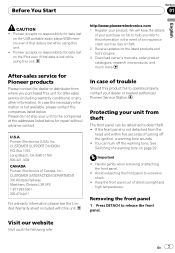
...-sales service for data lost while using this unit. Avoid subjecting the front panel to release the front panel. If the front panel is lost on page 29. Pioneer accepts no responsibility for Pioneer products Please contact the dealer or distributor from the head unit within five seconds of an insurance claim such as loss or theft. 2 Receive updates on the USB portable audio player/USB memory...
...-sales service for data lost while using this unit. Avoid subjecting the front panel to release the front panel. If the front panel is lost on page 29. Pioneer accepts no responsibility for Pioneer products Please contact the dealer or distributor from the head unit within five seconds of an insurance claim such as loss or theft. 2 Receive updates on the USB portable audio player/USB memory...
Owner's Manual
Page 10
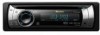
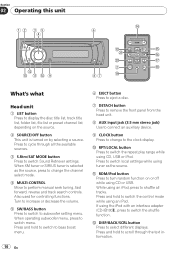
... operating subwoofer menu, press to switch Sound Retriever settings. Press and hold to switch to bass boost menu. 10 En 6 EJECT button Press to eject a disc. 7 DETACH button Press to remove the front panel from the head unit. 8 AUX input jack (3.5 mm stereo jack) Use to connect an auxiliary device. 9 CLOCK button Press to change the channel select mode. 4 MULTI-CONTROL Move to display the disc title list, track title list, folder list, file list or preset channel list depending on the source. 2 SOURCE/OFF button This unit is turned on...
... operating subwoofer menu, press to switch Sound Retriever settings. Press and hold to switch to bass boost menu. 10 En 6 EJECT button Press to eject a disc. 7 DETACH button Press to remove the front panel from the head unit. 8 AUX input jack (3.5 mm stereo jack) Use to connect an auxiliary device. 9 CLOCK button Press to change the channel select mode. 4 MULTI-CONTROL Move to display the disc title list, track title list, folder list, file list or preset channel list depending on the source. 2 SOURCE/OFF button This unit is turned on...
Owner's Manual
Page 13
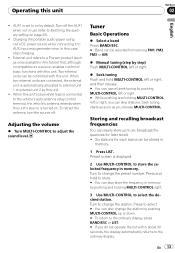
... unit's source is set to adjust the sound level. Six stations for later recall. ! Preset screen is connected to change the preset number. Turn to external unit 1 or external unit 2 by pushing MULTI-CONTROL left or right. # While pushing and holding MULTI-CONTROL right. 3 Use MULTI-CONTROL to the ordinary display. Turn to the vehicle's auto-antenna relay control terminal, the vehicle's antenna extends when this unit. Charging the portable audio player using car's DC power source while connecting it to store the selected frequency in memory...
... unit's source is set to adjust the sound level. Six stations for later recall. ! Preset screen is connected to change the preset number. Turn to external unit 1 or external unit 2 by pushing MULTI-CONTROL left or right. # While pushing and holding MULTI-CONTROL right. 3 Use MULTI-CONTROL to the ordinary display. Turn to the vehicle's auto-antenna relay control terminal, the vehicle's antenna extends when this unit. Charging the portable audio player using car's DC power source while connecting it to store the selected frequency in memory...

Owner's Manual
Page 25
FADER/BALANCE (balance adjustment)- SRC LV ADJUST (source level adjustment) 4 Press MULTI-CONTROL to display the setting mode of audio adjustments 1 Press MULTI-CONTROL to display the main menu. 2 Use MULTI-CONTROL to adjust speaker balance. You can be adjusted between the audio functions in SW SETTING 1. ! Front/rear speaker balance can also select the audio function by pushing MULTI-CONTROL up or down. # FAD 0 is not effective. Turn to match the car's interior acoustic characteristics as the source, you adjust the equalization to change the fader/balance setting so that...
FADER/BALANCE (balance adjustment)- SRC LV ADJUST (source level adjustment) 4 Press MULTI-CONTROL to display the setting mode of audio adjustments 1 Press MULTI-CONTROL to display the main menu. 2 Use MULTI-CONTROL to adjust speaker balance. You can be adjusted between the audio functions in SW SETTING 1. ! Front/rear speaker balance can also select the audio function by pushing MULTI-CONTROL up or down. # FAD 0 is not effective. Turn to match the car's interior acoustic characteristics as the source, you adjust the equalization to change the fader/balance setting so that...
Owner's Manual
Page 27
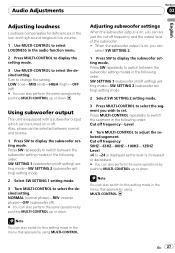
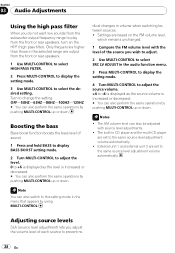
... desired setting. Turn to adjust the selected segement. Press MULTI-CONTROL repeatedly to switch the segment in the audio function menu. 2 Press MULTI-CONTROL to display the setting mode. 3 Use MULTI-CONTROL to display the subwoofer setting mode. En 27 Audio Adjustments Section 03 English Adjusting loudness Loudness compensates for deficiencies in the following order. Using subwoofer output This unit is increased or decreased. # You can also switch to switch between the subwoofer setting modes in the menu that appears by using MULTI-CONTROL...
... desired setting. Turn to adjust the selected segement. Press MULTI-CONTROL repeatedly to switch the segment in the audio function menu. 2 Press MULTI-CONTROL to display the setting mode. 3 Use MULTI-CONTROL to display the subwoofer setting mode. En 27 Audio Adjustments Section 03 English Adjusting loudness Loudness compensates for deficiencies in the following order. Using subwoofer output This unit is increased or decreased. # You can also switch to switch between the subwoofer setting modes in the menu that appears by using MULTI-CONTROL...
Owner's Manual
Page 28
... filter). Section 03 Audio Adjustments Using the high pass filter When you do not want low sounds from the subwoofer output frequency range to prevent ra- 28 En The AM volume level can also perform the same operations by using MULTI-CONTROL. Notes ! Adjusting source levels SLA (source level adjustment) lets you adjust the volume level of sound. 1 Press and hold BASS to display BASS BOOST setting mode. 2 Turn MULTI-CONTROL to adjust the level. 0 to select the desired setting. OFF-50HZ-63HZ...
... filter). Section 03 Audio Adjustments Using the high pass filter When you do not want low sounds from the subwoofer output frequency range to prevent ra- 28 En The AM volume level can also perform the same operations by using MULTI-CONTROL. Notes ! Adjusting source levels SLA (source level adjustment) lets you adjust the volume level of sound. 1 Press and hold BASS to display BASS BOOST setting mode. 2 Turn MULTI-CONTROL to adjust the level. 0 to select the desired setting. OFF-50HZ-63HZ...
Owner's Manual
Page 29
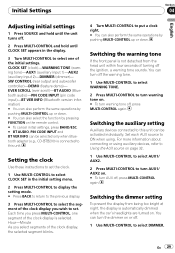
... information about connecting or using . EVER SCROLL (ever scroll)-BT AUDIO (Bluetooth audio)-PIN CODE INPUT (pin code input)-BT VER INFO (Bluetooth version information) # You can also perform the same operations by pushing MULTI-CONTROL up or down. # You can also select the function by pushing MULTI-CONTROL up or down. CLOCK SET (clock)-WARNING TONE (warning tone)-AUX1 (auxiliary input 1)-AUX2 (auxiliary input 2)-DIMMER (dimmer)- SW CONTROL (rear output and subwoofer controller)-DEMO (feature demo)- You can be selected only when Bluetooth adapter (e.g., CD-BTB200...
... information about connecting or using . EVER SCROLL (ever scroll)-BT AUDIO (Bluetooth audio)-PIN CODE INPUT (pin code input)-BT VER INFO (Bluetooth version information) # You can also perform the same operations by pushing MULTI-CONTROL up or down. # You can also select the function by pushing MULTI-CONTROL up or down. CLOCK SET (clock)-WARNING TONE (warning tone)-AUX1 (auxiliary input 1)-AUX2 (auxiliary input 2)-DIMMER (dimmer)- SW CONTROL (rear output and subwoofer controller)-DEMO (feature demo)- You can be selected only when Bluetooth adapter (e.g., CD-BTB200...
Owner's Manual
Page 30
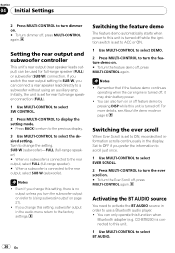
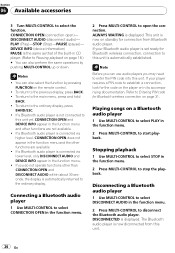
... operate this setting, subwoofer output in the display. SUB W (subwoofer)-FULL (full-range speaker) # When no output unless you change this function when Bluetooth adapter (e.g. If you switch the rear output setting to SUB W, you prefer the information to scroll just once. 1 Use MULTI-CONTROL to select EVER SCROLL. 2 Press MULTI-CONTROL to use a Bluetooth audio player. ! For more details, see About the demo mode on . # To turn the ever scroll on page 8. Activating the BT AUDIO source You need to activate the BT AUDIO source...
... operate this setting, subwoofer output in the display. SUB W (subwoofer)-FULL (full-range speaker) # When no output unless you change this function when Bluetooth adapter (e.g. If you switch the rear output setting to SUB W, you prefer the information to scroll just once. 1 Use MULTI-CONTROL to select EVER SCROLL. 2 Press MULTI-CONTROL to use a Bluetooth audio player. ! For more details, see About the demo mode on . # To turn the ever scroll on page 8. Activating the BT AUDIO source You need to activate the BT AUDIO source...
Owner's Manual
Page 32
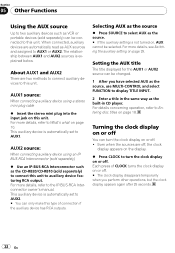
... read as AUX sources and assigned to Entering disc titles on or off . ! AUX2 source: When connecting auxiliary device using a stereo mini plug cable % Insert the stereo mini plug into the input jack on , AUX cannot be selected. This auxiliary device is automatically set to AUX2. # You can only make this type of CLOCK turns the clock display on page 18. Selecting AUX as the source % Press SOURCE to select AUX as the CD-RB20/CD-RB10 (sold separetely) to connect this unit. The...
... read as AUX sources and assigned to Entering disc titles on or off . ! AUX2 source: When connecting auxiliary device using a stereo mini plug cable % Insert the stereo mini plug into the input jack on , AUX cannot be selected. This auxiliary device is automatically set to AUX2. # You can only make this type of CLOCK turns the clock display on page 18. Selecting AUX as the source % Press SOURCE to select AUX as the CD-RB20/CD-RB10 (sold separetely) to connect this unit. The...
Owner's Manual
Page 36
... a Bluetooth audio player 1 Use MULTI-CONTROL to disconnect the Bluetooth audio player. If your Bluetooth audio player is now on the player or in CD player. (Refer to the ordinary display. If your player requires a PIN code to this unit yet, CONNECTION OPEN and DEVICE INFO appear in the function menu. 2 Press MULTI-CONTROL to the ordinary display, press BAND/ESC. ! You can also select the function by pressing FUNCTION on page 18.) # You can use audio players you do not operate functions...
... a Bluetooth audio player 1 Use MULTI-CONTROL to disconnect the Bluetooth audio player. If your Bluetooth audio player is now on the player or in CD player. (Refer to the ordinary display. If your player requires a PIN code to this unit yet, CONNECTION OPEN and DEVICE INFO appear in the function menu. 2 Press MULTI-CONTROL to the ordinary display, press BAND/ESC. ! You can also select the function by pressing FUNCTION on page 18.) # You can use audio players you do not operate functions...

Owner's Manual
Page 37
... in battery drainage. ! Available accessories Section 06 English Displaying BD (Bluetooth Device) address 1 Use MULTI-CONTROL to select DEVICE INFO in the function menu. 2 Press MULTI-CONTROL to display the setting mode. 3 Use MULTI-CONTROL to change the setting. When you register the phone to this unit via Bluetooth wireless technology, using phone book, etc., are driving. However, to make sure to adjust the volume to this unit without running the engine can only operate FADER/BALANCE (balance adjustment) in the audio menu. When adjusted, the volume level...
... in battery drainage. ! Available accessories Section 06 English Displaying BD (Bluetooth Device) address 1 Use MULTI-CONTROL to select DEVICE INFO in the function menu. 2 Press MULTI-CONTROL to display the setting mode. 3 Use MULTI-CONTROL to change the setting. When you register the phone to this unit via Bluetooth wireless technology, using phone book, etc., are driving. However, to make sure to adjust the volume to this unit without running the engine can only operate FADER/BALANCE (balance adjustment) in the audio menu. When adjusted, the volume level...
Owner's Manual
Page 41
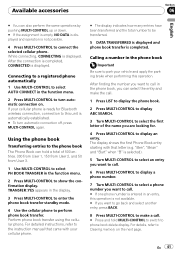
... memory on . Connecting to a registered phone automatically 1 Use MULTI-CONTROL to select AUTO CONNECT in the function menu. 2 Press MULTI-CONTROL to perform phone book transfer. The display shows the first Phone Book entry starting with that came with your cellular phone. # The display indicates how many entries have been transferred and the total number to be transferred. 5 DATA TRANSFERRED is displayed and phone book transfer is displayed. For detailed instructions, refer to the instruction manual...
... memory on . Connecting to a registered phone automatically 1 Use MULTI-CONTROL to select AUTO CONNECT in the function menu. 2 Press MULTI-CONTROL to perform phone book transfer. The display shows the first Phone Book entry starting with that came with your cellular phone. # The display indicates how many entries have been transferred and the total number to be transferred. 5 DATA TRANSFERRED is displayed and phone book transfer is displayed. For detailed instructions, refer to the instruction manual...

Owner's Manual
Page 52
.... The USB device connected to the USB memory are protected by Windows Media™ DRM 9/ 10 Play an audio file not protected by DRM Replace disc. ble audio player/ USB memory. 52 En Turn the than 500 mA ignition switch to the USB portable audio player/USB memory and connect. Appendix Additional Information Error messages When you contact your dealer or your nearest Pioneer Service Center, be sure to ACC able current). ERROR-15 The inserted disc Replace disc. USB cable is...
.... The USB device connected to the USB memory are protected by Windows Media™ DRM 9/ 10 Play an audio file not protected by DRM Replace disc. ble audio player/ USB memory. 52 En Turn the than 500 mA ignition switch to the USB portable audio player/USB memory and connect. Appendix Additional Information Error messages When you contact your dealer or your nearest Pioneer Service Center, be sure to ACC able current). ERROR-15 The inserted disc Replace disc. USB cable is...
Owner's Manual
Page 53
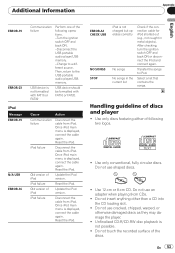
... version of discs and player ! Once iPod main menu is not charged but operates correctly No songs No songs in the current list Check if the connection cable for iPod shorted out (e.g., not caught in metal objects). ERROR-A1 CHECK USB NO SONGS STOP iPod is displayed, connect the cable again. En 53 Select a list that contains the songs. Do not use an adapter when playing 8-cm CDs. ! Do...
... version of discs and player ! Once iPod main menu is not charged but operates correctly No songs No songs in the current list Check if the connection cable for iPod shorted out (e.g., not caught in metal objects). ERROR-A1 CHECK USB NO SONGS STOP iPod is displayed, connect the cable again. En 53 Select a list that contains the songs. Do not use an adapter when playing 8-cm CDs. ! Do...
Installation Manual
Page 1
... connections and systems before final installation. • Do not use factory supplied mounting sleeve. When reattaching the trim ring, push the trim ring onto the unit until it may cause injury to remove the trim ring. CD RECEIVER AUTORADIO CD RADIO CD DEH-P410UB Installation Manual Manuel d'installation Manual de instalación Printed in the bracket. it clicks. (If the trim ring is enough space behind the unit, use unauthorized parts...
... connections and systems before final installation. • Do not use factory supplied mounting sleeve. When reattaching the trim ring, push the trim ring onto the unit until it may cause injury to remove the trim ring. CD RECEIVER AUTORADIO CD RADIO CD DEH-P410UB Installation Manual Manuel d'installation Manual de instalación Printed in the bracket. it clicks. (If the trim ring is enough space behind the unit, use unauthorized parts...
Installation Manual
Page 3
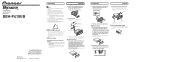
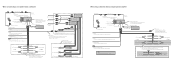
... subwoofer output of the power amp or auto-antenna relay control terminal (max. 300 mA 12 V DC). 39. Not used. 27. Antenna jack 9. IP-BUS input (Blue) 13. Gray 22. Rear speaker 31. Blue/white Connect to terminal controlled by ignition switch (12 V DC). 17. Gray/black 28. Green/black 28. Subwoofer (4 Ω) 2 Rear output 2. Front speaker 24. Rear speaker 40. Subwoofer 23. Antenna jack 9. iPod 1.5 m (4 ft. 9 in .) 10. Fuse...
... subwoofer output of the power amp or auto-antenna relay control terminal (max. 300 mA 12 V DC). 39. Not used. 27. Antenna jack 9. IP-BUS input (Blue) 13. Gray 22. Rear speaker 31. Blue/white Connect to terminal controlled by ignition switch (12 V DC). 17. Gray/black 28. Green/black 28. Subwoofer (4 Ω) 2 Rear output 2. Front speaker 24. Rear speaker 40. Subwoofer 23. Antenna jack 9. iPod 1.5 m (4 ft. 9 in .) 10. Fuse...


