
Owner's Manual
Page 3
... a connected cellular phone 38 - Using the Phone Book 39 - Contents English - AUX1 source: 30 - Setting the AUX title 30 Turning the clock display on iPod 32 - Browsing for hands-free phoning 35 - Playing songs on iPod 32 - Introduction of Bluetooth adapter for Bluetooth wireless connection 29... Using the high pass filter 26 Boosting the bass 26 Adjusting source levels 26 Initial Settings Adjusting initial settings 27 Setting the clock 27 Switching the warning tone 27 Switching the auxiliary setting 27 Switching the dimmer setting 27 Setting the rear output and subwoofer...
... a connected cellular phone 38 - Using the Phone Book 39 - Contents English - AUX1 source: 30 - Setting the AUX title 30 Turning the clock display on iPod 32 - Browsing for hands-free phoning 35 - Playing songs on iPod 32 - Introduction of Bluetooth adapter for Bluetooth wireless connection 29... Using the high pass filter 26 Boosting the bass 26 Adjusting source levels 26 Initial Settings Adjusting initial settings 27 Setting the clock 27 Switching the warning tone 27 Switching the auxiliary setting 27 Switching the dimmer setting 27 Setting the rear output and subwoofer...
Owner's Manual
Page 9
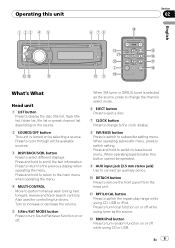
...range while using tuner as the source, press to change the channel select mode. 6 EJECT button Press to eject a disc. 7 CLOCK button Press to change to the clock display. 8 SW/BASS button Press to switch to select different displays. b RPT/LOCAL button Press to remove the front panel from the... sources. 3 DISP/BACK/SCRL button Press to subwoofer setting menu. When operating subwoofer menu, press to turn random function on or off while using CD, USB or iPod. Press to switch setting. c RDM/iPod button Press to display the disc title list, track title list, folder list, file...
...range while using tuner as the source, press to change the channel select mode. 6 EJECT button Press to eject a disc. 7 CLOCK button Press to change to the clock display. 8 SW/BASS button Press to switch to select different displays. b RPT/LOCAL button Press to remove the front panel from the... sources. 3 DISP/BACK/SCRL button Press to subwoofer setting menu. When operating subwoofer menu, press to turn random function on or off while using CD, USB or iPod. Press to switch setting. c RDM/iPod button Press to display the disc title list, track title list, folder list, file...
Owner's Manual
Page 27
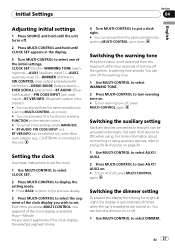
... or off , press MULTI-CONTROL again. Switching the auxiliary setting Auxiliary devices connected to this unit. You can be selected only when Bluetooth adapter (e.g., CD-BTB200) is connected to this unit can turn warning tone off . 1 Use MULTI-CONTROL to turn warning tone on. # To turn the dimmer ...off the warning tone. 1 Use MULTI-CONTROL to select WARNING TONE. 2 Press MULTI-CONTROL to select DIMMER. Hour-Minute As you wish to put a clock right. # You can also perform the same operations by pushing MULTI-CONTROL up or down . # You can also select the function by pushing MULTI-...
... or off , press MULTI-CONTROL again. Switching the auxiliary setting Auxiliary devices connected to this unit. You can be selected only when Bluetooth adapter (e.g., CD-BTB200) is connected to this unit can turn warning tone off . 1 Use MULTI-CONTROL to turn warning tone on. # To turn the dimmer ...off the warning tone. 1 Use MULTI-CONTROL to select WARNING TONE. 2 Press MULTI-CONTROL to select DIMMER. Hour-Minute As you wish to put a clock right. # You can also perform the same operations by pushing MULTI-CONTROL up or down . # You can also select the function by pushing MULTI-...
Owner's Manual
Page 30
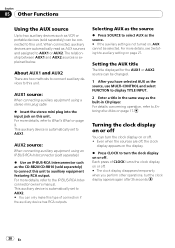
... assigned to this unit. For more details, refer to this unit. Each press of connection if the auxiliary device has RCA outputs. Turning the clock display on or off You can only make this unit. Section 05 Other Functions Using the AUX source Up to two auxiliary devices such as... this unit to display TITLE INPUT. 2 Enter a title in the same way as the built-in CD player. Selecting AUX as the source. # If the auxiliary setting is automatically set to turn the clock display on page 27. For more details, see Switching the auxiliary setting on or off . This auxiliary...
... assigned to this unit. For more details, refer to this unit. Each press of connection if the auxiliary device has RCA outputs. Turning the clock display on or off You can only make this unit. Section 05 Other Functions Using the AUX source Up to two auxiliary devices such as... this unit to display TITLE INPUT. 2 Enter a title in the same way as the built-in CD player. Selecting AUX as the source. # If the auxiliary setting is automatically set to turn the clock display on page 27. For more details, see Switching the auxiliary setting on or off . This auxiliary...


