Owner's Manual
Page 2
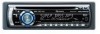
...control 7 - Displaying text information on 10 Selecting a source 10 Turning the unit off 10 Tuner Listening to the radio 11 Introduction of advanced tuner operation 11 Storing and recalling broadcast frequencies 11 Storing the strongest broadcast frequencies 12 Tuning in... battery 7 - Please read through these operating instructions so you have finished reading the instructions, keep this Pioneer product. Before You Start Information to operate your unit from theft 6 - Entering disc titles 15 - Displaying disc titles 15 Using CD TEXT functions 16 - When playing back a WMA...
...control 7 - Displaying text information on 10 Selecting a source 10 Turning the unit off 10 Tuner Listening to the radio 11 Introduction of advanced tuner operation 11 Storing and recalling broadcast frequencies 11 Storing the strongest broadcast frequencies 12 Tuning in... battery 7 - Please read through these operating instructions so you have finished reading the instructions, keep this Pioneer product. Before You Start Information to operate your unit from theft 6 - Entering disc titles 15 - Displaying disc titles 15 Using CD TEXT functions 16 - When playing back a WMA...
Owner's Manual
Page 34
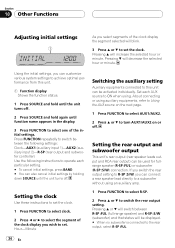
... Press a or b to select the segment of the clock display you select segments of the initial settings. Setting the clock Use these instructions to switch the rear output setting. Pressing b will be displayed. # When no subwoofer is connected to select one of the clock display...or b will switch between the following settings: Clock-AUX1 (auxiliary input 1)-AUX2 (auxiliary input 2)-R-SP (rear output and subwoofer controller) Use the following instructions to operate each AUX source to ON when using. About connecting or using an auxiliary amp. 1 Press FUNCTION to select R-SP. 2 Press a ...
... Press a or b to select the segment of the clock display you select segments of the initial settings. Setting the clock Use these instructions to switch the rear output setting. Pressing b will be displayed. # When no subwoofer is connected to select one of the clock display...or b will switch between the following settings: Clock-AUX1 (auxiliary input 1)-AUX2 (auxiliary input 2)-R-SP (rear output and subwoofer controller) Use the following instructions to operate each AUX source to ON when using. About connecting or using an auxiliary amp. 1 Press FUNCTION to select R-SP. 2 Press a ...


