Owner's Manual
Page 2
Displaying disc titles 15 Using CD TEXT functions 16 - Removing the front panel 6 - Using the remote control 7 What's What Head unit 8 Remote control 9 Power ON/OFF Turning the unit on WMA/MP3/ AAC/WAV disc 20 - Please read through these operating instructions so you have finished reading the instructions, keep this manual in a safe place for Pioneer products 4 Visit our website 5 About WMA 5 About MP3 5 About AAC 5 About the SAT RADIO READY mark 6 iPod® compatibility 6 Protecting your...
Displaying disc titles 15 Using CD TEXT functions 16 - Removing the front panel 6 - Using the remote control 7 What's What Head unit 8 Remote control 9 Power ON/OFF Turning the unit on WMA/MP3/ AAC/WAV disc 20 - Please read through these operating instructions so you have finished reading the instructions, keep this manual in a safe place for Pioneer products 4 Visit our website 5 About WMA 5 About MP3 5 About AAC 5 About the SAT RADIO READY mark 6 iPod® compatibility 6 Protecting your...
Owner's Manual
Page 3
... advanced iPod adapter operation 28 Repeating play 28 Playing songs in CD player error messages 39 Handling guideline of the selected team starts 38 - Displaying text information on CD TEXT discs 25 Using compression and bass emphasis 25 Playing songs on iPod Listening to songs on or off 35 Using the AUX source 35 - Switching the SIRIUS channel select setting 37 - Switching the SIRIUS display 38 - Adjusting equalizer curves 30 - Switching the XM display 36 - About AUX connection method 35 - Example of SIRIUS operation 37 - Switching...
... advanced iPod adapter operation 28 Repeating play 28 Playing songs in CD player error messages 39 Handling guideline of the selected team starts 38 - Displaying text information on CD TEXT discs 25 Using compression and bass emphasis 25 Playing songs on iPod Listening to songs on or off 35 Using the AUX source 35 - Switching the SIRIUS channel select setting 37 - Switching the SIRIUS display 38 - Adjusting equalizer curves 30 - Switching the XM display 36 - About AUX connection method 35 - Example of SIRIUS operation 37 - Switching...

Owner's Manual
Page 4
... is located on the enclosed warranty card. Section 01 Before You Start Information to User Alteration or modifications carried out without advance contact. 4 En For Canadian model This Class B digital apparatus complies with liquids. About this unit The tuner frequencies on proposition 65 known to the State of this unit for use in North America. CAUTION: USE OF CONTROL OR ADJUSTMENT...
... is located on the enclosed warranty card. Section 01 Before You Start Information to User Alteration or modifications carried out without advance contact. 4 En For Canadian model This Class B digital apparatus complies with liquids. About this unit The tuner frequencies on proposition 65 known to the State of this unit for use in North America. CAUTION: USE OF CONTROL OR ADJUSTMENT...

Owner's Manual
Page 5
... Corporation in any right to an audio compression technology standard used to an audio compression technology that this unit. Before You Start Section 01 English U.S.A. About MP3 Supply of this product only conveys a license for such use this information in other countries. En 5 Pioneer Electronics (USA) Inc. revenuegenerating) real time broadcasting (terrestrial, satellite, cable and/or any other media...
... Corporation in any right to an audio compression technology standard used to an audio compression technology that this unit. Before You Start Section 01 English U.S.A. About MP3 Supply of this product only conveys a license for such use this information in other countries. En 5 Pioneer Electronics (USA) Inc. revenuegenerating) real time broadcasting (terrestrial, satellite, cable and/or any other media...

Owner's Manual
Page 6
... that the Satellite Radio Tuner for Pioneer (i.e., XM tuner and Sirius satellite tuner which is a trademark of digital-quality music, news, sports, talk and children's programming. ! Protecting your dealer or nearest authorized Pioneer service station regarding the satellite radio tuner that the front panel has been jointed to excessive shocks. ! Attaching the front panel 1 Slide the front panel to this unit. and other countries. Notes ! iPod® compatibility iPod is a trademark of direct sunlight and...
... that the Satellite Radio Tuner for Pioneer (i.e., XM tuner and Sirius satellite tuner which is a trademark of digital-quality music, news, sports, talk and children's programming. ! Protecting your dealer or nearest authorized Pioneer service station regarding the satellite radio tuner that the front panel has been jointed to excessive shocks. ! Attaching the front panel 1 Slide the front panel to this unit. and other countries. Notes ! iPod® compatibility iPod is a trademark of direct sunlight and...
Owner's Manual
Page 8
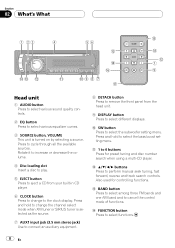
... AUDIO button Press to select various sound quality controls. 2 EQ button Press to select the subwoofer setting menu. b 1 to the clock display. Press and hold to change to 6 buttons Press for controlling functions. a SW button Press to select various equalizer curves. 3 SOURCE button, VOLUME This unit is selected as the source. 7 AUX1 input jack (3.5 mm stereo jack) Use to connect an auxiliary equipment. 8 DETACH button Press to remove the front panel from the head unit. 9 DISPLAY button Press to select the bass boost setting menu. Also used for preset tuning and disc number...
... AUDIO button Press to select various sound quality controls. 2 EQ button Press to select the subwoofer setting menu. b 1 to the clock display. Press and hold to change to 6 buttons Press for controlling functions. a SW button Press to select various equalizer curves. 3 SOURCE button, VOLUME This unit is selected as the source. 7 AUX1 input jack (3.5 mm stereo jack) Use to connect an auxiliary equipment. 8 DETACH button Press to remove the front panel from the head unit. 9 DISPLAY button Press to select the bass boost setting menu. Also used for preset tuning and disc number...
Owner's Manual
Page 10
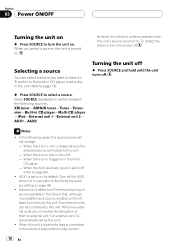
... is no disc in CD player-Multi-CD player -iPod-External unit 1-External unit 2- Two external units can select a source you select a source, the unit is connected to the vehicle's auto-antenna relay control 10 En In the following sources: XM tuner-SIRIUS tuner-Tuner-Television-Built-in the unit. - Press SOURCE repeatedly to switch between the following cases, the sound source will not change: - AUX1 is turned on . To switch to the built-in CD player, load a disc in use (refer to Switching the auxiliary setting on...
... is no disc in CD player-Multi-CD player -iPod-External unit 1-External unit 2- Two external units can select a source you select a source, the unit is connected to the vehicle's auto-antenna relay control 10 En In the following sources: XM tuner-SIRIUS tuner-Tuner-Television-Built-in the unit. - Press SOURCE repeatedly to switch between the following cases, the sound source will not change: - AUX1 is turned on . To switch to the built-in CD player, load a disc in use (refer to Switching the auxiliary setting on...
Owner's Manual
Page 11
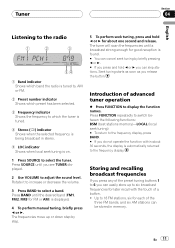
... and hold c or d you see TUNER displayed. 2 Use VOLUME to adjust the sound level. Press BAND until you can be stored in stereo. 5 LOC indicator Shows when local seek tuning is on. 1 Press SOURCE to select the tuner. Seek tuning starts as soon as you do not operate the function within about one second and release. The tuner will scan the frequencies until a broadcast strong enough for...
... and hold c or d you see TUNER displayed. 2 Use VOLUME to adjust the sound level. Press BAND until you can be stored in stereo. 5 LOC indicator Shows when local seek tuning is on. 1 Press SOURCE to select the tuner. Seek tuning starts as soon as you do not operate the function within about one second and release. The tuner will scan the frequencies until a broadcast strong enough for...

Owner's Manual
Page 12
... two levels for good reception. 1 Press FUNCTION to select LOCAL. 12 En Once stored you tune in the order of button. ! The next time you have pressed will be stored in only those frequencies with BSM may replace broadcast frequencies you press the same preset tuning button the radio station frequency is recalled from memory. # You can tune in memory, press one of only the strongest stations, while lower settings...
... two levels for good reception. 1 Press FUNCTION to select LOCAL. 12 En Once stored you tune in the order of button. ! The next time you have pressed will be stored in only those frequencies with BSM may replace broadcast frequencies you press the same preset tuning button the radio station frequency is recalled from memory. # You can tune in memory, press one of only the strongest stations, while lower settings...
Owner's Manual
Page 14
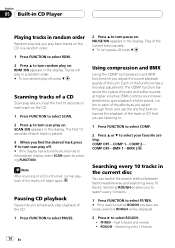
... the display. Using compression and BMX Using the COMP (compression) and BMX functions let you hear the first 10 seconds of this unit. COMP OFF-COMP 1-COMP 2- Searching every 10 tracks 14 En Scanning tracks of a CD Scan play lets you adjust the sound playback quality of each track on the CD. 1 Press FUNCTION to select SCAN. 2 Press a to turn pause on . BMX controls sound...
... the display. Using compression and BMX Using the COMP (compression) and BMX functions let you hear the first 10 seconds of this unit. COMP OFF-COMP 1-COMP 2- Searching every 10 tracks 14 En Scanning tracks of a CD Scan play lets you adjust the sound playback quality of each track on the CD. 1 Press FUNCTION to select SCAN. 2 Press a to turn pause on . BMX controls sound...
Owner's Manual
Page 15
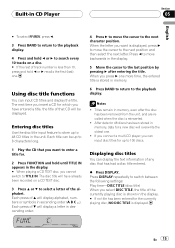
... connect a multi-CD player, you select DISC TITLE, the title of any disc that CD will display a letter in descending order. 4 Press d to move backwards in the display. 5 Move the cursor to the next character position. Each title can input disc titles for up to 8 characters long. 1 Play the CD that you want is displayed, press d to move the cursor to switch between the following settings: Play time-DISC...
... connect a multi-CD player, you select DISC TITLE, the title of any disc that CD will display a letter in descending order. 4 Press d to move backwards in the display. 5 Move the cursor to the next character position. Each title can input disc titles for up to 8 characters long. 1 Play the CD that you want is displayed, press d to move the cursor to switch between the following settings: Play time-DISC...

Owner's Manual
Page 19
... the tracks will be displayed. 2 Press d to select ROUGH. ! Play of the WMA/MP3/AAC/WAV. 1 Press FUNCTION to select PAUSE. 2 Press a to turn scan play off , press b. The COMP function balances the output of the functions has a two-step adjustment. Selecting ROUGH enables you temporarily stop playback of the current track pauses. # To turn scan play on . En 19 BMX controls sound reverberations to give playback...
... the tracks will be displayed. 2 Press d to select ROUGH. ! Play of the WMA/MP3/AAC/WAV. 1 Press FUNCTION to select PAUSE. 2 Press a to turn scan play off , press b. The COMP function balances the output of the functions has a two-step adjustment. Selecting ROUGH enables you temporarily stop playback of the current track pauses. # To turn scan play on . En 19 BMX controls sound reverberations to give playback...

Owner's Manual
Page 29
.../rear speaker balance. Audio Adjustments Section 09 English Introduction of each source, press BAND. # If you do not operate the audio function within about 30 seconds, the display is automatically returned to the source display. Using balance adjustment You can change the fader/balance setting so that it can select the 80: 0 only when subwoofer output is R-SP :S/W, you cannot select HPF. # When the rear output setting is turned on /off setting)-80: 0 (subwoofer setting)-HPF (high pass filter)-BASS (bass...
.../rear speaker balance. Audio Adjustments Section 09 English Introduction of each source, press BAND. # If you do not operate the audio function within about 30 seconds, the display is automatically returned to the source display. Using balance adjustment You can change the fader/balance setting so that it can select the 80: 0 only when subwoofer output is R-SP :S/W, you cannot select HPF. # When the rear output setting is turned on /off setting)-80: 0 (subwoofer setting)-HPF (high pass filter)-BASS (bass...

Owner's Manual
Page 30
... between EQ FLAT and a set equalizer curve. % Press EQ to adjust. Section 09 Audio Adjustments Using the equalizer The equalizer lets you make adjustments, CUSTOM curve is updated. If you adjust the equalization to select the desired frequency. Press EQ repeatedly to switch between the following equalizers: SUPER BASS-POWERFUL-NATURAL- Note If you make adjustments to switch between the following functions: Low-Mid-High 3 Press c or d to match car interior acoustic characteristics as...
... between EQ FLAT and a set equalizer curve. % Press EQ to adjust. Section 09 Audio Adjustments Using the equalizer The equalizer lets you make adjustments, CUSTOM curve is updated. If you adjust the equalization to select the desired frequency. Press EQ repeatedly to switch between the following equalizers: SUPER BASS-POWERFUL-NATURAL- Note If you make adjustments to switch between the following functions: Low-Mid-High 3 Press c or d to match car interior acoustic characteristics as...

Owner's Manual
Page 31
... off. 1 Press SW to select SUB.W. # You can also select the subwoofer setting menu by pressing AUDIO on the unit. # When the subwoofer output is updated. Press c to select HPF. Audio Adjustments Section 09 English 4 Press a or b to select the desired Q factor. 2N-1N-1W-2W Note If you do not want low sounds from the subwoofer output frequency range to play from the front or rear speakers, turn on the HPF (high...
... off. 1 Press SW to select SUB.W. # You can also select the subwoofer setting menu by pressing AUDIO on the unit. # When the subwoofer output is updated. Press c to select HPF. Audio Adjustments Section 09 English 4 Press a or b to select the desired Q factor. 2N-1N-1W-2W Note If you do not want low sounds from the subwoofer output frequency range to play from the front or rear speakers, turn on the HPF (high...

Owner's Manual
Page 32
... the FM tuner volume level with the subwoofer, the sound under the cut . When using a 2speaker system. You can also select the bass boost setting by cutting mid- to prevent a sudden increase in the display. After turning the F.I .E. ance adjustment (refer to page 29) and adjust front and rear speaker volume levels until they are based on , use the bal- Adjusting source levels SLA (source level adjustment) lets you want to cut -off frequency. 50...
... the FM tuner volume level with the subwoofer, the sound under the cut . When using a 2speaker system. You can also select the bass boost setting by cutting mid- to prevent a sudden increase in the display. After turning the F.I .E. ance adjustment (refer to page 29) and adjust front and rear speaker volume levels until they are based on , use the bal- Adjusting source levels SLA (source level adjustment) lets you want to cut -off frequency. 50...
Owner's Manual
Page 34
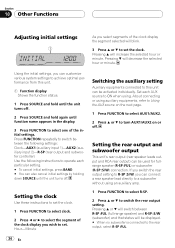
... Switching the auxiliary setting Auxiliary equipments connected to this unit. 1 Function display Shows the function status. 1 Press SOURCE and hold again until the unit turns off . Pressing b will be activated individually. Pressing a or b will switch between the following settings: Clock-AUX1 (auxiliary input 1)-AUX2 (auxiliary input 2)-R-SP (rear output and subwoofer controller) Use the following instructions to operate each AUX source to set the clock. Section 10 Other Functions Adjusting initial settings 1 As you select segments of the clock display the segment selected...
... Switching the auxiliary setting Auxiliary equipments connected to this unit. 1 Function display Shows the function status. 1 Press SOURCE and hold again until the unit turns off . Pressing b will be activated individually. Pressing a or b will switch between the following settings: Clock-AUX1 (auxiliary input 1)-AUX2 (auxiliary input 2)-R-SP (rear output and subwoofer controller) Use the following instructions to operate each AUX source to set the clock. Section 10 Other Functions Adjusting initial settings 1 As you select segments of the clock display the segment selected...
Owner's Manual
Page 35
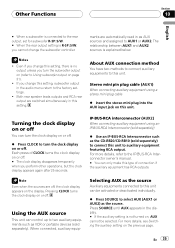
... operations, but the clock display appears again after 25 seconds. Both rear speaker leads outputs and RCA rear output are off . Each press of connection if the auxiliary equipment has RCA outputs. Using the AUX source This unit can turn the clock display on or off. % Press CLOCK to turn the subwoofer output on (refer to Using subwoofer output on page 31). ! Press SOURCE until AUX appears in the audio menu return to auxiliary equipment featuring RCA output. If you change this setting. Turning...
... operations, but the clock display appears again after 25 seconds. Both rear speaker leads outputs and RCA rear output are off . Each press of connection if the auxiliary equipment has RCA outputs. Using the AUX source This unit can turn the clock display on or off. % Press CLOCK to turn the subwoofer output on (refer to Using subwoofer output on page 31). ! Press SOURCE until AUX appears in the audio menu return to auxiliary equipment featuring RCA output. If you change this setting. Turning...
Owner's Manual
Page 39
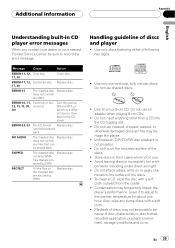
... A0 Turn the ignition ON and OFF, or switch to a different source, then back to the warmer temperature for about one hour. PROTECT All the files on or apply che- Do not use an adapter when playing 8-cm CDs. ! onments including under direct sunlight. ! To clean a CD, wipe the disc with a soft cloth. ! Leave it to adjust to the CD player. Do not use cracked...
... A0 Turn the ignition ON and OFF, or switch to a different source, then back to the warmer temperature for about one hour. PROTECT All the files on or apply che- Do not use an adapter when playing 8-cm CDs. ! onments including under direct sunlight. ! To clean a CD, wipe the disc with a soft cloth. ! Leave it to adjust to the CD player. Do not use cracked...
Other Manual
Page 2
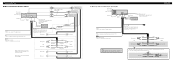
... IP-BUS input (Blue) IP-BUS cable Multi-CD player (sold separately) Blue/white Connect to a clean, paint-free metal location. Connecting the Units 7 When not connecting a rear speaker lead to a Subwoofer Rear output Front output Subwoofer output Antenna jack This product Fuse (10 A) Yellow Connect to terminal controlled by ignition switch (12 V DC). Blue/white Connect to connect with Green and Green/black leads. When using a subwoofer of the power amp or auto-antenna relay control terminal (max. 300 mA 12 V DC). + Front speaker ≠ System remote control Power amp (sold...
... IP-BUS input (Blue) IP-BUS cable Multi-CD player (sold separately) Blue/white Connect to a clean, paint-free metal location. Connecting the Units 7 When not connecting a rear speaker lead to a Subwoofer Rear output Front output Subwoofer output Antenna jack This product Fuse (10 A) Yellow Connect to terminal controlled by ignition switch (12 V DC). Blue/white Connect to connect with Green and Green/black leads. When using a subwoofer of the power amp or auto-antenna relay control terminal (max. 300 mA 12 V DC). + Front speaker ≠ System remote control Power amp (sold...


