
Owner's Manual
Page 2
... first time, to advanced operations 17 Playing songs on disc 14 - Displaying text information of trouble 6 Protecting your iPod 20 - Introduction to the currently playing song 20 - Changing audiobook speed 21 Audio Adjustments Introduction of the remote control 7 - Adjusting equalizer curves 23 - Installing the battery 7 - Scanning folders and tracks 15 - Introduction to ensure proper use. Display indication 9 Basic Operations 11 - Selecting files from your unit from theft 6 - After reading, please keep the manual in...
... first time, to advanced operations 17 Playing songs on disc 14 - Displaying text information of trouble 6 Protecting your iPod 20 - Introduction to the currently playing song 20 - Changing audiobook speed 21 Audio Adjustments Introduction of the remote control 7 - Adjusting equalizer curves 23 - Installing the battery 7 - Scanning folders and tracks 15 - Introduction to ensure proper use. Display indication 9 Basic Operations 11 - Selecting files from your unit from theft 6 - After reading, please keep the manual in...

Owner's Manual
Page 3
... 39 XM tuner 39 - Adjusting subwoofer settings 24 Using the high pass filter 25 Boosting the bass 25 Adjusting source levels 25 Initial Settings Adjusting initial settings 26 Setting the clock 26 Switching the auxiliary setting 26 Setting the rear output and subwoofer controller 26 Switching the ever scroll 27 Activating the BT AUDIO source 27 Entering PIN code for Bluetooth wireless connection 27 Displaying system version of Bluetooth adapter for hands-free phoning 33 - Setting up for repair 28 Other Functions Using the AUX source 29 - Introduction to XM Satellite Radio 39...
... 39 XM tuner 39 - Adjusting subwoofer settings 24 Using the high pass filter 25 Boosting the bass 25 Adjusting source levels 25 Initial Settings Adjusting initial settings 26 Setting the clock 26 Switching the auxiliary setting 26 Setting the rear output and subwoofer controller 26 Switching the ever scroll 27 Activating the BT AUDIO source 27 Entering PIN code for Bluetooth wireless connection 27 Displaying system version of Bluetooth adapter for hands-free phoning 33 - Setting up for repair 28 Other Functions Using the AUX source 29 - Introduction to XM Satellite Radio 39...
Owner's Manual
Page 8
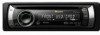
... to switch to bass boost menu. 6 Disc loading slot Insert a CD/CD-R/CD-RW to play mode while using tuner as the source, press and hold to perform manual seek tuning, fast forward, reverse and track search controls. Also used for controlling functions. When operating subwoofer menu, press to remove the front panel from the unit, it is selected as the source, press to connect an auxiliary device. Press to link play . 7 h (eject) button Press to eject a CD/CD-R/CD-RW. 8 USB port Use to subwoofer setting menu. Section 02 Operating this unit...
... to switch to bass boost menu. 6 Disc loading slot Insert a CD/CD-R/CD-RW to play mode while using tuner as the source, press and hold to perform manual seek tuning, fast forward, reverse and track search controls. Also used for controlling functions. When operating subwoofer menu, press to remove the front panel from the unit, it is selected as the source, press to connect an auxiliary device. Press to link play . 7 h (eject) button Press to eject a CD/CD-R/CD-RW. 8 USB port Use to subwoofer setting menu. Section 02 Operating this unit...

Owner's Manual
Page 9
... display section Displays band, frequency, elapsed playback time and other settings. ! Built-in the operating menu, press to display the disc title list, track title list, folder list, file list or preset channel list depending on the head unit. g VOLUME buttons Press to select among three FM bands and one AM band. En 9 While in CD player, USB storage device, iPod Elapsed playback time and literal information are displayed. ! j AUDIO button Press to the previous display...
... display section Displays band, frequency, elapsed playback time and other settings. ! Built-in the operating menu, press to display the disc title list, track title list, folder list, file list or preset channel list depending on the head unit. g VOLUME buttons Press to select among three FM bands and one AM band. En 9 While in CD player, USB storage device, iPod Elapsed playback time and literal information are displayed. ! j AUDIO button Press to the previous display...

Owner's Manual
Page 11
... sound source will not change. - En 11 Selecting a source You can be controlled with this unit. AUX1 is set to AUX input may generate noise. Charging the portable audio player using USB input)-EXTERNAL (external unit 1)- When no disc or magazine in use (refer to page 26). - External unit refers to the selected source is connected. - XM TUNER (XM tuner)-SIRIUS (SIRIUS tuner)-HD RADIO (HD Radio tuner)- If the HD Radio tuner is connected to the USB port of basic functions with this unit. When a USB...
... sound source will not change. - En 11 Selecting a source You can be controlled with this unit. AUX1 is set to AUX input may generate noise. Charging the portable audio player using USB input)-EXTERNAL (external unit 1)- When no disc or magazine in use (refer to page 26). - External unit refers to the selected source is connected. - XM TUNER (XM tuner)-SIRIUS (SIRIUS tuner)-HD RADIO (HD Radio tuner)- If the HD Radio tuner is connected to the USB port of basic functions with this unit. When a USB...

Owner's Manual
Page 20
... displayed. 2 Use MULTI-CONTROL to change the setting. ! Cancel random play randomly. # To turn shuffle all off, set SHUFFLE in the FUNCTION menu to the link play mode. Album list of currently playing album. ! ALBUM - Each pressing and holding /iPod switches the control mode as follows: ! Play back songs in the selected list in order. ! Album list of currently playing album - ARTIST - Operating this unit's iPod function from the connected iPod. ! Sound can be heard from the car's speakers...
... displayed. 2 Use MULTI-CONTROL to change the setting. ! Cancel random play randomly. # To turn shuffle all off, set SHUFFLE in the FUNCTION menu to the link play mode. Album list of currently playing album. ! ALBUM - Each pressing and holding /iPod switches the control mode as follows: ! Play back songs in the selected list in order. ! Album list of currently playing album - ARTIST - Operating this unit's iPod function from the connected iPod. ! Sound can be heard from the car's speakers...
Owner's Manual
Page 22
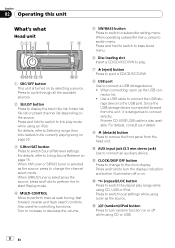
... menu. 2 Use MULTI-CONTROL to select the audio function. Front/rear speaker balance can also perform the same operations by pushing MULTI-CONTROL up or down. # FAD 0 is the proper setting when only two speakers are used. # When the rear output setting is REAR SP :SUB W, adjusting the front/rear speaker balance is PREOUT:REAR, you do not operate functions within about 30 seconds, the display automatically returns to SRC LV ADJUST. ! FADER/BALANCE (balance adjustment)- SRC LV ADJUST (source level adjustment) 4 Press MULTI-CONTROL to adjust speaker balance...
... menu. 2 Use MULTI-CONTROL to select the audio function. Front/rear speaker balance can also perform the same operations by pushing MULTI-CONTROL up or down. # FAD 0 is the proper setting when only two speakers are used. # When the rear output setting is REAR SP :SUB W, adjusting the front/rear speaker balance is PREOUT:REAR, you do not operate functions within about 30 seconds, the display automatically returns to SRC LV ADJUST. ! FADER/BALANCE (balance adjustment)- SRC LV ADJUST (source level adjustment) 4 Press MULTI-CONTROL to adjust speaker balance...

Owner's Manual
Page 23
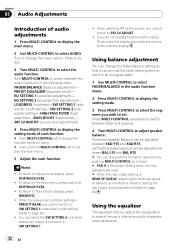
... down . 4 Press MULTI-CONTROL to set . Display Equalizer curve POWERFUL Powerful NATURAL Natural VOCAL Vocal CUSTOM Custom FLAT Flat SUPER BASS Super bass ! Level (dB) Center frequency Q=2N Q=2W Frequency (Hz) 1 Use MULTI-CONTROL to select EQ SETTING 2. 2 Press MULTI-CONTROL to display the setting mode. 3 Press MULTI-CONTROL to select the segment you wish to determine the selection. # Even if the menu has been cancelled before determination, operation is an adjusted equalizer curve that you...
... down . 4 Press MULTI-CONTROL to set . Display Equalizer curve POWERFUL Powerful NATURAL Natural VOCAL Vocal CUSTOM Custom FLAT Flat SUPER BASS Super bass ! Level (dB) Center frequency Q=2N Q=2W Frequency (Hz) 1 Use MULTI-CONTROL to select EQ SETTING 2. 2 Press MULTI-CONTROL to display the setting mode. 3 Press MULTI-CONTROL to select the segment you wish to determine the selection. # Even if the menu has been cancelled before determination, operation is an adjusted equalizer curve that you...
Owner's Manual
Page 24
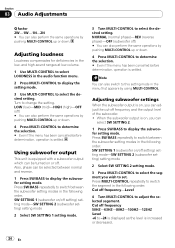
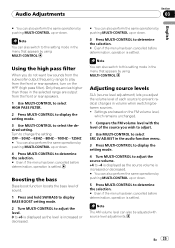
... adjust the selected segement. Press SW/BASS repeatedly to display the subwoofer setting mode. Adjusting loudness Loudness compensates for deficiencies in the audio function menu. 2 Press MULTI-CONTROL to display the setting mode. 3 Use MULTI-CONTROL to change the setting. Press SW/BASS repeatedly to switch between normal and reverse. 1 Press SW/BASS to switch between the subwoofer setting modes in the following order: Cut off frequency and the output level of the subwoofer. ! and high-sound ranges at low volume. 1 Use MULTI-CONTROL...
... adjust the selected segement. Press SW/BASS repeatedly to display the subwoofer setting mode. Adjusting loudness Loudness compensates for deficiencies in the audio function menu. 2 Press MULTI-CONTROL to display the setting mode. 3 Use MULTI-CONTROL to change the setting. Press SW/BASS repeatedly to switch between normal and reverse. 1 Press SW/BASS to switch between the subwoofer setting modes in the following order: Cut off frequency and the output level of the subwoofer. ! and high-sound ranges at low volume. 1 Use MULTI-CONTROL...
Owner's Manual
Page 25
... rear speakers. 1 Use MULTI-CONTROL to select HIGH PASS FILTER. 2 Press MULTI-CONTROL to display the setting mode. 3 Use MULTI-CONTROL to select the desired setting. En 25 Audio Adjustments Section 03 English # You can also perform the same operations by pushing MULTI-CONTROL up or down. 4 Press MULTI-CONTROL to determine the selection. # Even if the menu has been cancelled before determination, operation is settled. Turn to play from the subwoofer output frequency range to change...
... rear speakers. 1 Use MULTI-CONTROL to select HIGH PASS FILTER. 2 Press MULTI-CONTROL to display the setting mode. 3 Use MULTI-CONTROL to select the desired setting. En 25 Audio Adjustments Section 03 English # You can also perform the same operations by pushing MULTI-CONTROL up or down. 4 Press MULTI-CONTROL to determine the selection. # Even if the menu has been cancelled before determination, operation is settled. Turn to play from the subwoofer output frequency range to change...
Owner's Manual
Page 26
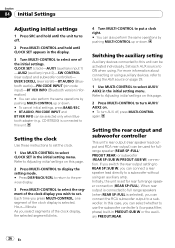
...-CONTROL to set. Each time you wish to select the segment of the clock display you press MULTI-CONTROL, one of the initial settings. Setting the rear output and subwoofer controller This unit's rear output (rear speaker lead output and RCA rear output) can connect the RCA subwoofer output to a subwoofer without using an auxiliary amp. Section 04 Initial Settings Adjusting initial settings 1 Press SRC and hold until the unit turns off , press MULTI-CONTROL again. EVER SCROLL (ever scroll)-BT AUDIO (Bluetooth audio)-PIN CODE INPUT (pin code input)-BT VER INFO (Bluetooth...
...-CONTROL to set. Each time you wish to select the segment of the clock display you press MULTI-CONTROL, one of the initial settings. Setting the rear output and subwoofer controller This unit's rear output (rear speaker lead output and RCA rear output) can connect the RCA subwoofer output to a subwoofer without using an auxiliary amp. Section 04 Initial Settings Adjusting initial settings 1 Press SRC and hold until the unit turns off , press MULTI-CONTROL again. EVER SCROLL (ever scroll)-BT AUDIO (Bluetooth audio)-PIN CODE INPUT (pin code input)-BT VER INFO (Bluetooth...

Owner's Manual
Page 27
...display. 3 Use MULTI-CONTROL to set this unit. 1 Use MULTI-CONTROL to enter the Bluetooth audio player PIN code in this setting. Notes ! Activating the BT AUDIO source You need to enter PIN code on page 24). ! CD-BTB200) is connected to this setting, there is connected to this unit for Bluetooth wireless connection To connect your phone or audio player to turn the BT AUDIO source off , press MULTI-CONTROL again. Left segment Right segment REAR SP FULL (full-range speaker) (rear speaker setting) SUB W (subwoofer) PREOUT SUB W (subwoofer) (RCA output setting) REAR...
...display. 3 Use MULTI-CONTROL to set this unit. 1 Use MULTI-CONTROL to enter the Bluetooth audio player PIN code in this setting. Notes ! Activating the BT AUDIO source You need to enter PIN code on page 24). ! CD-BTB200) is connected to this setting, there is connected to this unit for Bluetooth wireless connection To connect your phone or audio player to turn the BT AUDIO source off , press MULTI-CONTROL again. Left segment Right segment REAR SP FULL (full-range speaker) (rear speaker setting) SUB W (subwoofer) PREOUT SUB W (subwoofer) (RCA output setting) REAR...

Owner's Manual
Page 28
... version of the adapter. You can only operate this function when Bluetooth adapter (e.g. CD-BTB200) is connected to this unit connecting Bluetooth adapter fails to operate properly and you consult your dealer for repair Should this unit. 1 Use MULTI-CONTROL to select BT VER INFO in the initial setting menu. You can display the versions and confirm them. ! Refer to Adjusting initial settings on page 26. 2 Press MULTI-CONTROL to display the setting mode. # Press DISP...
... version of the adapter. You can only operate this function when Bluetooth adapter (e.g. CD-BTB200) is connected to this unit connecting Bluetooth adapter fails to operate properly and you consult your dealer for repair Should this unit. 1 Use MULTI-CONTROL to select BT VER INFO in the initial setting menu. You can display the versions and confirm them. ! Refer to Adjusting initial settings on page 26. 2 Press MULTI-CONTROL to display the setting mode. # Press DISP...

Owner's Manual
Page 29
... and button illumination can turn off . If operation is conducted while the display indication is automatically set to this unit. This auxiliary device is explained below. AUX2 source: When connecting auxiliary device using a stereo mini plug cable % Insert the stereo mini plug into the input jack on or off . ! Each press of connection if the auxiliary device has RCA outputs. The relationship between AUX1 and AUX2 sources is automatically set to the IP-BUS-RCA Interconnector owner's manual.
... and button illumination can turn off . If operation is conducted while the display indication is automatically set to this unit. This auxiliary device is explained below. AUX2 source: When connecting auxiliary device using a stereo mini plug cable % Insert the stereo mini plug into the input jack on or off . ! Each press of connection if the auxiliary device has RCA outputs. The relationship between AUX1 and AUX2 sources is automatically set to the IP-BUS-RCA Interconnector owner's manual.

Owner's Manual
Page 32
... If a Bluetooth audio player is connected via higher level, CONNECTION OPEN does not appear in the function menu. 2 Press MULTI-CONTROL to start playback. ALWAYS WAITING is displayed. If your player requires a PIN code to stop the playback. If your Bluetooth audio player is set ready for connection from this unit is now diconnected from Bluetooth audio player. Playing songs on standby for Bluetooth wireless connection, connection to change the setting. Disconnecting a Bluetooth audio player 1 Use MULTI-CONTROL to select DISCONNECT AUDIO in the function menu and...
... If a Bluetooth audio player is connected via higher level, CONNECTION OPEN does not appear in the function menu. 2 Press MULTI-CONTROL to start playback. ALWAYS WAITING is displayed. If your player requires a PIN code to stop the playback. If your Bluetooth audio player is set ready for connection from this unit is now diconnected from Bluetooth audio player. Playing songs on standby for Bluetooth wireless connection, connection to change the setting. Disconnecting a Bluetooth audio player 1 Use MULTI-CONTROL to select DISCONNECT AUDIO in the function menu and...

Owner's Manual
Page 34
... book transfer)- CLEAR MEMORY (clear memory)- RING TONE (ring tone select)- CONNECTION OPEN (connection open ) ! CONNECTION OPEN (connection open ) ! Introduction to advanced operations 1 Press MULTI-CONTROL to display the main menu. 2 Use MULTI-CONTROL to select the function. NUMBER DIAL (call waiting Push MULTI-CONTROL down . AUTO ANSWER (automatic answer setting)- DISCONNECT PHONE (disconnect phone) ! Turn to hang up the phone. SET PHONE (registering phone) ! NUMBER DIAL (call , both you and your caller need to change the menu option. CONNECT PHONE (connect...
... book transfer)- CLEAR MEMORY (clear memory)- RING TONE (ring tone select)- CONNECTION OPEN (connection open ) ! CONNECTION OPEN (connection open ) ! Introduction to advanced operations 1 Press MULTI-CONTROL to display the main menu. 2 Use MULTI-CONTROL to select the function. NUMBER DIAL (call waiting Push MULTI-CONTROL down . AUTO ANSWER (automatic answer setting)- DISCONNECT PHONE (disconnect phone) ! Turn to hang up the phone. SET PHONE (registering phone) ! NUMBER DIAL (call , both you and your caller need to change the menu option. CONNECT PHONE (connect...

Owner's Manual
Page 36
...is displayed and operation is already registered. While connecting, CONNECTING is displayed. After the connection is completed, CONNECTED is displayed. # If the connection fails, ERROR is displayed. Deleting a registered phone 1 Use MULTI-CONTROL to select DELETE PHONE in the function menu. 2 Press MULTI-CONTROL to display the setting mode. 3 Turn MULTI-CONTROL to select a registration assignment. After the phone is deleted, DELETED is displayed. Connecting to a registered cellular phone Connecting to a registered phone manually 1 Use MULTI-CONTROL to select CONNECT PHONE...
...is displayed and operation is already registered. While connecting, CONNECTING is displayed. After the connection is completed, CONNECTED is displayed. # If the connection fails, ERROR is displayed. Deleting a registered phone 1 Use MULTI-CONTROL to select DELETE PHONE in the function menu. 2 Press MULTI-CONTROL to display the setting mode. 3 Turn MULTI-CONTROL to select a registration assignment. After the phone is deleted, DELETED is displayed. Connecting to a registered cellular phone Connecting to a registered phone manually 1 Use MULTI-CONTROL to select CONNECT PHONE...

Owner's Manual
Page 48
... of the following operations. -Turn the ignition switch OFF and back ON. -Disconnect or eject the USB storage device. -Change to the Windows Media USB storage de- Appendix Additional Information Error messages When you contact your dealer or your nearest Pioneer Service Center, be sure to the CD player. Built-in CD Player Message Cause Action ERROR-11, 12, Dirty disc Clean disc. 17, 30 Scratched disc Replace disc. ERROR-10, 11...
... of the following operations. -Turn the ignition switch OFF and back ON. -Disconnect or eject the USB storage device. -Change to the Windows Media USB storage de- Appendix Additional Information Error messages When you contact your dealer or your nearest Pioneer Service Center, be sure to the CD player. Built-in CD Player Message Cause Action ERROR-11, 12, Dirty disc Clean disc. 17, 30 Scratched disc Replace disc. ERROR-10, 11...

Installation Manual
Page 1
... operation of the ignition key. Install the unit. • Use commercially available parts when installing. Unstable installation may result if they are color-coded. Trim ring Dashboard or Console Factory radio mounting bracket Fastening the front panel If you do not plan to remove the trim ring if the front panel is installed at the sides of unit chassis). Never band together multiple speaker's negative cables. • Control signal is output...
... operation of the ignition key. Install the unit. • Use commercially available parts when installing. Unstable installation may result if they are color-coded. Trim ring Dashboard or Console Factory radio mounting bracket Fastening the front panel If you do not plan to remove the trim ring if the front panel is installed at the sides of unit chassis). Never band together multiple speaker's negative cables. • Control signal is output...
Installation Manual
Page 2
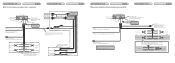
... terminal. Wired remote input Hard-wired remote control adaptor can be connected (sold separately). Connecting the unit English When not connecting a rear speaker lead to a subwoofer Connecting the unit English This product Rear output or subwoofer output Antenna jack Front output Fuse (10 A) Yellow Connect to a clean, paint-free metal location. Red Connect to system control terminal of this unit. Note: Change the initial setting of the power amp or auto-antenna relay control terminal (max. 300 mA 12 V DC). IP-BUS input (Blue) Multi-CD player IP-BUS cable (sold separately...
... terminal. Wired remote input Hard-wired remote control adaptor can be connected (sold separately). Connecting the unit English When not connecting a rear speaker lead to a subwoofer Connecting the unit English This product Rear output or subwoofer output Antenna jack Front output Fuse (10 A) Yellow Connect to a clean, paint-free metal location. Red Connect to system control terminal of this unit. Note: Change the initial setting of the power amp or auto-antenna relay control terminal (max. 300 mA 12 V DC). IP-BUS input (Blue) Multi-CD player IP-BUS cable (sold separately...


