Owner's Manual
Page 3
Contents English Initial Settings Adjusting initial settings 25 Setting the clock 25 Switching the warning tone 25 Switching the auxiliary setting 25 Setting the rear output and subwoofer controller 26 Switching the Ever Scroll 26 Activating... to a registered cellular phone 36 - Deleting a registered phone 36 - Using the Phone Book 37 - Setting automatic rejecting 39 - Setting the AUX title 28 Turning the clock display on or off 28 Using the external unit 28 - Connecting a Bluetooth audio player 32 - Basic Operations 31 - Introduction of advanced operations 30 Bluetooth Audio...
Contents English Initial Settings Adjusting initial settings 25 Setting the clock 25 Switching the warning tone 25 Switching the auxiliary setting 25 Setting the rear output and subwoofer controller 26 Switching the Ever Scroll 26 Activating... to a registered cellular phone 36 - Deleting a registered phone 36 - Using the Phone Book 37 - Setting automatic rejecting 39 - Setting the AUX title 28 Turning the clock display on or off 28 Using the external unit 28 - Connecting a Bluetooth audio player 32 - Basic Operations 31 - Introduction of advanced operations 30 Bluetooth Audio...

Owner's Manual
Page 9
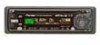
... head unit. Press and hold to switch to bass boost menu. 9 DETACH button Press to remove the front panel from your built-in CD player. 7 CLOCK button Press to change the channel select mode. 5 Disc loading slot Insert a disc to play. 6 EJECT button Press to display the disc title list, track... to subwoofer setting menu. c RDM/ button Press to turn repeat function on or off while using tuner as the source, press to change to the clock display. 8 SW/BASS button Press to switch to the previous display when operating the menu.
... head unit. Press and hold to switch to bass boost menu. 9 DETACH button Press to remove the front panel from your built-in CD player. 7 CLOCK button Press to change the channel select mode. 5 Disc loading slot Insert a disc to play. 6 EJECT button Press to display the disc title list, track... to subwoofer setting menu. c RDM/ button Press to turn repeat function on or off while using tuner as the source, press to change to the clock display. 8 SW/BASS button Press to switch to the previous display when operating the menu.

Owner's Manual
Page 25
...operations by pressing FUNCTION on . # To turn AUX off, press MULTI-CONTROL again. En 25 For more information about connecting or using . CLOCK SET (clock)-WARNING TONE (warning tone)-AUX1 (auxiliary input 1)-AUX2 (auxiliary input 2)-SW CONTROL (rear output and subwoofer controller)-EVER SCROLL (ever scroll)-BT ...Initial Settings Section 04 English Adjusting initial settings 1 Press OFF and hold until the unit turns off. 2 Press MULTI-CONTROL and hold until CLOCK SET appears in the display. 3 Turn MULTI-CONTROL to ON when using auxiliary devices, refer to Using the AUX source on . # To...
...operations by pressing FUNCTION on . # To turn AUX off, press MULTI-CONTROL again. En 25 For more information about connecting or using . CLOCK SET (clock)-WARNING TONE (warning tone)-AUX1 (auxiliary input 1)-AUX2 (auxiliary input 2)-SW CONTROL (rear output and subwoofer controller)-EVER SCROLL (ever scroll)-BT ...Initial Settings Section 04 English Adjusting initial settings 1 Press OFF and hold until the unit turns off. 2 Press MULTI-CONTROL and hold until CLOCK SET appears in the display. 3 Turn MULTI-CONTROL to ON when using auxiliary devices, refer to Using the AUX source on . # To...
Owner's Manual
Page 28
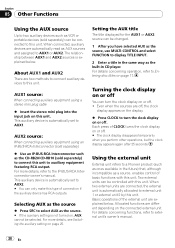
... relationship between AUX1 and AUX2 sources is automatically allocated to a Pioneer product (such as ones available in CD player. About AUX1 ... set to select AUX as the source. # If the auxiliary setting is automatically set to turn the clock display on this unit. For details concerning functions, refer to AUX1 or AUX2. Selecting AUX as the ... by this unit. When two external units are explained below . Basic operations of CLOCK turns the clock display on or off . # The clock display disappears temporarily when you have selected AUX as the source, use MULTI-CONTROL...
... relationship between AUX1 and AUX2 sources is automatically allocated to a Pioneer product (such as ones available in CD player. About AUX1 ... set to select AUX as the source. # If the auxiliary setting is automatically set to turn the clock display on this unit. For details concerning functions, refer to AUX1 or AUX2. Selecting AUX as the ... by this unit. When two external units are explained below . Basic operations of CLOCK turns the clock display on or off . # The clock display disappears temporarily when you have selected AUX as the source, use MULTI-CONTROL...


