
Owner's Manual
Page 3
Contents Other Functions Adjusting initial settings 23 Setting the clock 23 Switching the auxiliary setting 23 Setting the rear output and subwoofer controller 23 Turning the clock display on iPod 25 Introduction of iPod® operation 24 - Selecting AUX as the source 24 Introduction of XM operation...Information Understanding built-in CD player error messages 28 Handling guideline of SIRIUS operation 26 - Switching the XM channel select mode 25 Introduction of discs and player 28 Dual Discs 29 WMA, MP3 and WAV files 29 - Switching the SIRIUS channel select setting 26 - Example of...
Contents Other Functions Adjusting initial settings 23 Setting the clock 23 Switching the auxiliary setting 23 Setting the rear output and subwoofer controller 23 Turning the clock display on iPod 25 Introduction of iPod® operation 24 - Selecting AUX as the source 24 Introduction of XM operation...Information Understanding built-in CD player error messages 28 Handling guideline of SIRIUS operation 26 - Switching the XM channel select mode 25 Introduction of discs and player 28 Dual Discs 29 WMA, MP3 and WAV files 29 - Switching the SIRIUS channel select setting 26 - Example of...
Owner's Manual
Page 8
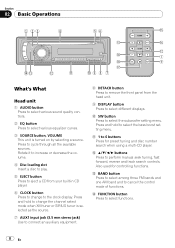
...9 h ed c b a9 8 7 What's What Head unit 1 AUDIO button Press to select various sound quality controls. 2 EQ button Press to select the bass boost setting menu. Press and hold to change the channel select mode when XM tuner or SIRIUS tuner is turned on by selecting a source. a SW button Press...DISPLAY button Press to cycle through all the available sources. e FUNCTION button Press to the clock display. Also used for preset tuning and disc number search when using a multi-CD player. Press to select different displays. Press and hold to select various equalizer curves. ...
...9 h ed c b a9 8 7 What's What Head unit 1 AUDIO button Press to select various sound quality controls. 2 EQ button Press to select the bass boost setting menu. Press and hold to change the channel select mode when XM tuner or SIRIUS tuner is turned on by selecting a source. a SW button Press...DISPLAY button Press to cycle through all the available sources. e FUNCTION button Press to the clock display. Also used for preset tuning and disc number search when using a multi-CD player. Press to select different displays. Press and hold to select various equalizer curves. ...
Owner's Manual
Page 23
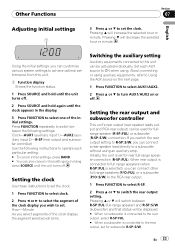
... off . When rear output is connected to full range speakers (when R-SP :FUL is set the clock. 1 Press FUNCTION to select clock. 2 Press c or d to select the segment of the clock display you can be used for rear full-range speaker connection (R-SP :FUL). Pressing a ... input 2)-R-SP (rear output and subwoofer controller) Use the following instructions to operate each AUX source to ON when using. Setting the clock Use these instructions to set for fullrange speaker (R-SP :FUL) or subwoofer (R-SP :S/W) connection. Press FUNCTION repeatedly to switch between R-SP :FUL (...
... off . When rear output is connected to full range speakers (when R-SP :FUL is set the clock. 1 Press FUNCTION to select clock. 2 Press c or d to select the segment of the clock display you can be used for rear full-range speaker connection (R-SP :FUL). Pressing a ... input 2)-R-SP (rear output and subwoofer controller) Use the following instructions to operate each AUX source to ON when using. Setting the clock Use these instructions to set for fullrange speaker (R-SP :FUL) or subwoofer (R-SP :S/W) connection. Press FUNCTION repeatedly to switch between R-SP :FUL (...
Owner's Manual
Page 24
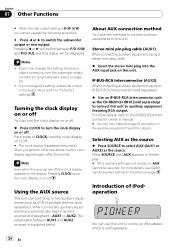
...% Insert the stereo mini plug into the AUX input jack on or off. Notes ! Even if you change this setting, subwoofer output in the display. # If the auxiliary setting is explained below. About AUX connection method You have two methods to connect auxiliary equipments to select AUX (AUX1 or AUX2... operation 1 You can only make this unit to two auxiliary equipments such as the CD-RB20/CD-RB10 (sold separately. 24 En Pressing c or d will be selected. Using the AUX source This unit can turn the clock display on or off . Press SOURCE until AUX appears in the audio menu return ...
...% Insert the stereo mini plug into the AUX input jack on or off. Notes ! Even if you change this setting, subwoofer output in the display. # If the auxiliary setting is explained below. About AUX connection method You have two methods to connect auxiliary equipments to select AUX (AUX1 or AUX2... operation 1 You can only make this unit to two auxiliary equipments such as the CD-RB20/CD-RB10 (sold separately. 24 En Pressing c or d will be selected. Using the AUX source This unit can turn the clock display on or off . Press SOURCE until AUX appears in the audio menu return ...
Owner's Manual
Page 25
... ! iPod is a head unit group 1 unit. ! XM operation XM operation of Apple Computer, Inc., registered in the following channel select settings: En 25 Switching the XM channel select mode (Refer to this page.) This unit does not have the following functions with this unit which ...the text in the iPod adapter's operation manual. ! Displaying text information on iPod operations with this unit differs. ! Press and hold CLOCK to switch the XM display. Press DISPLAY repeatedly to switch between the following order: Channel name-Band/preset channel number -Artist name-Song ...
... ! iPod is a head unit group 1 unit. ! XM operation XM operation of Apple Computer, Inc., registered in the following channel select settings: En 25 Switching the XM channel select mode (Refer to this page.) This unit does not have the following functions with this unit which ...the text in the iPod adapter's operation manual. ! Displaying text information on iPod operations with this unit differs. ! Press and hold CLOCK to switch the XM display. Press DISPLAY repeatedly to switch between the following order: Channel name-Band/preset channel number -Artist name-Song ...
Owner's Manual
Page 26
... together with this unit differs. ! Section 07 Other Functions CHNUMBER (channel number select setting) -CATEGORY (channel category select setting) Introduction of SIRIUS operation 1 Switching the SIRIUS channel select setting % Press and hold CLOCK to this page.) ! You can listen to the broadcast channel. Press FUNCTION and... tuning station. Press and hold to switch to switch between the following channel select settings: CHNUMBER (channel number select setting) -CATEGORY (channel category select setting) This unit can control a SIRIUS Satellite Radio tuner (sold separately).
... together with this unit differs. ! Section 07 Other Functions CHNUMBER (channel number select setting) -CATEGORY (channel category select setting) Introduction of SIRIUS operation 1 Switching the SIRIUS channel select setting % Press and hold CLOCK to this page.) ! You can listen to the broadcast channel. Press FUNCTION and... tuning station. Press and hold to switch to switch between the following channel select settings: CHNUMBER (channel number select setting) -CATEGORY (channel category select setting) This unit can control a SIRIUS Satellite Radio tuner (sold separately).


