Owner's Manual
Page 9
... page. While setting SPCL. The default code is connected to transfer the phone book. Depending on the next page. to SW CONTROL (rear output and subwoofer setting) on the cellular phone, the phone book may not be stored in memory, press and hold one of the preset tuning buttons (1 to make...
... page. While setting SPCL. The default code is connected to transfer the phone book. Depending on the next page. to SW CONTROL (rear output and subwoofer setting) on the cellular phone, the phone book may not be stored in memory, press and hold one of the preset tuning buttons (1 to make...
Owner's Manual
Page 10
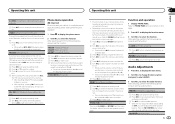
....) 3 Turn M.C. When selecting FM as the source, you prefer the information to -6 LOUDNESS (loudness) Loudness compensates for full-range speaker or subwoofer connection. After selecting, perform the following procedures to confirm the selection. Hour-Minute 3 Turn M.C. ON - If you turn the demo display on.... to select the equalizer. Settings are based on or off. AUX (auxiliary input) Activate this setting, there will return to SUBWOOFER1 (subwoofer on/off setting) on this unit. 1 Press M.C. REAR-SP: FUL-SW PREOUT: SW-REA ! to select the desired setting. to...
....) 3 Turn M.C. When selecting FM as the source, you prefer the information to -6 LOUDNESS (loudness) Loudness compensates for full-range speaker or subwoofer connection. After selecting, perform the following procedures to confirm the selection. Hour-Minute 3 Turn M.C. ON - If you turn the demo display on.... to select the equalizer. Settings are based on or off. AUX (auxiliary input) Activate this setting, there will return to SUBWOOFER1 (subwoofer on/off setting) on this unit. 1 Press M.C. REAR-SP: FUL-SW PREOUT: SW-REA ! to select the desired setting. to...
Owner's Manual
Page 12
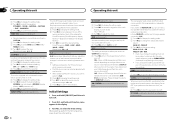
... 5 5 3 1 2 6 7 7 Installation Important ! f Yellow Connect to SW CONTROL (rear output and subwoofer setting) on page 10. Refer to the constant 12 V supply terminal. Check all connections and systems before final installation. ! Do not install this unit. h Blue...Section 03 Installation Installation This unit 3 12 45 67 8 1 Power cord input 2 Microphone input 3 Microphone 4 Rear output or subwoofer output 5 Front output 6 Antenna input 7 Fuse (10 A) 8 Wired remote input Hard-wired remote control adaptor can be properly...
... 5 5 3 1 2 6 7 7 Installation Important ! f Yellow Connect to SW CONTROL (rear output and subwoofer setting) on page 10. Refer to the constant 12 V supply terminal. Check all connections and systems before final installation. ! Do not install this unit. h Blue...Section 03 Installation Installation This unit 3 12 45 67 8 1 Power cord input 2 Microphone input 3 Microphone 4 Rear output or subwoofer output 5 Front output 6 Antenna input 7 Fuse (10 A) 8 Wired remote input Hard-wired remote control adaptor can be properly...

Owner's Manual
Page 19
... maximum output level 2.0 V Tone controls: Bass Frequency .......... 100 Hz Gain 12 dB Mid Frequency .......... 1 kHz Gain 12 dB Treble Frequency .......... 10 kHz Gain 12 dB Subwoofer (mono): Frequency 50/63/80/100/125 Hz Slope 18 dB/oct Gain 6 dB to -24 dB Phase Normal/Reverse CD player System Compact disc...
... maximum output level 2.0 V Tone controls: Bass Frequency .......... 100 Hz Gain 12 dB Mid Frequency .......... 1 kHz Gain 12 dB Treble Frequency .......... 10 kHz Gain 12 dB Subwoofer (mono): Frequency 50/63/80/100/125 Hz Slope 18 dB/oct Gain 6 dB to -24 dB Phase Normal/Reverse CD player System Compact disc...


