Owner's Manual
Page 2
... clearly, without distortion. ! It is connected. - FCC ID: AJDK042 MODEL NO.: DEH-6400BT/DEH-5400BT/DEH64BT IC: 775E-K042 This device complies with Part 15 of RF energy that you ... in many areas. Connect the equipment into contact with liquids. ! Do not allow this PIONEER product To ensure proper use in potentially hazardous situations. ! For your hearing "comfort level"...to correct the interference by turning the equipment off and on this device must not be installed and operated keeping the radiator at a low setting. ! This equipment complies with any ...
... clearly, without distortion. ! It is connected. - FCC ID: AJDK042 MODEL NO.: DEH-6400BT/DEH-5400BT/DEH64BT IC: 775E-K042 This device complies with Part 15 of RF energy that you ... in many areas. Connect the equipment into contact with liquids. ! Do not allow this PIONEER product To ensure proper use in potentially hazardous situations. ! For your hearing "comfort level"...to correct the interference by turning the equipment off and on this device must not be installed and operated keeping the radiator at a low setting. ! This equipment complies with any ...
Owner's Manual
Page 4
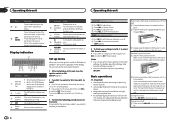
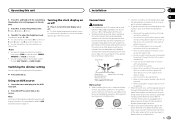
...24 5 79 68 Indicator State ! Built-in the initial settings. Indicator State Random play sec- You can set up the menu options below. 1 After installation of the front panel until the unit turns off. 4 En to confirm the selection. to adjust minute. 4 Press M.C. to NO. to switch to select ...If you do not operate for 30 seconds, the set up menu will not be displayed. # If you turn the ignition switch to ON after installation, set up menu appears on the front panel. Basic operations Important ! Press to select. # If you cannot set the demo display to insert...
...24 5 79 68 Indicator State ! Built-in the initial settings. Indicator State Random play sec- You can set up the menu options below. 1 After installation of the front panel until the unit turns off. 4 En to confirm the selection. to adjust minute. 4 Press M.C. to NO. to switch to select ...If you do not operate for 30 seconds, the set up menu will not be displayed. # If you turn the ignition switch to ON after installation, set up menu appears on the front panel. Basic operations Important ! Press to select. # If you cannot set the demo display to insert...
Owner's Manual
Page 5
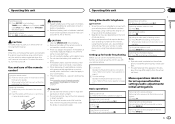
...public institutions' rules that require attention such as sunshine, fire or the like. If the battery leaks, wipe the remote control completely clean and install a new battery. ! Do not store the remote control in the display (this unit is on or off . Since this may vary depending... the phone book, etc., are prohibited while driving. Replacing the battery 1 Slide the tray out on page 10. Notes ! Batteries (battery pack or batteries installed) must set up menu 1 Press BAND/ . Answering a call waiting 1 When a call 1 Refer to excessive heat such as dialing numbers on page 10...
...public institutions' rules that require attention such as sunshine, fire or the like. If the battery leaks, wipe the remote control completely clean and install a new battery. ! Do not store the remote control in the display (this unit is on or off . Since this may vary depending... the phone book, etc., are prohibited while driving. Replacing the battery 1 Slide the tray out on page 10. Notes ! Batteries (battery pack or batteries installed) must set up menu 1 Press BAND/ . Answering a call waiting 1 When a call 1 Refer to excessive heat such as dialing numbers on page 10...
Owner's Manual
Page 13
... speakers for both KEY COLOR and DISP COLOR. Disconnect the negative terminal of the cable is limited. - The current capacity of the battery before installation. - Use a fuse of multiple speakers. ! Also, never connect it through the blue/white cable. Operating this unit is on, control signals ... ignition key may result in the display. 5 Press M.C. Never connect the blue/white cable to adjust the brightness level. Notes ! When installing this cable to the car separately with other operations, but the clock display appears again after 25 seconds. F O OF N STAR T...
... speakers for both KEY COLOR and DISP COLOR. Disconnect the negative terminal of the cable is limited. - The current capacity of the battery before installation. - Use a fuse of multiple speakers. ! Also, never connect it through the blue/white cable. Operating this unit is on, control signals ... ignition key may result in the display. 5 Press M.C. Never connect the blue/white cable to adjust the brightness level. Notes ! When installing this cable to the car separately with other operations, but the clock display appears again after 25 seconds. F O OF N STAR T...
Owner's Manual
Page 14
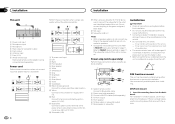
...61482;b d e f g h Perform these connections when using the optional amplifier. 1 3 2 4 5 5 3 1 2 6 7 7 Installation Important ! L 2 4 6 F 7 i a SW b 1 R 3 8 9 c d ej f ac gk l h bd 1 To power cord input 2 Left 3 Right 4 Front speaker 5 Rear... setting) on page 11. Refer to a clean, paint-free metal location. Section 03 Installation Installation This unit 3 12 45 67 8 1 Power cord input 2 Microphone input 3 Microphone ...
...61482;b d e f g h Perform these connections when using the optional amplifier. 1 3 2 4 5 5 3 1 2 6 7 7 Installation Important ! L 2 4 6 F 7 i a SW b 1 R 3 8 9 c d ej f ac gk l h bd 1 To power cord input 2 Left 3 Right 4 Front speaker 5 Rear... setting) on page 11. Refer to a clean, paint-free metal location. Section 03 Installation Installation This unit 3 12 45 67 8 1 Power cord input 2 Microphone input 3 Microphone ...
Owner's Manual
Page 15
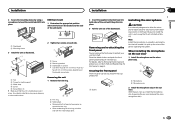
... into place. 1 DIN Rear-mount 1 Determine the appropriate position where the holes on the bracket and the side of the unit match. 2 1 Dashboard 2 Mounting sleeve 3 Install the unit as illustrated. 1 2 3 4 5 1 Nut 2 Firewall or metal support 3 Metal strap 4 Screw 5 Screw (M4 × 8) # Make sure that the unit ... or shift lever. Securing the front panel The front panel can remove the front panel to protect your unit from theft. An unstable installation may cause skipping or other malfunctions. 2 Tighten two screws on the sun visor. When reattaching the trim ring, point the side with...
... into place. 1 DIN Rear-mount 1 Determine the appropriate position where the holes on the bracket and the side of the unit match. 2 1 Dashboard 2 Mounting sleeve 3 Install the unit as illustrated. 1 2 3 4 5 1 Nut 2 Firewall or metal support 3 Metal strap 4 Screw 5 Screw (M4 × 8) # Make sure that the unit ... or shift lever. Securing the front panel The front panel can remove the front panel to protect your unit from theft. An unstable installation may cause skipping or other malfunctions. 2 Tighten two screws on the sun visor. When reattaching the trim ring, point the side with...
Owner's Manual
Page 16
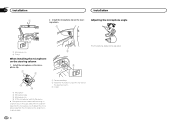
... microphone angle can be adjusted. 3 4 1 Microphone 2 Microphone base 3 Microphone clip 4 Fit the microphone lead into the groove. # Microphone can be installed without using microphone clip. To detach the microphone base from the microphone clip. Section 03 Installation 1 Installation 2 Install the microphone clip on the steering column. 1 Adjusting the microphone angle 2 1 Microphone clip 2 Clamp When...
... microphone angle can be adjusted. 3 4 1 Microphone 2 Microphone base 3 Microphone clip 4 Fit the microphone lead into the groove. # Microphone can be installed without using microphone clip. To detach the microphone base from the microphone clip. Section 03 Installation 1 Installation 2 Install the microphone clip on the steering column. 1 Adjusting the microphone angle 2 1 Microphone clip 2 Clamp When...
Operation Manual
Page 5
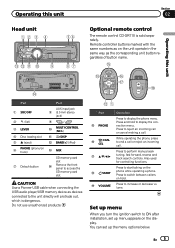
...) 9 / a MULTI-CONTROL (M.C.) b /DISP c BAND/ (iPod) d MIX SD memory card slot e Remove the front panel to reject an incoming call or cancel making a call . CAUTION Use a Pioneer USB cable when connecting the USB audio player/USB memory device as on the phone while operating a phone. Press to display the phone menu. Operating..., which is sold separately. Press and hold . Set up menu When you turn the ignition switch to increase or decrease volume. Press to ON after installation, set up menu appears on the display. Do not use unauthorized products. En 5
...) 9 / a MULTI-CONTROL (M.C.) b /DISP c BAND/ (iPod) d MIX SD memory card slot e Remove the front panel to reject an incoming call or cancel making a call . CAUTION Use a Pioneer USB cable when connecting the USB audio player/USB memory device as on the phone while operating a phone. Press to display the phone menu. Operating..., which is sold separately. Press and hold . Set up menu When you turn the ignition switch to increase or decrease volume. Press to ON after installation, set up menu appears on the display. Do not use unauthorized products. En 5
Operation Manual
Page 6
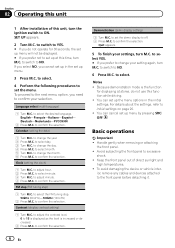
.... 4 Press M.C. to confirm your settings, turn M.C. to select day. 3 Turn M.C. Notes ! Because demonstration mode is increased or decreased. 2 Press M.C. Section 02 Operating this unit 1 After installation of direct sunlight and high temperatures. ! Deutsch-Nederlands 2 Press M.C. Basic operations Important ! to confirm the selection. to NO. 6 Press M.C. to change the year. 2 Press M.C. FM...
.... 4 Press M.C. to confirm your settings, turn M.C. to select day. 3 Turn M.C. Notes ! Because demonstration mode is increased or decreased. 2 Press M.C. Section 02 Operating this unit 1 After installation of direct sunlight and high temperatures. ! Deutsch-Nederlands 2 Press M.C. Basic operations Important ! to confirm the selection. to NO. 6 Press M.C. to change the year. 2 Press M.C. FM...


