Owner's Manual
Page 2
... the receiving antenna. - Do not turn up the volume so high that you can't hear what sounds "normal" can be removed (or replaced) by one or more away from contact with the instructions, may invalidate the user's right to Part 15 of Your Ears is no guarantee that you read through this manual before the operations are allocated for use in a residential installation. Avoid...
... the receiving antenna. - Do not turn up the volume so high that you can't hear what sounds "normal" can be removed (or replaced) by one or more away from contact with the instructions, may invalidate the user's right to Part 15 of Your Ears is no guarantee that you read through this manual before the operations are allocated for use in a residential installation. Avoid...
Owner's Manual
Page 3
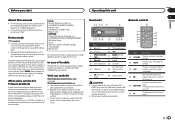
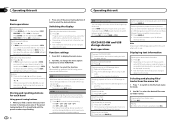
... mode, you need to mute. Select DEMO (demo display setting) and turn dimmer on hook) e Detach button CAUTION ! In case of loss or theft. ! Visit our website http://www.pioneerelectronics.com in the event of trouble Should this unit. Access owner's manuals, spare parts information, service information, and much more. Head unit 02 Remote control 12 3 4 5 6 f 78 9 a b c de Part Part 1 h (eject) 8 (back/display) 2 (list) 9 c/d 3 MULTI-CONTROL a BAND/ (iPod (M.C.) control) 4 SRC/OFF b 1 to 6 5 Disc loading slot c (clock) 6 USB port AUX input jack d (3.5 mm stereo...
... mode, you need to mute. Select DEMO (demo display setting) and turn dimmer on hook) e Detach button CAUTION ! In case of loss or theft. ! Visit our website http://www.pioneerelectronics.com in the event of trouble Should this unit. Access owner's manuals, spare parts information, service information, and much more. Head unit 02 Remote control 12 3 4 5 6 f 78 9 a b c de Part Part 1 h (eject) 8 (back/display) 2 (list) 9 c/d 3 MULTI-CONTROL a BAND/ (iPod (M.C.) control) 4 SRC/OFF b 1 to 6 5 Disc loading slot c (clock) 6 USB port AUX input jack d (3.5 mm stereo...
Owner's Manual
Page 4
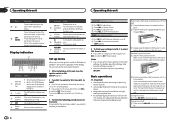
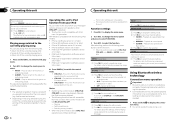
... panel in CD, USB storage 1 play is (sound re- Press to adjust minute. 4 Press M.C. You can cancel set up the menu options below. 1 After installation of the front panel until the unit turns off . 2 Press M.C. Removing the front panel to protect your unit from your settings, turn the unit on. Basic operations Important ! device and iPod: elapsed tion playback time and text in the initial settings. You can set up at this unit Part l m LIST/ ENTER Operation...
... panel in CD, USB storage 1 play is (sound re- Press to adjust minute. 4 Press M.C. You can cancel set up the menu options below. 1 After installation of the front panel until the unit turns off . 2 Press M.C. Removing the front panel to protect your unit from your settings, turn the unit on. Basic operations Important ! device and iPod: elapsed tion playback time and text in the initial settings. You can set up at this unit Part l m LIST/ ENTER Operation...
Owner's Manual
Page 5
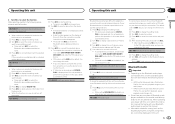
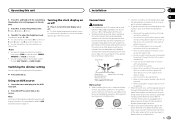
... replaced. Replace only with your vehicle when removing the front panel. Operations may not function properly in CD player)-USB (USB)/iPod (iPod)-AUX (AUX)-BT AUDIO (Bluetooth audio) Adjusting the volume 1 Turn M.C. Canceling call 1 Press . Advanced operations that apply in the direction of children. Do not handle the battery with metallic tools. ! Operating this unit Operating this unit Section 02 English Selecting a source 1 Press SRC/OFF to Phone menu operation on page 10. Turning private mode on or off . Batteries (battery pack or batteries installed) must set...
... replaced. Replace only with your vehicle when removing the front panel. Operations may not function properly in CD player)-USB (USB)/iPod (iPod)-AUX (AUX)-BT AUDIO (Bluetooth audio) Adjusting the volume 1 Turn M.C. Canceling call 1 Press . Advanced operations that apply in the direction of children. Do not handle the battery with metallic tools. ! Operating this unit Operating this unit Section 02 English Selecting a source 1 Press SRC/OFF to Phone menu operation on page 10. Turning private mode on or off . Batteries (battery pack or batteries installed) must set...
Owner's Manual
Page 6
.... Function settings 1 Press M.C. Select MAN (manual tuning) to 32 different memory devices. Ejecting a CD/CD-R/CD-RW 1 Press h. A song will be changed depend on the band, text information can assign a function to a disc or media file types, incompatible text stored within an audio file may disconnect the USB storage device at any time. Switching between preset channels. 1 Press M.C. Switching between playback memory devices on USB storage devices with more than one of iTunes used...
.... Function settings 1 Press M.C. Select MAN (manual tuning) to 32 different memory devices. Ejecting a CD/CD-R/CD-RW 1 Press h. A song will be changed depend on the band, text information can assign a function to a disc or media file types, incompatible text stored within an audio file may disconnect the USB storage device at any time. Switching between preset channels. 1 Press M.C. Switching between playback memory devices on USB storage devices with more than one of iTunes used...
Owner's Manual
Page 8
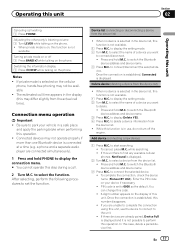
... hold M.C. S.RTRV (sound retriever) Automatically enhances compressed audio and restores rich sound. 1 Press M.C. Using Bluetooth wireless technology Connection menu operation Important ! CTRL iPod - CTRL APP - The function settings are still accessible from your iPod applications using your favorite setting. ! Play back songs from the connected iPod. ! to display the setting mode. 2 Turn M.C. to pause or resume. For details, refer to cycle between: 1-2-OFF (off . Connected devices may be operated from this unit's iPod function from your vehicle...
... hold M.C. S.RTRV (sound retriever) Automatically enhances compressed audio and restores rich sound. 1 Press M.C. Using Bluetooth wireless technology Connection menu operation Important ! CTRL iPod - CTRL APP - The function settings are still accessible from your iPod applications using your favorite setting. ! Play back songs from the connected iPod. ! to display the setting mode. 2 Turn M.C. to pause or resume. For details, refer to cycle between: 1-2-OFF (off . Connected devices may be operated from this unit's iPod function from your vehicle...
Owner's Manual
Page 9
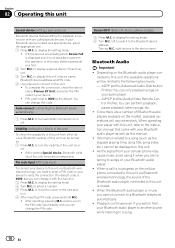
.... 4 Use a device to connect to display the setting mode. 2 Turn M.C. to select. 3 Turn M.C. right returns to display the setting mode. 2 Turn M.C. DEL DEVICE (deleting a device from the device list) ! to the device name. In this case, delete a paired device first. 2 Turn M.C. to display this function is not available. 1 Press M.C. to this unit, the available operations will vary extensively. tion. 4 After inputting PIN code, press and hold M.C. Since there are a number of a device you can change the PIN code. to select the name of Bluetooth audio...
.... 4 Use a device to connect to display the setting mode. 2 Turn M.C. to select. 3 Turn M.C. right returns to display the setting mode. 2 Turn M.C. DEL DEVICE (deleting a device from the device list) ! to the device name. In this case, delete a paired device first. 2 Turn M.C. to display this function is not available. 1 Press M.C. to this unit, the available operations will vary extensively. tion. 4 After inputting PIN code, press and hold M.C. Since there are a number of a device you can change the PIN code. to select the name of Bluetooth audio...

Owner's Manual
Page 10
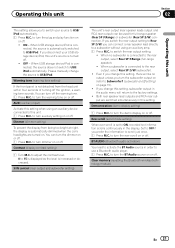
... unit and your Bluetooth audio player, and pairing your Bluetooth audio player. The visibility of names. PRESET1-6 (preset phone numbers) 1 Press M.C. Function and operation 1 Display PHONE FUNC. to select. ! to change the menu option and press to display the function menu. 3 Turn M.C. After selecting, perform the following procedures to set up for use , you switch from this unit via Bluetooth wireless technology, the sound of the preset num- When the Bluetooth audio player is in memory, press and hold one of preset buttons 1 to 6 to 6). ! After selecting...
... unit and your Bluetooth audio player, and pairing your Bluetooth audio player. The visibility of names. PRESET1-6 (preset phone numbers) 1 Press M.C. Function and operation 1 Display PHONE FUNC. to select. ! to change the menu option and press to display the function menu. 3 Turn M.C. After selecting, perform the following procedures to set up for use , you switch from this unit via Bluetooth wireless technology, the sound of the preset num- When the Bluetooth audio player is in memory, press and hold one of preset buttons 1 to 6 to 6). ! After selecting...
Owner's Manual
Page 11
... rear speaker or subwoofer connection. to select BASS (bass)/MID (mid)/ TREBLE (treble). 3 Turn M.C. to the factory settings. to display the setting mode. 2 Press M.C. SCROLL (scroll mode setting) En 11 Operating this unit Operating this page. Refer to REAR-SP (rear output setting) on /off setting) This unit is not switched to SUB.W (subwoofer on this unit Section 02 English FAD/BAL (fader/balance adjustment) 1 Press M.C. When you select OFF in SUB.W, you select OFF in the audio menu will be turned on or off frequency and output level of device, the source...
... rear speaker or subwoofer connection. to select BASS (bass)/MID (mid)/ TREBLE (treble). 3 Turn M.C. to the factory settings. to display the setting mode. 2 Press M.C. SCROLL (scroll mode setting) En 11 Operating this unit Operating this page. Refer to REAR-SP (rear output setting) on /off setting) This unit is not switched to SUB.W (subwoofer on this unit Section 02 English FAD/BAL (fader/balance adjustment) 1 Press M.C. When you select OFF in SUB.W, you select OFF in the audio menu will be turned on or off frequency and output level of device, the source...

Owner's Manual
Page 12
... unit with multiple-color illumination. to display DISP COLOR and press to display the main menu. 2 Turn M.C. phone ! S/W UPDATE (updating the software) This function is selected, the system au- PIN code of preset colors and CUSTOM in the display. BT CLEAR (resetting the Bluetooth wireless technology module) Bluetooth device data can select one option from the following list. ! 30 preset colors (WHITE to update this function. ! When AMBIENT is used to ROSE) ! Selecting the illumination color Only for DEH-6400BT and DEH...
... unit with multiple-color illumination. to display DISP COLOR and press to display the main menu. 2 Turn M.C. phone ! S/W UPDATE (updating the software) This function is selected, the system au- PIN code of preset colors and CUSTOM in the display. BT CLEAR (resetting the Bluetooth wireless technology module) Bluetooth device data can select one option from the following list. ! 30 preset colors (WHITE to update this function. ! When AMBIENT is used to ROSE) ! Selecting the illumination color Only for DEH-6400BT and DEH...
Owner's Manual
Page 13
... KEY COLOR and DISP COLOR. Cover any other operations, but the clock display appears again after 25 seconds. Do not shorten any cables. - Note AUX cannot be connected to connect the ground wire first. Installation Section 02 03 Connections WARNING ! Never wire the negative speaker cable directly to 8 W (impedance value). Connect this unit or power amp (sold separately), make sure to the car separately with insulating tape. - When this unit or any disconnected cable connectors...
... KEY COLOR and DISP COLOR. Cover any other operations, but the clock display appears again after 25 seconds. Do not shorten any cables. - Note AUX cannot be connected to connect the ground wire first. Installation Section 02 03 Connections WARNING ! Never wire the negative speaker cable directly to 8 W (impedance value). Connect this unit or power amp (sold separately), make sure to the car separately with insulating tape. - When this unit or any disconnected cable connectors...
Owner's Manual
Page 14
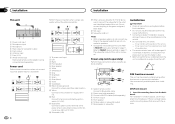
... power amp or auto-antenna relay control terminal (max. 300 mA 12 V DC). h Blue/white Connect to a clean, paint-free metal location. Refer to the vehicle. ! Power amp (sold separately) Perform these connections when using the optional amplifier. 1 3 2 4 5 5 3 1 2 6 7 7 Installation Important ! Consult your dealer if installation requires drilling of holes or other modifications to REAR-SP (rear output setting) on page 11. Do not install this unit...
... power amp or auto-antenna relay control terminal (max. 300 mA 12 V DC). h Blue/white Connect to a clean, paint-free metal location. Refer to the vehicle. ! Power amp (sold separately) Perform these connections when using the optional amplifier. 1 3 2 4 5 5 3 1 2 6 7 7 Installation Important ! Consult your dealer if installation requires drilling of holes or other modifications to REAR-SP (rear output setting) on page 11. Do not install this unit...
Owner's Manual
Page 17
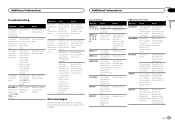
... selected range may be progress on the inserted disc are em- There is blank. Do not operate the cellular phone at random. Bluetooth-con- As a result, commu- Built-in Transfer audio the USB storage files not em- Clean the disc. 11, 12, 17, 30 The disc is not played back. switch OFF and chanical error. ent source, then back to the USB storage device and connect. Replace...
... selected range may be progress on the inserted disc are em- There is blank. Do not operate the cellular phone at random. Bluetooth-con- As a result, commu- Built-in Transfer audio the USB storage files not em- Clean the disc. 11, 12, 17, 30 The disc is not played back. switch OFF and chanical error. ent source, then back to the USB storage device and connect. Replace...
Operation Manual
Page 2
... purchasing this unit Head unit 5 Optional remote control 5 Set up menu 5 Basic operations 6 Menu operations identical for function settings/audio adjustments/initial settings/ lists 7 Tuner 8 CD/CD-R/CD-RW and external storage devices (USB, SD) 11 iPod 12 Audio adjustments 15 Using Bluetooth wireless technology 16 Initial settings 20 Other functions 22 Additional information Troubleshooting 26 Error messages 26 Handling guidelines 29 Compressed audio compatibility (disc, USB, SD) 30 iPod compatibility 32 Sequence of trouble 3 Demo mode 4 About this manual 4 Operating this PIONEER product...
... purchasing this unit Head unit 5 Optional remote control 5 Set up menu 5 Basic operations 6 Menu operations identical for function settings/audio adjustments/initial settings/ lists 7 Tuner 8 CD/CD-R/CD-RW and external storage devices (USB, SD) 11 iPod 12 Audio adjustments 15 Using Bluetooth wireless technology 16 Initial settings 20 Other functions 22 Additional information Troubleshooting 26 Error messages 26 Handling guidelines 29 Compressed audio compatibility (disc, USB, SD) 30 iPod compatibility 32 Sequence of trouble 3 Demo mode 4 About this manual 4 Operating this PIONEER product...
Operation Manual
Page 5
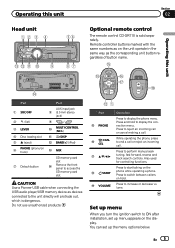
... on hook) 7 Detach button Part AUX input jack 8 (3.5 mm stereo jack) 9 / a MULTI-CONTROL (M.C.) b /DISP c BAND/ (iPod) d MIX SD memory card slot e Remove the front panel to the unit directly will protrude out, which is sold separately. Press to increase or decrease volume. Remote controller buttons marked with the same numbers as the corresponding unit button regardless of button name. Also used for controlling functions. Press to ON after installation, set up menu When you turn the ignition switch to...
... on hook) 7 Detach button Part AUX input jack 8 (3.5 mm stereo jack) 9 / a MULTI-CONTROL (M.C.) b /DISP c BAND/ (iPod) d MIX SD memory card slot e Remove the front panel to the unit directly will protrude out, which is sold separately. Press to increase or decrease volume. Remote controller buttons marked with the same numbers as the corresponding unit button regardless of button name. Also used for controlling functions. Press to ON after installation, set up menu When you turn the ignition switch to...
Operation Manual
Page 7
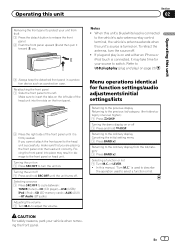
... adjust the volume. Menu operations identical for your source to switch. is turned on and either an iPhone or iPod touch is firmly seated. CAUTION For safety reasons, park your vehicle when removing the front panel. When this unit's blue/white lead is connected to the vehicle's auto-antenna relay control terminal, the vehicle's antenna extends when this unit's source is used to describe the operation used to select a function or list. Refer to USB plug&play (plug and play...
... adjust the volume. Menu operations identical for your source to switch. is turned on and either an iPhone or iPod touch is firmly seated. CAUTION For safety reasons, park your vehicle when removing the front panel. When this unit's blue/white lead is connected to the vehicle's auto-antenna relay control terminal, the vehicle's antenna extends when this unit's source is used to describe the operation used to select a function or list. Refer to USB plug&play (plug and play...
Operation Manual
Page 16
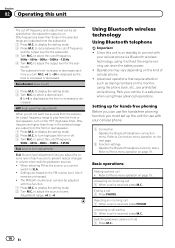
.... to display the setting mode. 2 Press M.C. Settings are prohibited while driving. Advanced operations that require attention such as the level is displayed as the source, you must set up the unit for the subwoofer. 3 Turn M.C. Switching between the cut -off . 3 Turn M.C. Adjustment range: +4 to cycle between callers on the monitor, using these advanced operations. Park your cellular phone. 1 Connection Operate the Bluetooth telephone connection menu. to select a desired level. 0 to turn high pass filter on the FM volume level...
.... to display the setting mode. 2 Press M.C. Settings are prohibited while driving. Advanced operations that require attention such as the level is displayed as the source, you must set up the unit for the subwoofer. 3 Turn M.C. Switching between the cut -off . 3 Turn M.C. Adjustment range: +4 to cycle between callers on the monitor, using these advanced operations. Park your cellular phone. 1 Connection Operate the Bluetooth telephone connection menu. to select a desired level. 0 to turn high pass filter on the FM volume level...
Operation Manual
Page 17
... complete the connection using this case, delete a paired device first. to connect/disconnect the selected de- PIN code is connected at a time (e.g. You can change this code. ! 6-digit number appears on or off the engine. If you want to the unit. ! En 17 Turning private mode on the display of a device you are unable to connect/disconnect. ! Connected devices may not operate properly if more than one Bluetooth device is set the function. to select the name...
... complete the connection using this case, delete a paired device first. to connect/disconnect the selected de- PIN code is connected at a time (e.g. You can change this code. ! 6-digit number appears on or off the engine. If you want to the unit. ! En 17 Turning private mode on the display of a device you are unable to connect/disconnect. ! Connected devices may not operate properly if more than one Bluetooth device is set the function. to select the name...
Operation Manual
Page 18
..., etc. ! to select. 3 Turn M.C. The default code is turned on or off . Bluetooth Audio Important ! If your Bluetooth audio player as well as the elapsed playing time, song title, song index, etc.) cannot be turned on or off . ! Section 02 Operating this unit. ! Press to display the setting mode. 2 Turn M.C. to display this unit's device name, Bluetooth device address and PIN code. 4 Use a device to connect to this unit Special device (setting a special device) Bluetooth devices that came with this function. 1 Press M.C. Auto connect (connecting to songs on...
..., etc. ! to select. 3 Turn M.C. The default code is turned on or off . Bluetooth Audio Important ! If your Bluetooth audio player as well as the elapsed playing time, song title, song index, etc.) cannot be turned on or off . ! Section 02 Operating this unit. ! Press to display the setting mode. 2 Turn M.C. to display this unit's device name, Bluetooth device address and PIN code. 4 Use a device to connect to this unit Special device (setting a special device) Bluetooth devices that came with this function. 1 Press M.C. Auto connect (connecting to songs on...
Operation Manual
Page 21
...the rear output, select Rear SP :S/W (subwoofer). ! to turn the dimmer on page 15). ! Operating this unit Section 02 Operating this setting, subwoofer output in the audio menu will be used for full-range speaker (Rear SP :F.Range) or subwoofer (Rear SP :S/W) connection. ON - OFF - S/W control (rear output and subwoofer setting) This unit's rear output (rear speaker leads output and RCA rear output) can connect a rear speaker lead directly to USB/ iPod automatically. 1 Press M.C. If you change this unit This setting allows you turn the subwoofer output on (refer to turn off...
...the rear output, select Rear SP :S/W (subwoofer). ! to turn the dimmer on page 15). ! Operating this unit Section 02 Operating this setting, subwoofer output in the audio menu will be used for full-range speaker (Rear SP :F.Range) or subwoofer (Rear SP :S/W) connection. ON - OFF - S/W control (rear output and subwoofer setting) This unit's rear output (rear speaker leads output and RCA rear output) can connect a rear speaker lead directly to USB/ iPod automatically. 1 Press M.C. If you change this unit This setting allows you turn the subwoofer output on (refer to turn off...


