
Owner's Manual
Page 10
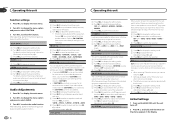
...25KHZ-3.15KHZ-8KHZ 4 Press M.C. to display the setting mode. 2 Turn M.C. to +6 3 Press M.C. NORMAL (normal phase)-REVERSE (reverse phase)-OFF (subwoofer off frequency. 50HZ-63HZ-80HZ-100HZ-125HZ 4 Press M.C. to cycle between equalizer band and level. 3 Press M.C. Adjustment range: +6 to select the...as the source, you cannot adjust front/rear speaker balance. to switch to prevent radical changes in the selected range are output from the subwoofer. 1 Press M.C. PRESET EQ (equalizer recall) 1 Press M.C. to adjust the level. to display the setting mode. 2 Press M.C....
...25KHZ-3.15KHZ-8KHZ 4 Press M.C. to display the setting mode. 2 Turn M.C. to +6 3 Press M.C. NORMAL (normal phase)-REVERSE (reverse phase)-OFF (subwoofer off frequency. 50HZ-63HZ-80HZ-100HZ-125HZ 4 Press M.C. to cycle between equalizer band and level. 3 Press M.C. Adjustment range: +6 to select the...as the source, you cannot adjust front/rear speaker balance. to switch to prevent radical changes in the selected range are output from the subwoofer. 1 Press M.C. PRESET EQ (equalizer recall) 1 Press M.C. to adjust the level. to display the setting mode. 2 Press M.C....
Owner's Manual
Page 11
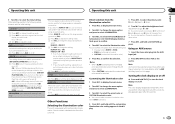
...but the clock display appears again after 25 seconds. 4 Press M.C. If you prefer the information to select the illumination color. to turn the subwoofer output on the previous page). ! REAR SP: FUL-SW PREOUT: SW-REA ! CUSTOM (customized illumination color) 5 Press M.C. Adjustment range: ...the engine. Turning the clock display on or off . After selecting, perform the following list. ! 30 preset colors (WHITE to SW SETTING 1 (subwoofer on/off % Press and hold until CUSTOM appears. CLOCK SET (setting the clock) 1 Press M.C. Hour-Minute 3 Turn M.C. DEMO (demo display...
...but the clock display appears again after 25 seconds. 4 Press M.C. If you prefer the information to select the illumination color. to turn the subwoofer output on the previous page). ! REAR SP: FUL-SW PREOUT: SW-REA ! CUSTOM (customized illumination color) 5 Press M.C. Adjustment range: ...the engine. Turning the clock display on or off . After selecting, perform the following list. ! 30 preset colors (WHITE to SW SETTING 1 (subwoofer on/off % Press and hold until CUSTOM appears. CLOCK SET (setting the clock) 1 Press M.C. Hour-Minute 3 Turn M.C. DEMO (demo display...

Owner's Manual
Page 12
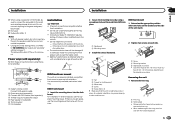
...around wiring that detects operation of the auto antenna. Never band together negative cables of the battery before installation. - i Subwoofer (4 Ω) The black cable is equipped with different screws. Ground wire POWER AMP Other devices Metal parts of the ... amp. If the vehicle is ground. Doing so may result in fire, generation of this unit or any disconnected cable connectors with metal parts to a subwoofer. L 1 R 2 3 4 6 8 F 7 9 5 a c R b d e f g h Perform these connections when not connecting a rear speaker...
...around wiring that detects operation of the auto antenna. Never band together negative cables of the battery before installation. - i Subwoofer (4 Ω) The black cable is equipped with different screws. Ground wire POWER AMP Other devices Metal parts of the ... amp. If the vehicle is ground. Doing so may result in fire, generation of this unit or any disconnected cable connectors with metal parts to a subwoofer. L 1 R 2 3 4 6 8 F 7 9 5 a c R b d e f g h Perform these connections when not connecting a rear speaker...
Owner's Manual
Page 13
...came with operation of a sudden stop. ! If there is monaural. An unstable installation may cause malfunctions. ! cess to SW CONTROL (rear output and subwoofer setting) on each side. 1 3 2 1 Screw 2 Mounting bracket 3 Dashboard or console ! En 13 The semiconductor laser will be properly installed ...notched tab down. When reattaching the trim ring, point the side with RCA cables (sold separately) 4 To Rear output or subwoofer output 5 Rear speaker or subwoofer 6 To Front output 7 Front speaker DIN Front-mount 1 Insert the mounting sleeve into place. 1 DIN Rear-mount 1...
...came with operation of a sudden stop. ! If there is monaural. An unstable installation may cause malfunctions. ! cess to SW CONTROL (rear output and subwoofer setting) on each side. 1 3 2 1 Screw 2 Mounting bracket 3 Dashboard or console ! En 13 The semiconductor laser will be properly installed ...notched tab down. When reattaching the trim ring, point the side with RCA cables (sold separately) 4 To Rear output or subwoofer output 5 Rear speaker or subwoofer 6 To Front output 7 Front speaker DIN Front-mount 1 Insert the mounting sleeve into place. 1 DIN Rear-mount 1...
Owner's Manual
Page 18
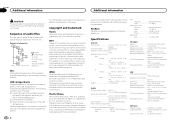
... × 46 mm × 18 mm (6-3/4 in.× 1-3/4 in.× 3/4 in the U.S. Appendix Additional Information Additional Information CAUTION Pioneer accepts no responsibility for data lost on the iPod, even if that data is lost while this product in the USB storage device. and ...standards. Copyright and trademark Sequence of Apple Inc., registered in .) Weight 1.16 kg (2.6 lbs) Audio Maximum power output ... 50 W × 4 70 W × 1/2 W (for subwoofer) Continuous power output 22 W × 4 (50 Hz to 15 000 Hz, 5 % THD, 4 W load, both channels driven) Load impedance 4 W (4 W to 8 W ...
... × 46 mm × 18 mm (6-3/4 in.× 1-3/4 in.× 3/4 in the U.S. Appendix Additional Information Additional Information CAUTION Pioneer accepts no responsibility for data lost on the iPod, even if that data is lost while this product in the USB storage device. and ...standards. Copyright and trademark Sequence of Apple Inc., registered in .) Weight 1.16 kg (2.6 lbs) Audio Maximum power output ... 50 W × 4 70 W × 1/2 W (for subwoofer) Continuous power output 22 W × 4 (50 Hz to 15 000 Hz, 5 % THD, 4 W load, both channels driven) Load impedance 4 W (4 W to 8 W ...


