Owner's Manual
Page 8
... 3 Press M.C. Adjusted equalizer curve settings are stored in order. ! to display the setting mode. 2 Press M.C. This function is available. OFF (subwoofer off . CTRL iPod - CTRL APP - Notes ! Pausing - to select FUNCTION. 3 Turn M.C. SHUFFLE ALL (shuffle all on the previous page...8 En S.RTRV (sound retriever) Automatically enhances compressed audio and restores rich sound. 1 Press M.C. to -6 LOUD (loudness) Loudness compensates for DEH-2400UB and DEH-24UB. 1 Press M.C. Playback at a speed faster than normal 3 Press M.C. Playback at low volume. 1 Press M.C. to select. to ...
... 3 Press M.C. Adjusted equalizer curve settings are stored in order. ! to display the setting mode. 2 Press M.C. This function is available. OFF (subwoofer off . CTRL iPod - CTRL APP - Notes ! Pausing - to select FUNCTION. 3 Turn M.C. SHUFFLE ALL (shuffle all on the previous page...8 En S.RTRV (sound retriever) Automatically enhances compressed audio and restores rich sound. 1 Press M.C. to -6 LOUD (loudness) Loudness compensates for DEH-2400UB and DEH-24UB. 1 Press M.C. Playback at a speed faster than normal 3 Press M.C. Playback at low volume. 1 Press M.C. to select. to ...
Owner's Manual
Page 9
...(FUL). 1 Press M.C. to -4 3 Press M.C. SCAN (cycle through all colors) ! 3 sets of the clock display you can select desired colors for DEH-2400UB and DEH-24UB. ! to select. 3 Turn M.C. to turn the demo display on the FM volume level, which remains unchanged. ! OFF - If you switch to.... Set to OFF if you cannot switch to this unit. 1 Press M.C. You also can connect a rear speaker lead directly to a subwoofer without using an auxiliary device connected to SLA. 1 Press M.C. Only frequencies lower than those in the display. SCROLL (scroll mode setting) When...
...(FUL). 1 Press M.C. to -4 3 Press M.C. SCAN (cycle through all colors) ! 3 sets of the clock display you can select desired colors for DEH-2400UB and DEH-24UB. ! to select. 3 Turn M.C. to turn the demo display on the FM volume level, which remains unchanged. ! OFF - If you switch to.... Set to OFF if you cannot switch to this unit. 1 Press M.C. You also can connect a rear speaker lead directly to a subwoofer without using an auxiliary device connected to SLA. 1 Press M.C. Only frequencies lower than those in the display. SCROLL (scroll mode setting) When...
Owner's Manual
Page 11
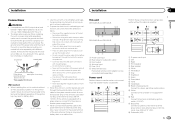
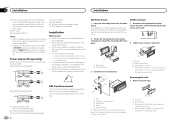
...equipped with different screws. Never cut the insulation of the power cable of smoke or malfunction. The current capacity of the car's body. i Subwoofer (4 Ω) En 11 Do not use 1 W to a clean, paint-free metal location. Ensure that detects operation of the power ...a fire or malfunction. ! Doing so may result in a vehicle without the optional amplifier. This unit DEH-3400UB and DEH-34UB 1 23 45 6 DEH-2400UB and DEH-24UB 1 2 45 1 Power cord input 2 Rear output or subwoofer output 3 Front output 4 Antenna input 5 Fuse (10 A) 6 Wired remote input Hard-wired remote ...
...equipped with different screws. Never cut the insulation of the power cable of smoke or malfunction. The current capacity of the car's body. i Subwoofer (4 Ω) En 11 Do not use 1 W to a clean, paint-free metal location. Ensure that detects operation of the power ...a fire or malfunction. ! Doing so may result in a vehicle without the optional amplifier. This unit DEH-3400UB and DEH-34UB 1 23 45 6 DEH-2400UB and DEH-24UB 1 2 45 1 Power cord input 2 Rear output or subwoofer output 3 Front output 4 Antenna input 5 Fuse (10 A) 6 Wired remote input Hard-wired remote ...
Owner's Manual
Page 12
...mm) or flush sur- DEH-3400UB and DEH-34UB 1 3 2 4 5 5 3 1 2 6 7 7 DEH-2400UB and DEH-24UB 1 3 2 6 7 7 4 To Front output 5 Front speaker 6 To Rear output or subwoofer output 7 Rear speaker or subwoofer Installation Important ! Do not... Use either front-mount or rear-mount installation. face (5 mm × 9 mm) screws, depending on page 9. l Subwoofer (4 Ω)× 2 Notes ! Refer to REAR-SP (rear output setting) on the bracket screw holes. Check all connections...
...mm) or flush sur- DEH-3400UB and DEH-34UB 1 3 2 4 5 5 3 1 2 6 7 7 DEH-2400UB and DEH-24UB 1 3 2 6 7 7 4 To Front output 5 Front speaker 6 To Rear output or subwoofer output 7 Rear speaker or subwoofer Installation Important ! Do not... Use either front-mount or rear-mount installation. face (5 mm × 9 mm) screws, depending on page 9. l Subwoofer (4 Ω)× 2 Notes ! Refer to REAR-SP (rear output setting) on the bracket screw holes. Check all connections...
Owner's Manual
Page 17
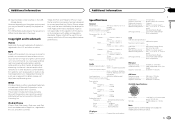
... Frequency range 530 kHz to 1 710 kHz Usable sensitivity 25 µV (S/N: 20 dB) Signal-to specify the playback sequence. "Made for iPod" and "Made for subwoofer) Continuous power output 22 W × 4 (50 Hz to 15 000 Hz, 5 % THD, 4 W load, both channels driven) Load impedance 4 W (4 W to 8 W allowable) Preout maximum...V Tone controls: Bass Frequency .......... 100 Hz Gain 12 dB Mid Frequency .......... 1 kHz Gain 12 dB Treble Frequency .......... 10 kHz Gain 12 dB Subwoofer (mono): Frequency 50 Hz/63 Hz/80 Hz/100 Hz/ 125 Hz Slope 18 dB/oct Gain 6 dB to -24 dB Phase Normal/Reverse ...
... Frequency range 530 kHz to 1 710 kHz Usable sensitivity 25 µV (S/N: 20 dB) Signal-to specify the playback sequence. "Made for iPod" and "Made for subwoofer) Continuous power output 22 W × 4 (50 Hz to 15 000 Hz, 5 % THD, 4 W load, both channels driven) Load impedance 4 W (4 W to 8 W allowable) Preout maximum...V Tone controls: Bass Frequency .......... 100 Hz Gain 12 dB Mid Frequency .......... 1 kHz Gain 12 dB Treble Frequency .......... 10 kHz Gain 12 dB Subwoofer (mono): Frequency 50 Hz/63 Hz/80 Hz/100 Hz/ 125 Hz Slope 18 dB/oct Gain 6 dB to -24 dB Phase Normal/Reverse ...


