Owner's Manual
Page 2
...Adjustments 11 - Scanning tracks or folders 10 - Displaying text information on and selecting a source 8 - Installing the battery 5 - Using the remote control 5 Operating this Pioneer product. Playing tracks in the current disc or folder 10 - Searching every 10 tracks in random order ... 7 Basic Operations 8 - Storing the strongest broadcast frequencies 9 Built-in a safe place for buying this unit What's What 6 - Listening to the radio 8 - Pausing disc playback 10 - Adjusting loudness 12 - Setting the clock 12 - After you for future reference. Adjusting the volume 8 - Storing...
...Adjustments 11 - Scanning tracks or folders 10 - Displaying text information on and selecting a source 8 - Installing the battery 5 - Using the remote control 5 Operating this Pioneer product. Playing tracks in the current disc or folder 10 - Searching every 10 tracks in random order ... 7 Basic Operations 8 - Storing the strongest broadcast frequencies 9 Built-in a safe place for buying this unit What's What 6 - Listening to the radio 8 - Pausing disc playback 10 - Adjusting loudness 12 - Setting the clock 12 - After you for future reference. Adjusting the volume 8 - Storing...
Owner's Manual
Page 5
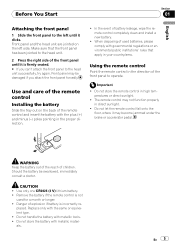
...the battery be damaged if you can't attach the front panel to operate. Danger of battery leakage, wipe the remote control completely clean and install a new battery. ! Do not store the battery with the same or equivalent type. ! Before You Start Section 01 English Attaching the front...a month or longer. ! Use only one CR2025 (3 V) lithium battery. ! Replace only with metallic materials. When disposing of the remote control Installing the battery Slide the tray out on the left until it clicks. CAUTION ! Remove the battery if the remote control is not used batteries, ...
...the battery be damaged if you can't attach the front panel to operate. Danger of battery leakage, wipe the remote control completely clean and install a new battery. ! Do not store the battery with the same or equivalent type. ! Before You Start Section 01 English Attaching the front...a month or longer. ! Use only one CR2025 (3 V) lithium battery. ! Replace only with metallic materials. When disposing of the remote control Installing the battery Slide the tray out on the left until it clicks. CAUTION ! Remove the battery if the remote control is not used batteries, ...
Other Manual
Page 2
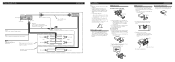
... Secure the mounting sleeve by ignition switch (12 V DC). Pull the unit out of the unit match. 3. Screw Dashboard or Console Factory radio mounting bracket it may interfere with supplied screw. Insert the mounting sleeve into place. 3. Fuse (10 A) Blue/white Connect to bend the ... control terminal (max. 300 mA 12 V DC). Extend top and bottom of unit chassis). Insert the supplied extraction keys into place. 3. Install this unit where: - Removing the Unit 1. Connecting the Units ENGLISH This Product Rear output Antenna jack Yellow Connect to a clean, paint-free...
... Secure the mounting sleeve by ignition switch (12 V DC). Pull the unit out of the unit match. 3. Screw Dashboard or Console Factory radio mounting bracket it may interfere with supplied screw. Insert the mounting sleeve into place. 3. Fuse (10 A) Blue/white Connect to bend the ... control terminal (max. 300 mA 12 V DC). Extend top and bottom of unit chassis). Insert the supplied extraction keys into place. 3. Install this unit where: - Removing the Unit 1. Connecting the Units ENGLISH This Product Rear output Antenna jack Yellow Connect to a clean, paint-free...


