Owner's Manual
Page 2
Removing the front panel 4 - Using the remote control 5 Operating this Pioneer product. Listening to the radio 8 - Storing the strongest broadcast frequencies 9 Built-in the current disc or folder 10 - Repeating play 9 - Using compression and BMX 10 2 En -...signals 8 - Remote control 7 - Using the equalizer 11 - After you have finished reading the instructions, keep this unit 3 After-sales service for future reference. Installing the battery 5 - Pausing disc playback 10 - Attaching the front panel 5 Use and care of the remote control 5 - Tuning in random order 10 - ...
Removing the front panel 4 - Using the remote control 5 Operating this Pioneer product. Listening to the radio 8 - Storing the strongest broadcast frequencies 9 Built-in the current disc or folder 10 - Repeating play 9 - Using compression and BMX 10 2 En -...signals 8 - Remote control 7 - Using the equalizer 11 - After you have finished reading the instructions, keep this unit 3 After-sales service for future reference. Installing the battery 5 - Pausing disc playback 10 - Attaching the front panel 5 Use and care of the remote control 5 - Tuning in random order 10 - ...
Owner's Manual
Page 5
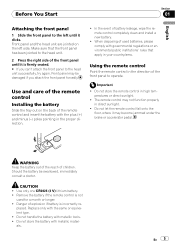
...in the proper direction. ! En 5 Do not store the remote control in the direction of battery leakage, wipe the remote control completely clean and install a new battery. ! Make sure that apply in direct sunlight. ! Danger of children. Replace only with metallic materials. WARNING Keep the battery ...Remove the battery if the remote control is incorrectly re- Front panel and the head unit are jointed on the back of the remote control Installing the battery Slide the tray out on the left until it is firmly seated. # If you attach the front panel forcedly. Important !...
...in the proper direction. ! En 5 Do not store the remote control in the direction of battery leakage, wipe the remote control completely clean and install a new battery. ! Make sure that apply in direct sunlight. ! Danger of children. Replace only with metallic materials. WARNING Keep the battery ...Remove the battery if the remote control is incorrectly re- Front panel and the head unit are jointed on the back of the remote control Installing the battery Slide the tray out on the left until it is firmly seated. # If you attach the front panel forcedly. Important !...
Other Manual
Page 2
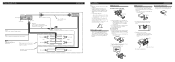
Fuse (10 A) Blue/white Connect to the following installation methods. If there is released. ENGLISH DIN Rear-mount 1. Trim ring Screw 2. Screw Dashboard or Console Factory radio mounting bracket The use a supplied mounting sleeve. For details, refer to system ...screwdriver to terminal controlled by using the optional amplifier. + Rear speaker ≠ + Rear speaker ≠ Installation Note: • Check all connections and systems before final installation. • Do not use factory supplied mounting sleeve. 2. Black (chassis ground) Connect to the constant...
Fuse (10 A) Blue/white Connect to the following installation methods. If there is released. ENGLISH DIN Rear-mount 1. Trim ring Screw 2. Screw Dashboard or Console Factory radio mounting bracket The use a supplied mounting sleeve. For details, refer to system ...screwdriver to terminal controlled by using the optional amplifier. + Rear speaker ≠ + Rear speaker ≠ Installation Note: • Check all connections and systems before final installation. • Do not use factory supplied mounting sleeve. 2. Black (chassis ground) Connect to the constant...


