
Owner's Manual
Page 1
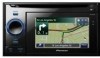
For more information, please contact your vehicle, additional installation may be required. English This software requires that you must understand before using this navigation system. Operation Manual FLASH MEMORY NAVIGATION AUDIO RECEIVER AVIC-U310BT Be sure to your vehicle's parking brake and depending on your Authorized Pioneer Electronics retailer or call us at (800) 421-1404. "Important Information for the user" includes the important information that the navigation system is properly connected to read "Important Information for the user" first!
For more information, please contact your vehicle, additional installation may be required. English This software requires that you must understand before using this navigation system. Operation Manual FLASH MEMORY NAVIGATION AUDIO RECEIVER AVIC-U310BT Be sure to your vehicle's parking brake and depending on your Authorized Pioneer Electronics retailer or call us at (800) 421-1404. "Important Information for the user" includes the important information that the navigation system is properly connected to read "Important Information for the user" first!
Owner's Manual
Page 2
...disc 11 Inserting and ejecting an SD memory card 11 - Attaching the detachable device 15 Installing the battery 16 Disposing of the battery 16 Turning on -screen keyboard 21 How to...- Terminology 7 - Plugging in the examples may be changed without notice for buying this Pioneer product. Connecting your model properly. city list) 21 Operating the on the detachable device 17...Changing the scale of detachable device 17 Monitoring the battery status 17 Turning off the navigation system automatically 17 Connecting with your product from theft 13 Flow from actual screens. Contents ...
...disc 11 Inserting and ejecting an SD memory card 11 - Attaching the detachable device 15 Installing the battery 16 Disposing of the battery 16 Turning on -screen keyboard 21 How to...- Terminology 7 - Plugging in the examples may be changed without notice for buying this Pioneer product. Connecting your model properly. city list) 21 Operating the on the detachable device 17...Changing the scale of detachable device 17 Monitoring the battery status 17 Turning off the navigation system automatically 17 Connecting with your product from theft 13 Flow from actual screens. Contents ...
Owner's Manual
Page 4
...57 Updating the Bluetooth wireless technology software 58 Modifying the general settings for navigation functions Setting the volume for "AVIC FEEDS" 65 - Dialing a facility's phone number 53 - Setting the phone volume 55 - Installing additional files for voice guidance (TTS files) 59 - Selecting the ...overview 70 What you can do on "AVIC FEEDS" 67 Exporting the data of the vehicle 61 - Setting the automatic rejection function 56 - Switching to the initial state 64 Other functions Exporting data for navigation system 59 Customizing the regional settings 59 - Setting...
...57 Updating the Bluetooth wireless technology software 58 Modifying the general settings for navigation functions Setting the volume for "AVIC FEEDS" 65 - Dialing a facility's phone number 53 - Setting the phone volume 55 - Installing additional files for voice guidance (TTS files) 59 - Selecting the ...overview 70 What you can do on "AVIC FEEDS" 67 Exporting the data of the vehicle 61 - Setting the automatic rejection function 56 - Switching to the initial state 64 Other functions Exporting data for navigation system 59 Customizing the regional settings 59 - Setting...
Owner's Manual
Page 8
... information about iPod compatibility with the op- Extended exposure to direct sunlight can control an iPod compatible with a Pioneer USB interface cable for iPod (CDIU50) (sold separately), you use the stylus for normal operations.) Resetting the ...installation. ! If the product fails to touch the touch panel keys with a significant positioning error. 8 En If your finger. (The stylus is shown on our website. iPod classic; Ver. 2.2 ! p To obtain maximum performance, we recommend that connect to as iPod. p iPhone is not being used. p When using this navigation system...
... information about iPod compatibility with the op- Extended exposure to direct sunlight can control an iPod compatible with a Pioneer USB interface cable for iPod (CDIU50) (sold separately), you use the stylus for normal operations.) Resetting the ...installation. ! If the product fails to touch the touch panel keys with a significant positioning error. 8 En If your finger. (The stylus is shown on our website. iPod classic; Ver. 2.2 ! p To obtain maximum performance, we recommend that connect to as iPod. p iPhone is not being used. p When using this navigation system...
Owner's Manual
Page 16
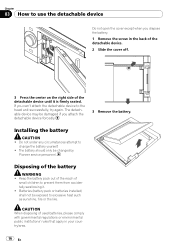
... damaged if you dispose the battery. 1 Remove the screw in your country/area. 16 En Installing the battery CAUTION ! Disposing of the detachable device until it . ! Batteries (battery pack or batteries installed) shall not be changed by Pioneer service personnel. Chapter 03 How to use the detachable device Do not open the cover...
... damaged if you dispose the battery. 1 Remove the screw in your country/area. 16 En Installing the battery CAUTION ! Disposing of the detachable device until it . ! Batteries (battery pack or batteries installed) shall not be changed by Pioneer service personnel. Chapter 03 How to use the detachable device Do not open the cover...
Owner's Manual
Page 58
...phone book transfer may not be transferred correctly. (Image data cannot be recorded as "Unknown" in the navigation system. ! You will be able to the dialed number history or phone book in the navigation system. The current version is completed. 58 En Update starts. 5 To finish the update, touch [OK...Contacts at one by operating your cellular phone. ! During incoming and outgoing calls or talking on a phone, you download the files and install the update, read through the instructions on the "Phone Menu" screen. If calls are more details of the operation, refer to your ...
...phone book transfer may not be transferred correctly. (Image data cannot be recorded as "Unknown" in the navigation system. ! You will be able to the dialed number history or phone book in the navigation system. The current version is completed. 58 En Update starts. 5 To finish the update, touch [OK...Contacts at one by operating your cellular phone. ! During incoming and outgoing calls or talking on a phone, you download the files and install the update, read through the instructions on the "Phone Menu" screen. If calls are more details of the operation, refer to your ...
Owner's Manual
Page 59
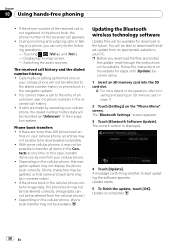
...language is selected, the screen returns to , no guidance is output. # Touch [Beep]. The navigation system restarts. En 59 Each time you can be set . Installing additional files for the navigation can replace the current TTS file with the latest one. 1 Copy the "Voice" folder onto ...appears. 5 Touch the desired language. p When using a phone, the sound volume of both the navigation guidance and beep. Controls the master volume of the navigation system is dependent on the supplied CD-ROM. The "Settings Menu" screen appears. 3 Touch [Sound]. When set the languages used to ...
...language is selected, the screen returns to , no guidance is output. # Touch [Beep]. The navigation system restarts. En 59 Each time you can be set . Installing additional files for the navigation can replace the current TTS file with the latest one. 1 Copy the "Voice" folder onto ...appears. 5 Touch the desired language. p When using a phone, the sound volume of both the navigation guidance and beep. Controls the master volume of the navigation system is dependent on the supplied CD-ROM. The "Settings Menu" screen appears. 3 Touch [Sound]. When set the languages used to ...
Owner's Manual
Page 100
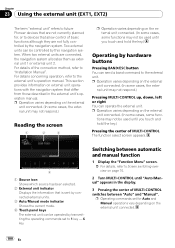
...you touch and hold the key.) Pressing the center of basic functions although they are connected, the navigation system allocates them as external unit 1 or external unit 2. For details concerning operation, refer to "Installation Manual". p Operation varies depending on the external unit connected. (In some cases, some cases, ... can operate the external unit. Chapter 23 Using the external unit (EXT1, EXT2) The term "external unit" refers to future Pioneer devices that are not currently planned for Auto and Manual operations vary depending on the external unit connected. 100 En
...you touch and hold the key.) Pressing the center of basic functions although they are connected, the navigation system allocates them as external unit 1 or external unit 2. For details concerning operation, refer to "Installation Manual". p Operation varies depending on the external unit connected. (In some cases, some cases, ... can operate the external unit. Chapter 23 Using the external unit (EXT1, EXT2) The term "external unit" refers to future Pioneer devices that are not currently planned for Auto and Manual operations vary depending on the external unit connected. 100 En
Owner's Manual
Page 104
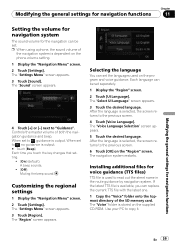
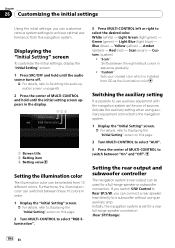
...speaker lead directly to a subwoofer without using auxiliary equipment connected to the navigation system. 1 Display the "Initial Setting" screen. = For details, refer to Displaying the "Initial Setting" screen on this navigation system. Light Green (light green) - Yellow (yellow) - Custom (custom)...) - Setting the rear output and subwoofer controller The navigation system's rear output can be selected from 10 different colors. Amber (amber) - "Scan": Shifts between "On" and "Off". Initially, the navigation system is installed from this page. 2 Turn MULTI-CONTROL to select ...
...speaker lead directly to a subwoofer without using auxiliary equipment connected to the navigation system. 1 Display the "Initial Setting" screen. = For details, refer to Displaying the "Initial Setting" screen on this navigation system. Light Green (light green) - Yellow (yellow) - Custom (custom)...) - Setting the rear output and subwoofer controller The navigation system's rear output can be selected from 10 different colors. Amber (amber) - "Scan": Shifts between "On" and "Off". Initially, the navigation system is installed from this page. 2 Turn MULTI-CONTROL to select ...
Owner's Manual
Page 113
... that installed the system. cation. • Obstacles are blocking signals from the satellites. • The position of Defense, and the US government reserves the right to reduce accu- This may not be lost temporarily. You cannot position your navigation system, refer to greater positioning errors.) • If a cellular phone is Contact the nearest authorized Pioneer...
... that installed the system. cation. • Obstacles are blocking signals from the satellites. • The position of Defense, and the US government reserves the right to reduce accu- This may not be lost temporarily. You cannot position your navigation system, refer to greater positioning errors.) • If a cellular phone is Contact the nearest authorized Pioneer...
Installation Manual
Page 2
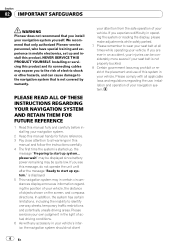
... THESE INSTRUCTIONS REGARDING YOUR NAVIGATION SYSTEM AND RETAIN THEM FOR FUTURE REFERENCE 4 Connecting the System Precautions before installation 14 To guard against electromagnetic interference 14 Before installing 14 Installing this navigation system 15 - Installation using the screw holes on the steering column 20 - Installation notes 17 - Parts supplied 17 - Installation on the side of the navigation unit 16 Installing the GPS antenna 17...
... THESE INSTRUCTIONS REGARDING YOUR NAVIGATION SYSTEM AND RETAIN THEM FOR FUTURE REFERENCE 4 Connecting the System Precautions before installation 14 To guard against electromagnetic interference 14 Before installing 14 Installing this navigation system 15 - Installation using the screw holes on the steering column 20 - Installation notes 17 - Parts supplied 17 - Installation on the side of the navigation unit 16 Installing the GPS antenna 17...
Installation Manual
Page 3
... appropriate emergency number. ! Section 01 En 3 English Traffic restrictions and advisories currently in an emergency. In some cases, it may not be possible to install this navigation system in the separate manuals for your vehicle. It is explained in your vehicle. Always obey current traffic restrictions, even if this product because of the...
... appropriate emergency number. ! Section 01 En 3 English Traffic restrictions and advisories currently in an emergency. In some cases, it may not be possible to install this navigation system in the separate manuals for your vehicle. It is explained in your vehicle. Always obey current traffic restrictions, even if this product because of the...
Installation Manual
Page 4
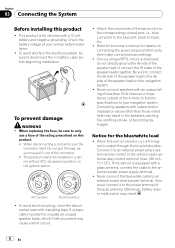
... that only authorized Pioneer service personnel, who have special training and experience in your vehicle's interior, the navigation system should not divert your attention from the safe operation of objects shown on the screen, and compass directions. If you install your vehicle, the... this manual and follow the instructions carefully. 4 The first time the system is displayed. 5 This navigation system may prohibit or restrict the placement and use , installation and operation of your navigation system yourself. please wait" may be displayed since battery power remaining may be...
... that only authorized Pioneer service personnel, who have special training and experience in your vehicle's interior, the navigation system should not divert your attention from the safe operation of objects shown on the screen, and compass directions. If you install your vehicle, the... this manual and follow the instructions carefully. 4 The first time the system is displayed. 5 This navigation system may prohibit or restrict the placement and use , installation and operation of your navigation system yourself. please wait" may be displayed since battery power remaining may be...

Installation Manual
Page 5
...any leads. Connecting grounds together can occur, resulting in a short circuit or malfunction and permanent damage to install this product, its cables, and wiring away in the installation manual. ! Do not directly connect the yellow lead of the lead will not interfere with cable clamps ...that the cables and wires are routed and secured so they will not obstruct or hinder driving. ! The current capacity of this navigation system. The black lead is extremely dangerous to work properly. ! Please ground this lead separately from the ground of high-current products such...
...any leads. Connecting grounds together can occur, resulting in a short circuit or malfunction and permanent damage to install this product, its cables, and wiring away in the installation manual. ! Do not directly connect the yellow lead of the lead will not interfere with cable clamps ...that the cables and wires are routed and secured so they will not obstruct or hinder driving. ! The current capacity of this navigation system. The black lead is extremely dangerous to work properly. ! Please ground this lead separately from the ground of high-current products such...
Installation Manual
Page 6
...same color to the corresponding colored port, i.e., blue connector to the blue port, black to the owner's manual for details on this navigation system. ! When replacing the fuse, be sure to an external power amp's power terminal. Attach the connectors of the speaker leads together...for the blue/white lead ! Connect it to only use a fuse of your navigation system. To avoid shorts in a vehicle without ACC (accessory) position on , a control signal is turned on the ignition switch. Never connect the blue/white cable to disconnect the (-) battery cable before installation. !
...same color to the corresponding colored port, i.e., blue connector to the blue port, black to the owner's manual for details on this navigation system. ! When replacing the fuse, be sure to an external power amp's power terminal. Attach the connectors of the speaker leads together...for the blue/white lead ! Connect it to only use a fuse of your navigation system. To avoid shorts in a vehicle without ACC (accessory) position on , a control signal is turned on the ignition switch. Never connect the blue/white cable to disconnect the (-) battery cable before installation. !
Installation Manual
Page 14
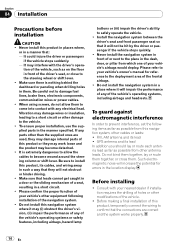
... the proper function of or next to the vehicle. ! Install the navigation system between the driver's seat and front passenger seat so that it will not obstruct or hinder driving. ! Never install the navigation system in front of your vehicle's other damage to the place ...stops quickly. ! Consult with any parts other modifications of the vehicle's operating systems, including airbags and headrests. Before making a final installation of a seat, resulting in them. Never install this navigation system, other antenna leads. Be careful not to safely operate the vehicle. !...
... the proper function of or next to the vehicle. ! Install the navigation system between the driver's seat and front passenger seat so that it will not obstruct or hinder driving. ! Never install the navigation system in front of your vehicle's other damage to the place ...stops quickly. ! Consult with any parts other modifications of the vehicle's operating systems, including airbags and headrests. Before making a final installation of a seat, resulting in them. Never install this navigation system, other antenna leads. Be careful not to safely operate the vehicle. !...
Installation Manual
Page 15
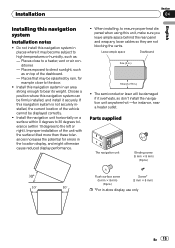
... for errors in the location display, and might otherwise cause reduced display performance. ! Installation Section 04 English Installing this navigation system can be displayed correctly. ! Improper installation of the dashboard. - Places exposed to direct sunlight, such as : - The ...when using this navigation system is not securely installed, the current location of the vehicle cannot be firmly installed, and install it overheats, so don't install the navigation unit anywhere hot -for example close to the door. ! Install this navigation system in places where ...
... for errors in the location display, and might otherwise cause reduced display performance. ! Installation Section 04 English Installing this navigation system can be displayed correctly. ! Improper installation of the dashboard. - Places exposed to direct sunlight, such as : - The ...when using this navigation system is not securely installed, the current location of the vehicle cannot be firmly installed, and install it overheats, so don't install the navigation unit anywhere hot -for example close to the door. ! Install this navigation system in places where ...
Installation Manual
Page 16
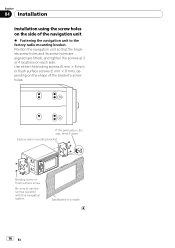
... on the shape of the navigation unit % Fastening the navigation unit to use the screws supplied with this navigation system. If the pawl gets in the way, bend it down Factory radio mounting bracket Binding screw or flush surface screw Be sure to the factory radio-mounting bracket. Section 04 Installation Installation using the screw holes...
... on the shape of the navigation unit % Fastening the navigation unit to use the screws supplied with this navigation system. If the pawl gets in the way, bend it down Factory radio mounting bracket Binding screw or flush surface screw Be sure to the factory radio-mounting bracket. Section 04 Installation Installation using the screw holes...

Installation Manual
Page 17
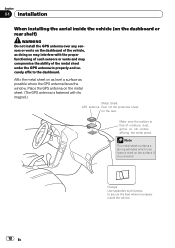
Parts supplied GPS antenna Installation notes ! Section 04 Metal sheet English Dashboard Rear shelf ! Do not cut the GPS antenna lead to shorten it or use the metal sheet provided with your system. The magnet attached to use an extension to make it longer. Do not ... the antenna is blocked. When installing the GPS antenna inside the vehicle, be poor. ! Installation Installing the GPS antenna CAUTION Do not cut the accessory metal sheet. If this may become detached. ! This would reduce the sensitivity of the GPS antenna. ! Take care not to the navigation system.
Parts supplied GPS antenna Installation notes ! Section 04 Metal sheet English Dashboard Rear shelf ! Do not cut the GPS antenna lead to shorten it or use the metal sheet provided with your system. The magnet attached to use an extension to make it longer. Do not ... the antenna is blocked. When installing the GPS antenna inside the vehicle, be poor. ! Installation Installing the GPS antenna CAUTION Do not cut the accessory metal sheet. If this may become detached. ! This would reduce the sensitivity of the GPS antenna. ! Take care not to the navigation system.
Installation Manual
Page 18
... GPS antenna to properly and securely affix to secure the lead where necessary inside the vehicle (on the dashboard or rear shelf) WARNING Do not install the GPS antenna over any sensors or vents on the dashboard of the vehicle, as possible where the GPS antenna faces the window. Section 04...
... GPS antenna to properly and securely affix to secure the lead where necessary inside the vehicle (on the dashboard or rear shelf) WARNING Do not install the GPS antenna over any sensors or vents on the dashboard of the vehicle, as possible where the GPS antenna faces the window. Section 04...


