Owner's Manual
Page 3
... the Bluetooth audio 39 Clearing Bluetooth memory 39 Updating Bluetooth connection software 39 Displaying the Bluetooth system version 39 Setting the rear view camera (back up camera) 39 Auto EQ (auto-equalizing) 40 Setting the video signal 41 Favorite menu Using the Favorite menu 41 Bluetooth connection... When connecting to separately sold power amp 47 When connecting the external video component and the display 47 When connecting with a rear view camera 48 Optional SiriusXM Tuner connection 48 Installation Installation using the screw holes on the side of the unit 49 Installing the microphone...
... the Bluetooth audio 39 Clearing Bluetooth memory 39 Updating Bluetooth connection software 39 Displaying the Bluetooth system version 39 Setting the rear view camera (back up camera) 39 Auto EQ (auto-equalizing) 40 Setting the video signal 41 Favorite menu Using the Favorite menu 41 Bluetooth connection... When connecting to separately sold power amp 47 When connecting the external video component and the display 47 When connecting with a rear view camera 48 Optional SiriusXM Tuner connection 48 Installation Installation using the screw holes on the side of the unit 49 Installing the microphone...
Owner's Manual
Page 4
.... ! WARNING ! USE INPUT ONLY FOR REVERSE OR MIRROR IMAGE REAR VIEW CAMERA. It is used to connect a rear display that allows passengers in motion. 6 Never set . To ensure safe driving WARNING ! Please keep the brake pedal pushed down before using the rear view camera With an optional rear view camera, this PIONEER product. SCREEN IMAGE MAY APPEAR RE- WARNING Do not...
.... ! WARNING ! USE INPUT ONLY FOR REVERSE OR MIRROR IMAGE REAR VIEW CAMERA. It is used to connect a rear display that allows passengers in motion. 6 Never set . To ensure safe driving WARNING ! Please keep the brake pedal pushed down before using the rear view camera With an optional rear view camera, this PIONEER product. SCREEN IMAGE MAY APPEAR RE- WARNING Do not...
Owner's Manual
Page 10
... MENU 1 1 1/2 -119'51'' 1 L+R 1 07'24'' Return 2/2 -112'47'' 1 1 Tab key Switching the touch keys on CD media - Use of the normal picture. The rear view camera needs to display the rear view image automatically when you do not dis- Using sound retriever Automatically enhances compressed audio and restores rich sound. This function is , granting viewers...
... MENU 1 1 1/2 -119'51'' 1 L+R 1 07'24'' Return 2/2 -112'47'' 1 1 Tab key Switching the touch keys on CD media - Use of the normal picture. The rear view camera needs to display the rear view image automatically when you do not dis- Using sound retriever Automatically enhances compressed audio and restores rich sound. This function is , granting viewers...
Owner's Manual
Page 37
... turn automatic playback off, touch DVD Auto Play again. NAVI Apps Completing Picture Adjustment for each source and rear view camera. ! Adjusting the Picture Adjustment for the source. Source Adjusting the Picture Adjustment for the rear view camera. Note If you are adjusting the Picture Adjustment, select the unit. The deregistration is not fully operated, turn...
... turn automatic playback off, touch DVD Auto Play again. NAVI Apps Completing Picture Adjustment for each source and rear view camera. ! Adjusting the Picture Adjustment for the source. Source Adjusting the Picture Adjustment for the rear view camera. Note If you are adjusting the Picture Adjustment, select the unit. The deregistration is not fully operated, turn...
Owner's Manual
Page 38
... is set - Adjusts the color saturation ! ture, resulting in a European language, they can be set to NTSC. # With some rear view cameras, picture adjustment may not be displayed on page 23. ing. ! Multi language setting for fullrange speaker (Full) or subwoofer (Subwoofer) connection...Notes ! ing: - Sound from +3 to a subwoofer without using an auxiliary amp. Setting the rear output and subwoofer controller This unit's rear output (rear speaker leads output and RCA rear output) can be adjusted from this setting. Color - You cannot operate this unit. ! You can...
... is set - Adjusts the color saturation ! ture, resulting in a European language, they can be set to NTSC. # With some rear view cameras, picture adjustment may not be displayed on page 23. ing. ! Multi language setting for fullrange speaker (Full) or subwoofer (Subwoofer) connection...Notes ! ing: - Sound from +3 to a subwoofer without using an auxiliary amp. Setting the rear output and subwoofer controller This unit's rear output (rear speaker leads output and RCA rear output) can be adjusted from this setting. Color - You cannot operate this unit. ! You can...
Owner's Manual
Page 39
...this unit ! Touch the RearView source icon to our website. When the polarity of AVH-X5500BHS/AVH-X4500BT/AVHX3500BHS/AVH-X2500BT) You need to the rear view camera video by pressing the touch key. Off - The rear view key setting also turns off . Important Never turn the unit off and never disconnect ... scroll is set up camera) CAUTION Pioneer recommends the use a Bluetooth audio player. 1 Press the home button to switch to the home display. 2 Touch the system key to open the system menu. 4 Touch BT Software Update. 5 Touch Start to Using the rear view on or off . Otherwise...
...this unit ! Touch the RearView source icon to our website. When the polarity of AVH-X5500BHS/AVH-X4500BT/AVHX3500BHS/AVH-X2500BT) You need to the rear view camera video by pressing the touch key. Off - The rear view key setting also turns off . Important Never turn the unit off and never disconnect ... scroll is set up camera) CAUTION Pioneer recommends the use a Bluetooth audio player. 1 Press the home button to switch to the home display. 2 Touch the system key to open the system menu. 4 Touch BT Software Update. 5 Touch Start to Using the rear view on or off . Otherwise...
Owner's Manual
Page 41
... may cause distortion, color change or malfunction. You can register up to select the desired video signal appears. Adjusts the AV video signal ! Adjusts the rear view camera video signal Using the Favorite menu 1 Display menu columns to Menu operations on the function menu. Video Signal Setting items are connected. # To stop auto...
... may cause distortion, color change or malfunction. You can register up to select the desired video signal appears. Adjusts the AV video signal ! Adjusts the rear view camera video signal Using the Favorite menu 1 Display menu columns to Menu operations on the function menu. Video Signal Setting items are connected. # To stop auto...
Owner's Manual
Page 48
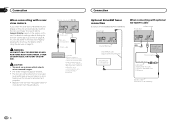
...used as an aid to keep an eye on trailers, or while backing up camera) on settings, refer to Setting the rear view camera (back up . Connection Optional SiriusXM Tuner connection (Function of AVH-X5500BHS/AVH-X3500BHS) This product When connecting with optional CD-IU201V cable USB/iPod input ... shift is moving forwards or backwards. WARNING USE INPUT ONLY FOR REVERSE OR MIRROR IMAGE REAR VIEW CAMERA. You must use for entertainment purposes. ! Objects in .) USB cable (Supplied with a rear view camera If you switch the shift lever to REVERSE (R), the display on page 10. Section ...
...used as an aid to keep an eye on trailers, or while backing up camera) on settings, refer to Setting the rear view camera (back up . Connection Optional SiriusXM Tuner connection (Function of AVH-X5500BHS/AVH-X3500BHS) This product When connecting with optional CD-IU201V cable USB/iPod input ... shift is moving forwards or backwards. WARNING USE INPUT ONLY FOR REVERSE OR MIRROR IMAGE REAR VIEW CAMERA. You must use for entertainment purposes. ! Objects in .) USB cable (Supplied with a rear view camera If you switch the shift lever to REVERSE (R), the display on page 10. Section ...
Owner's Manual
Page 51
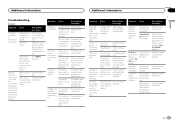
.... The aspect ratio is incorrect and the image is low. The unit is confirming whether or not a disc is not connected. The rear view camera is loaded. There is blown. play has been selected. The fuse is no longer be operated. Noise and/or Press RESET. The...Symptom Cause Action (Reference page) Nothing is changed (No Title, for the disc. The touch panel keys cannot be played back. Connect a rear view camera. Press the home button to return to ACC). Subfolders cannot be used. during still, slow motion or frameby-frame playback. Select the repeat ...
.... The aspect ratio is incorrect and the image is low. The unit is confirming whether or not a disc is not connected. The rear view camera is loaded. There is blown. play has been selected. The fuse is no longer be operated. Noise and/or Press RESET. The...Symptom Cause Action (Reference page) Nothing is changed (No Title, for the disc. The touch panel keys cannot be played back. Connect a rear view camera. Press the home button to return to ACC). Subfolders cannot be used. during still, slow motion or frameby-frame playback. Select the repeat ...


