
Other Manual
Page 2
... not recommend that wires will not obstruct driving. • Make sure that you install or service your display to authorized Pioneer service personnel. • Secure all installation and servicing of applicable laws, the front DVD or TV (sold power amp 7 When connecting with a rear view camera ...... 9 When connecting the external video component ...
... not recommend that wires will not obstruct driving. • Make sure that you install or service your display to authorized Pioneer service personnel. • Secure all installation and servicing of applicable laws, the front DVD or TV (sold power amp 7 When connecting with a rear view camera ...... 9 When connecting the external video component ...

Other Manual
Page 3
... and negative grounding. Connect the connectors of the same colors correctly. • This unit cannot be installed in the electrical system, be sure to disconnect the ≠ battery cable before beginning installation. • Refer to the products or fire. • Cords for this lead separately from the ...used , do not connect the blue lead to the power terminal of high-current products such as the gear shift, handbrake and seat rails. Before installing it in a recreational vehicle, truck, or bus, check the battery voltage. • To avoid shorts in a vehicle that get hot, such ...
... and negative grounding. Connect the connectors of the same colors correctly. • This unit cannot be installed in the electrical system, be sure to disconnect the ≠ battery cable before beginning installation. • Refer to the products or fire. • Cords for this lead separately from the ...used , do not connect the blue lead to the power terminal of high-current products such as the gear shift, handbrake and seat rails. Before installing it in a recreational vehicle, truck, or bus, check the battery voltage. • To avoid shorts in a vehicle that get hot, such ...

Other Manual
Page 12
... video output External video component (sold separately) RCA cables (sold separately) Hide-away unit RCA cables (sold separately power amp. 11 ponent. WARNING: • NEVER install the display in SETUP when connecting the external video com- When using a display connected to rear video output This product's rear video output is for...
... video output External video component (sold separately) RCA cables (sold separately) Hide-away unit RCA cables (sold separately power amp. 11 ponent. WARNING: • NEVER install the display in SETUP when connecting the external video com- When using a display connected to rear video output This product's rear video output is for...
Other Manual
Page 14
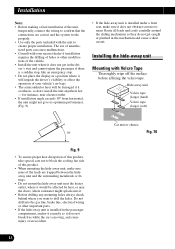
...by heat, or near the doors, where rainwater might not give its optimum performance. (Fig. 9) • If the hide-away unit is installed under a front seat, make sure none of the leads are correct and the system works properly. • Use only the parts included with... gas line, brake line, electrical wiring or other modifications of the vehicle. • Install the unit where it overheats, so don't install the unit anywhere hot - Installation Note: • Before making a final installation of the unit, temporarily connect the wiring to confirm that the connections are trapped between ...
...by heat, or near the doors, where rainwater might not give its optimum performance. (Fig. 9) • If the hide-away unit is installed under a front seat, make sure none of the leads are correct and the system works properly. • Use only the parts included with... gas line, brake line, electrical wiring or other modifications of the vehicle. • Install the unit where it overheats, so don't install the unit anywhere hot - Installation Note: • Before making a final installation of the unit, temporarily connect the wiring to confirm that the connections are trapped between ...
Other Manual
Page 15
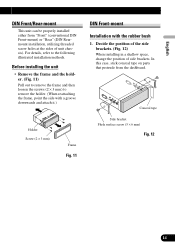
...reattaching the frame, point the side with a groove downwards and attach it.) Holder Screw (2 × 3 mm) Frame Fig. 11 DIN Front-mount Installation with the rubber bush 1. In this case, stick conceal tape on parts that protrude from "Front" (conventional DIN Front-mount) or "Rear" (DIN ...Rearmount installation, utilizing threaded screw holes at the sides of side brackets. Conceal tape Side bracket Flush surface screw (5 × 6 mm) Fig. 12 Deutsch...
...reattaching the frame, point the side with a groove downwards and attach it.) Holder Screw (2 × 3 mm) Frame Fig. 11 DIN Front-mount Installation with the rubber bush 1. In this case, stick conceal tape on parts that protrude from "Front" (conventional DIN Front-mount) or "Rear" (DIN ...Rearmount installation, utilizing threaded screw holes at the sides of side brackets. Conceal tape Side bracket Flush surface screw (5 × 6 mm) Fig. 12 Deutsch...
Other Manual
Page 16
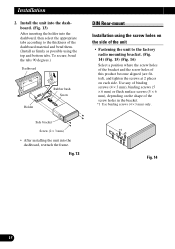
... dashboard, reattach the frame. Use any of the screw holes in the bracket. *1 Use binding screws (4 × 3 mm) only. Installation 2. Side bracket Screw (2 × 3 mm) • After installing the unit into the dashboard, then select the appropriate tabs according to the thickness of the dashboard material and bend them.... (Install as firmly as possible using the screw holes on the side of the unit • Fastening the unit to the factory radio mounting ...
... dashboard, reattach the frame. Use any of the screw holes in the bracket. *1 Use binding screws (4 × 3 mm) only. Installation 2. Side bracket Screw (2 × 3 mm) • After installing the unit into the dashboard, then select the appropriate tabs according to the thickness of the dashboard material and bend them.... (Install as firmly as possible using the screw holes on the side of the unit • Fastening the unit to the factory radio mounting ...
Other Manual
Page 17
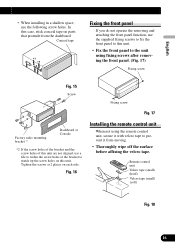
... a shallow space, use a file to widen the screw holes of the bracket to match up the screw holes on this unit. Fig. 16 Installing the remote control unit When not using fixing screws after removing the front panel. (Fig. 17) Fixing screw Fig. 15 Screw Fixing screw Fig. 17 ...
... a shallow space, use a file to widen the screw holes of the bracket to match up the screw holes on this unit. Fig. 16 Installing the remote control unit When not using fixing screws after removing the front panel. (Fig. 17) Fixing screw Fig. 15 Screw Fixing screw Fig. 17 ...


