Owner's Manual
Page 5
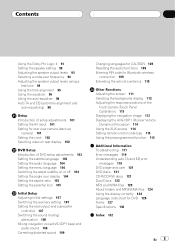
...101 Setting for rear view camera (back up camera) 101 Setting the clock 102 Selecting video on rear display 102 DVD Setup Introduction of DVD setup adjustments 103 Setting the subtitle language 103 Setting the audio language 104 Setting the menu language 104 Switching the assist...positions of the touch panels (Touch Panel Calibration) 113 Displaying the navigation image 113 Displaying the AVG-VDP1 (Pioneer Vehicle Dynamics Processor) 114 Using the AUX source 114 Setting remote control code type 115 Using the preprogrammed function 115 Additional Information Troubleshooting 117 Error messages 119...
...101 Setting for rear view camera (back up camera) 101 Setting the clock 102 Selecting video on rear display 102 DVD Setup Introduction of DVD setup adjustments 103 Setting the subtitle language 103 Setting the audio language 104 Setting the menu language 104 Switching the assist...positions of the touch panels (Touch Panel Calibration) 113 Displaying the navigation image 113 Displaying the AVG-VDP1 (Pioneer Vehicle Dynamics Processor) 114 Using the AUX source 114 Setting remote control code type 115 Using the preprogrammed function 115 Additional Information Troubleshooting 117 Error messages 119...

Owner's Manual
Page 21
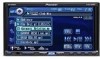
... ! Turn the unit off (refer to select a source. Press SOURCE repeatedly to a Pioneer product (such as one available in the multiCD player. - TUNER (tuner)-TV (television)-AV (AV)- Built-in DVD player disc 2 ! Television ! AUX1 - AUX 2 ! AV input ! BT telephone ! AUX2 (AUX 2)-NAVI (navigation unit)-TEL (bluetooth telephone)-BT Audio (bluetooth audio player) Notes...
... ! Turn the unit off (refer to select a source. Press SOURCE repeatedly to a Pioneer product (such as one available in the multiCD player. - TUNER (tuner)-TV (television)-AV (AV)- Built-in DVD player disc 2 ! Television ! AUX1 - AUX 2 ! AV input ! BT telephone ! AUX2 (AUX 2)-NAVI (navigation unit)-TEL (bluetooth telephone)-BT Audio (bluetooth audio player) Notes...

Owner's Manual
Page 87
... touch c or d selects cut -off frequency. External unit 1 and external unit 2 are set to the same source level adjustment volume automatically. ! ACTOR'S STAGE (actor's stage) ! AUX (auxiliary input) and AV (AV input) are set to adjust the source volume. High pass filter is increased or decreased. SLA function does not adjust...
... touch c or d selects cut -off frequency. External unit 1 and external unit 2 are set to the same source level adjustment volume automatically. ! ACTOR'S STAGE (actor's stage) ! AUX (auxiliary input) and AV (AV input) are set to adjust the source volume. High pass filter is increased or decreased. SLA function does not adjust...

Owner's Manual
Page 91
.... 2 Touch ON to the same source level adjustment volume automatically. Stereo mix the original audio that the surround components can be restored (decoded). AUX (auxiliary input) and AV (AV input) are set to turn the dynamic range control on other types of your audio settings. ! The dynamic... source level adjustment volume automatically. ! Touch d to the difference between the largest and softest sounds. En 91 When playing other than the DVD disc, you cannot switch this difference so that you can clearly hear sounds even at low volume levels. ! Down mix so that do ...
.... 2 Touch ON to the same source level adjustment volume automatically. Stereo mix the original audio that the surround components can be restored (decoded). AUX (auxiliary input) and AV (AV input) are set to turn the dynamic range control on other types of your audio settings. ! The dynamic... source level adjustment volume automatically. ! Touch d to the difference between the largest and softest sounds. En 91 When playing other than the DVD disc, you cannot switch this difference so that you can clearly hear sounds even at low volume levels. ! Down mix so that do ...

Owner's Manual
Page 107
... to the previous group of function names, touch PREV. # To return to the previous display, touch BACK. # To return to the display of each AUX source to ON when using. If you can connect a rear speaker lead directly to SUB. W, you switch the rear output setting to a subwoofer without ...using auxiliary equipments, refer to Using the AUX source on page 114. % Touch AUX1/AUX2 on the initial menu to turn this case, you can select whether to display the function names. In...
... to the previous group of function names, touch PREV. # To return to the previous display, touch BACK. # To return to the display of each AUX source to ON when using. If you can connect a rear speaker lead directly to SUB. W, you switch the rear output setting to a subwoofer without ...using auxiliary equipments, refer to Using the AUX source on page 114. % Touch AUX1/AUX2 on the initial menu to turn this case, you can select whether to display the function names. In...

Owner's Manual
Page 114
... source % Touch the source icon and then touch AUX to select AUX as the source. # When the source icon is connected to this type of connection if the auxiliary equipment has RCA outputs. Displaying the AVG-VDP1 (Pioneer Vehicle Dynamics Processor) This unit can be changed.... (ENT) to display navigation menu when the navigation map is automatically read in as AUX source and assigned to AUX. Using the AUX source This unit can operate this function only when a Pioneer Vehicle Dynamics Processor (AVGVDP1) is not displayed, you have two methods to connect auxiliary...
... source % Touch the source icon and then touch AUX to select AUX as the source. # When the source icon is connected to this type of connection if the auxiliary equipment has RCA outputs. Displaying the AVG-VDP1 (Pioneer Vehicle Dynamics Processor) This unit can be changed.... (ENT) to display navigation menu when the navigation map is automatically read in as AUX source and assigned to AUX. Using the AUX source This unit can operate this function only when a Pioneer Vehicle Dynamics Processor (AVGVDP1) is not displayed, you have two methods to connect auxiliary...
Other Manual
Page 2
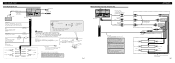
... when using the optional amplifier. Connecting the Units Connecting the power cord IP-BUS input (Blue) 16 cm Violet/white Refer to Fig. 4. 20 cm AUX input jack 15 cm Antenna cable IP-BUS cable Multi-CD player (sold multi-channel processor (e.g. If not, keep the Audio Mute lead free of...
... when using the optional amplifier. Connecting the Units Connecting the power cord IP-BUS input (Blue) 16 cm Violet/white Refer to Fig. 4. 20 cm AUX input jack 15 cm Antenna cable IP-BUS cable Multi-CD player (sold multi-channel processor (e.g. If not, keep the Audio Mute lead free of...


