Owner's Manual
Page 5
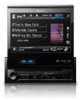
...even by persons other hazards. If you are disabled unless the parking brake is on the front display. Do not attempt to install or service your display by persons without training and experience in electronic equipment and automotive accessories may be obeyed and this unit's DVD... from the safe operation of your vehicle. Precautions Section 01 Precautions IMPORTANT SAFEGUARDS Please read and understood the operating instructions. 5 Do not install the display where it may (i) obstruct the driver's vision, (ii) impair the performance of any of the vehicle's operating systems or...
...even by persons other hazards. If you are disabled unless the parking brake is on the front display. Do not attempt to install or service your display by persons without training and experience in electronic equipment and automotive accessories may be obeyed and this unit's DVD... from the safe operation of your vehicle. Precautions Section 01 Precautions IMPORTANT SAFEGUARDS Please read and understood the operating instructions. 5 Do not install the display where it may (i) obstruct the driver's vision, (ii) impair the performance of any of the vehicle's operating systems or...

Owner's Manual
Page 6
... keys) offered by this unit could be dangerous and/or unlawful if used for checking the rear when the vehicle is moving forward. WARNING NEVER install the rear display in the rear seats to enable passengers in a location where the driver can watch the DVD or Video CD. ! Please keep an...
... keys) offered by this unit could be dangerous and/or unlawful if used for checking the rear when the vehicle is moving forward. WARNING NEVER install the rear display in the rear seats to enable passengers in a location where the driver can watch the DVD or Video CD. ! Please keep an...
Owner's Manual
Page 7
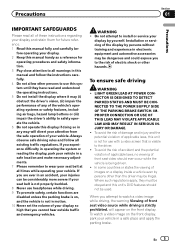
... cause harmful interference, and (2) this unit are allocated for future reference. ! Wash hands after handling.. For your own security and convenience, be installed and operated with at least 20 cm and more between the radiator and person's body (excluding extremities: hands, wrists, feet and ankles). Information ... is located on this device must not be erased. Before You Start Section 02 Before You Start FCC ID: AJDK027 MODEL NO.: AVH-P5200BT IC: 775E-K027 This equipment complies with FCC/IC radiation exposure limits set forth for uncontrolled equipment and meets the FCC/IC radio...
... cause harmful interference, and (2) this unit are allocated for future reference. ! Wash hands after handling.. For your own security and convenience, be installed and operated with at least 20 cm and more between the radiator and person's body (excluding extremities: hands, wrists, feet and ankles). Information ... is located on this device must not be erased. Before You Start Section 02 Before You Start FCC ID: AJDK027 MODEL NO.: AVH-P5200BT IC: 775E-K027 This equipment complies with FCC/IC radiation exposure limits set forth for uncontrolled equipment and meets the FCC/IC radio...
Owner's Manual
Page 9
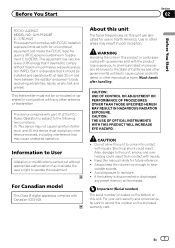
Front panel and the head unit are connected on the left . Resetting the microprocessor By pressing RESET, you select Off for the first time after installation ! Feature demo mode The feature demo automatically starts when you can 't attach the front panel to the head unit successfully, try again. Operating the feature ...
Front panel and the head unit are connected on the left . Resetting the microprocessor By pressing RESET, you select Off for the first time after installation ! Feature demo mode The feature demo automatically starts when you can 't attach the front panel to the head unit successfully, try again. Operating the feature ...
Owner's Manual
Page 65
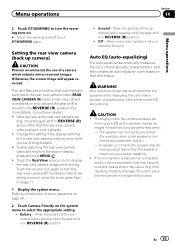
...the gear shift to REVERSE (R) and confirm that automatically switches to the rear view camera video (REAR VIEW CAMERA IN) when a rear view camera is installed on your car and the gear shift is not connected to this setting if the display switches to the rear view camera video by error... may be damaged if these functions are driving forward. ! Setting the rear view camera (back up the rear view camera set up camera) CAUTION Pioneer recommends the use of the connected lead is positive while the gear shift is in REVERSE (R) position ! If the microphone is connected as the speakers...
...the gear shift to REVERSE (R) and confirm that automatically switches to the rear view camera video (REAR VIEW CAMERA IN) when a rear view camera is installed on your car and the gear shift is not connected to this setting if the display switches to the rear view camera video by error... may be damaged if these functions are driving forward. ! Setting the rear view camera (back up the rear view camera set up camera) CAUTION Pioneer recommends the use of the connected lead is positive while the gear shift is in REVERSE (R) position ! If the microphone is connected as the speakers...
Owner's Manual
Page 72
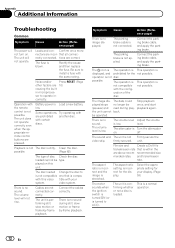
.... The volume level is compa- off. recommended size mended rates. Confirm once more nectors are not connected correctly. The disc loaded Change the disc to install a fuse with another disc. Connect the cables correctly. unit. File size and Create a DivX file transmission rate that all connecrectly connected. and transmission rate. The...
.... The volume level is compa- off. recommended size mended rates. Confirm once more nectors are not connected correctly. The disc loaded Change the disc to install a fuse with another disc. Connect the cables correctly. unit. File size and Create a DivX file transmission rate that all connecrectly connected. and transmission rate. The...
Installation Manual
Page 2
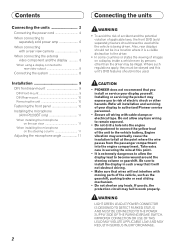
...Front-mount 9 DIN Rear-mount 10 Removing the unit 10 Fastening the front panel 10 Installing the microphone (AVH-P5200BT only 11 When installing the microphone on the sun visor 11 When installing the microphone on a display inside a vehicle even by persons other hazards. Where such regulations...not be used while the vehicle is being driven. Installing or servicing the product may expose you do, the protection circuit may eventually cause the insulation to authorized Pioneer service personnel. • Secure all installation and servicing of the unit to become wound around ...
...Front-mount 9 DIN Rear-mount 10 Removing the unit 10 Fastening the front panel 10 Installing the microphone (AVH-P5200BT only 11 When installing the microphone on the sun visor 11 When installing the microphone on a display inside a vehicle even by persons other hazards. Where such regulations...not be used while the vehicle is being driven. Installing or servicing the product may expose you do, the protection circuit may eventually cause the insulation to authorized Pioneer service personnel. • Secure all installation and servicing of the unit to become wound around ...

Installation Manual
Page 3
...must be wired separately. Disconnect the negative terminal of the rating prescribed. - Cover any cables. - If they are color-coded. When installing this cable to the engine compartment. - Place all cables away from moving parts, such as near the heater outlet. - Do not...blue/white cable. Do not connect the yellow cable to 8 ohm (impedance value). • To prevent short-circuit, overheating or malfunction, be installed in battery drain or a malfunction. • IP-BUS connectors are not, an accidental detachment may result in a vehicle without ACC (accessory) ...
...must be wired separately. Disconnect the negative terminal of the rating prescribed. - Cover any cables. - If they are color-coded. When installing this cable to the engine compartment. - Place all cables away from moving parts, such as near the heater outlet. - Do not...blue/white cable. Do not connect the yellow cable to 8 ohm (impedance value). • To prevent short-circuit, overheating or malfunction, be installed in battery drain or a malfunction. • IP-BUS connectors are not, an accidental detachment may result in a vehicle without ACC (accessory) ...
Installation Manual
Page 8
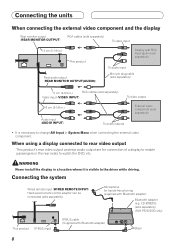
...display to enable passengers in the rear seats to change AV Input in System Menu when connecting the external video component. WARNING Never install the display in a location where it is necessary to watch the DVD, etc. When using a display connected to the driver ...input (VIDEO INPUT) To video output 13 cm (5-1/8 in.) Audio input (AUDIO INPUT) To audio outputs External video component (sold separately) (AVH-P5200DVD only) This product IP-BUS input IP-BUS cable (Supplied with Bluetooth adapter) Bluetooth adapter (e.g. Connecting the system Wired remote input (WIRED REMOTE...
...display to enable passengers in the rear seats to change AV Input in System Menu when connecting the external video component. WARNING Never install the display in a location where it is necessary to watch the DVD, etc. When using a display connected to the driver ...input (VIDEO INPUT) To video output 13 cm (5-1/8 in.) Audio input (AUDIO INPUT) To audio outputs External video component (sold separately) (AVH-P5200DVD only) This product IP-BUS input IP-BUS cable (Supplied with Bluetooth adapter) Bluetooth adapter (e.g. Connecting the system Wired remote input (WIRED REMOTE...

Installation Manual
Page 9
..., hazard lamp buttons or (iii) impair the driver's ability to the following installation methods. • Use commercially available parts when installing. Side bracket (small) Flush surface screw (5 mm × 6 mm) 9 Install this unit away from "Front" (conventional DIN Front-mount) or "Rear" ... an angle of less than 30°. • When installing, to radiate freely. This is installed at the sides of unit chassis). English Installation Note • Check all connections and systems before final installation. • Do not use of unauthorized parts may cause malfunctions...
..., hazard lamp buttons or (iii) impair the driver's ability to the following installation methods. • Use commercially available parts when installing. Side bracket (small) Flush surface screw (5 mm × 6 mm) 9 Install this unit away from "Front" (conventional DIN Front-mount) or "Rear" ... an angle of less than 30°. • When installing, to radiate freely. This is installed at the sides of unit chassis). English Installation Note • Check all connections and systems before final installation. • Do not use of unauthorized parts may cause malfunctions...

Installation Manual
Page 10
... detach the front panel, the front panel can be fastened with supplied screw. Screw 10 Determine the appropriate position where the holes on each side. Installation 2. Screw Factory radio mounting bracket Dashboard or Console Removing the unit Extend top and bottom of the unit match. • When...
... detach the front panel, the front panel can be fastened with supplied screw. Screw 10 Determine the appropriate position where the holes on each side. Installation 2. Screw Factory radio mounting bracket Dashboard or Console Removing the unit Extend top and bottom of the unit match. • When...
Installation Manual
Page 11
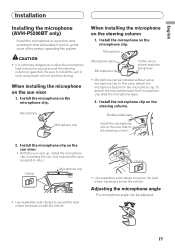
... Clamp Microphone clip • Use separately sold clamps to become wound around the steering column or gearstick. Install the microphone on the steering column. Install the microphone on the sun visor. • With the sun visor up the voice of the steering column.... 2. In this case, detach the microphone base from microphone clip, slide the microphone base. 2. English Installation Installing the microphone (AVH-P5200BT only) Install the microphone in such a way that will not obstruct driving. Microphone Microphone base Microphone clip Fit the microphone lead...
... Clamp Microphone clip • Use separately sold clamps to become wound around the steering column or gearstick. Install the microphone on the steering column. Install the microphone on the sun visor. • With the sun visor up the voice of the steering column.... 2. In this case, detach the microphone base from microphone clip, slide the microphone base. 2. English Installation Installing the microphone (AVH-P5200BT only) Install the microphone in such a way that will not obstruct driving. Microphone Microphone base Microphone clip Fit the microphone lead...


