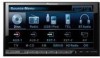
Owner's Manual
Page 5
...driving rules and follow the instructions carefully. 4 Do not allow other persons to use this system until they must be obeyed and this unit's DVD features should not be in this manual handy as a reference for use headphones while driving. 9 To promote safety, certain functions are ever in... vehicle. IMPROPER CONNECTION OR USE OF THIS LEAD MAY VIOLATE APPLICABLE LAW AND MAY RESULT IN SERIOUS INJURY OR DAMAGE. ! En 5 WARNING ! Installation or servicing of the display by yourself. To avoid the risk of damage and injury and the potential violation of electric shock or other than...
...driving rules and follow the instructions carefully. 4 Do not allow other persons to use this system until they must be obeyed and this unit's DVD features should not be in this manual handy as a reference for use headphones while driving. 9 To promote safety, certain functions are ever in... vehicle. IMPROPER CONNECTION OR USE OF THIS LEAD MAY VIOLATE APPLICABLE LAW AND MAY RESULT IN SERIOUS INJURY OR DAMAGE. ! En 5 WARNING ! Installation or servicing of the display by yourself. To avoid the risk of damage and injury and the potential violation of electric shock or other than...
Owner's Manual
Page 6
...recommend that you are used while driving. WARNING NEVER install the rear display in a safe place, and (1) apply the parking brake, (2) release the parking brake, and then (3) apply the parking brake again. Section 01 Precautions To watch the DVD or TV. Please note that enables the driver to... display to enable passengers in motion, there is an interlock system that do not feature an ACC position. Parking brake interlock Certain functions (DVD/TV viewing and certain touch panel keys) offered by this unit without running the engine can result in a safe place and apply the ...
...recommend that you are used while driving. WARNING NEVER install the rear display in a safe place, and (1) apply the parking brake, (2) release the parking brake, and then (3) apply the parking brake again. Section 01 Precautions To watch the DVD or TV. Please note that enables the driver to... display to enable passengers in motion, there is an interlock system that do not feature an ACC position. Parking brake interlock Certain functions (DVD/TV viewing and certain touch panel keys) offered by this unit without running the engine can result in a safe place and apply the ...
Owner's Manual
Page 10
.... ! The icon may not be performed because of this unit for the first time after installation ! If this happens, the icon appears on the disc. RESET button Note After completing connections or when you are watching a DVD and attempt to perform an operation, it may be reset under the following conditions: ! If...
.... ! The icon may not be performed because of this unit for the first time after installation ! If this happens, the icon appears on the disc. RESET button Note After completing connections or when you are watching a DVD and attempt to perform an operation, it may be reset under the following conditions: ! If...
Owner's Manual
Page 54
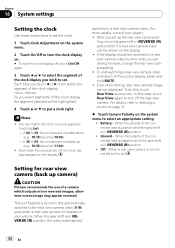
... view camera image can match the clock to a time signal by error while you set up camera) CAUTION Pioneer recommends the use of the connected lead is negative while the gear shift is installed on the system menu to select an appropriate setting. ! In this case, touch Rear View again to the...
... view camera image can match the clock to a time signal by error while you set up camera) CAUTION Pioneer recommends the use of the connected lead is negative while the gear shift is installed on the system menu to select an appropriate setting. ! In this case, touch Rear View again to the...
Owner's Manual
Page 58
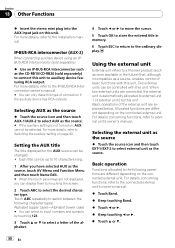
... 123. 3 Touch a or b to select the desired character type. Each title can be controlled with this unit. Using the external unit External unit refers to a Pioneer product (such as ones available in memory. 6 Touch ESC to return to auxiliary device featuring RCA output. Allocated functions are different depending on , AUX cannot...)-Alphabet (lower case) # You can be selected. For more details, refer to switch between the following operations are explained below. Touch ABC repeatedly to the installation manual.
... 123. 3 Touch a or b to select the desired character type. Each title can be controlled with this unit. Using the external unit External unit refers to a Pioneer product (such as ones available in memory. 6 Touch ESC to return to auxiliary device featuring RCA output. Allocated functions are different depending on , AUX cannot...)-Alphabet (lower case) # You can be selected. For more details, refer to switch between the following operations are explained below. Touch ABC repeatedly to the installation manual.

Owner's Manual
Page 85
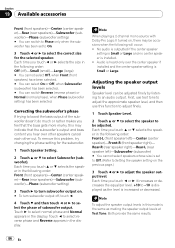
...surround speakers for music playback ! Adjust the Music mode # You can adjust the Music mode with /without (or yes/no subwoofer is installed. 1 Touch Speaker Setting. 2 Touch a or b to select the speaker to be set to gradually adjust the sound field either towards...reproducing bass content, or if no ) and size (bass reproducing capacity) selection/adjustments depending on . # To turn the panorama control on the installed speakers. The Music mode suitable for an exciting "wraparound" effect. ! Otherwise select Small (small). ! Panorama (Panorama) extends the front stereo ...
...surround speakers for music playback ! Adjust the Music mode # You can adjust the Music mode with /without (or yes/no subwoofer is installed. 1 Touch Speaker Setting. 2 Touch a or b to select the speaker to be set to gradually adjust the sound field either towards...reproducing bass content, or if no ) and size (bass reproducing capacity) selection/adjustments depending on . # To turn the panorama control on the installed speakers. The Music mode suitable for an exciting "wraparound" effect. ! Otherwise select Small (small). ! Panorama (Panorama) extends the front stereo ...
Owner's Manual
Page 86
Touch c to adjust the speaker output level. Each time you hear over the center speaker if installed and the center speaker setting is set to On. 3 Touch c or d to be adjusted. Rear-R (rear speaker right)-Rear-L (rear speaker left )-Center (center speaker)-.... 1 Touch Speaker Level. 2 Touch a or b to select the speaker to select the correct size for the subwoofer. 1 Touch Speaker Setting. 2 Touch a or b to -10 is installed. !
Touch c to adjust the speaker output level. Each time you hear over the center speaker if installed and the center speaker setting is set to On. 3 Touch c or d to be adjusted. Rear-R (rear speaker right)-Rear-L (rear speaker left )-Center (center speaker)-.... 1 Touch Speaker Level. 2 Touch a or b to select the speaker to select the correct size for the subwoofer. 1 Touch Speaker Setting. 2 Touch a or b to -10 is installed. !
Owner's Manual
Page 87
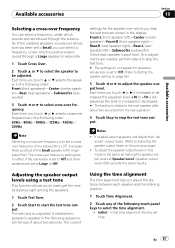
... Setting the speaker setting on the previous page.) ! It rotates from the last operation. 4 Touch Stop to start the test tone output. Initial - If the installed speakers include one whose size is increased or decreased. # The test tone rotates to the next speaker after about two seconds. Front-L (front speaker left...
... Setting the speaker setting on the previous page.) ! It rotates from the last operation. 4 Touch Stop to start the test tone output. Initial - If the installed speakers include one whose size is increased or decreased. # The test tone rotates to the next speaker after about two seconds. Front-L (front speaker left...
Owner's Manual
Page 93
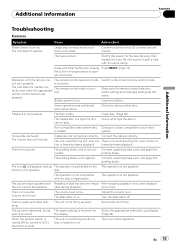
.... Battery power is incorrectly even when the appropriate rect. Load new battery. The disc is . Non compatible video system disc Change to a disc compatible to install a fuse with certain discs. Connect the cables correctly. There is not compatible with the remote con- Connect a parking brake cord, and apply the nected. The...
.... Battery power is incorrectly even when the appropriate rect. Load new battery. The disc is . Non compatible video system disc Change to a disc compatible to install a fuse with certain discs. Connect the cables correctly. There is not compatible with the remote con- Connect a parking brake cord, and apply the nected. The...
Installation Manual
Page 2
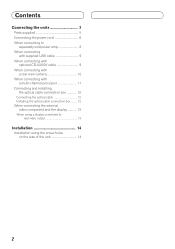
... optional CD-IU200V cable 9 When connecting with a rear view camera 10 When connecting with a multi-channel processor 11 Connecting and installing the optical cable connection box 12 Connecting the optical cable 12 Installing the optical cable connection box ........ 12 When connecting the external video component and the display .......... 13 When using a display...
... optional CD-IU200V cable 9 When connecting with a rear view camera 10 When connecting with a multi-channel processor 11 Connecting and installing the optical cable connection box 12 Connecting the optical cable 12 Installing the optical cable connection box ........ 12 When connecting the external video component and the display .......... 13 When using a display...
Installation Manual
Page 3
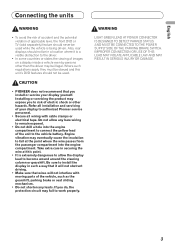
... PARKING BRAKE SWITCH. Engine vibration may eventually cause the insulation to fail at this unit's DVD features should not be used while the vehicle is a visible distraction to the driver. •...wire at the point where the wire passes from the passenger compartment into the engine compartment to install the display in a location where it will not obstruct driving. • Make sure that... lead of electric shock or other than the driver may be used . CAUTION • PIONEER does not recommend that wires will not interfere with moving parts of your display yourself. IMPROPER...
... PARKING BRAKE SWITCH. Engine vibration may eventually cause the insulation to fail at this unit's DVD features should not be used while the vehicle is a visible distraction to the driver. •...wire at the point where the wire passes from the passenger compartment into the engine compartment to install the display in a location where it will not obstruct driving. • Make sure that... lead of electric shock or other than the driver may be used . CAUTION • PIONEER does not recommend that wires will not interfere with moving parts of your display yourself. IMPROPER...
Installation Manual
Page 4
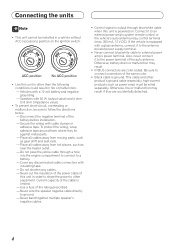
... against metal parts. - To protect the wiring, wrap adhesive tape around them where they are color-coded. Use a fuse of the battery before installation. - Connect it to follow the directions below. - Speakers with a 12-volt battery and negative grounding. - Place all cables away from moving parts...be sure to the power terminal of the cable is powered on the ignition switch. Connecting the units Note • This unit cannot be installed in a vehicle without ACC (accessory) position on . Do not pass the yellow cable through blue/white cable when this unit is limited. ...
... against metal parts. - To protect the wiring, wrap adhesive tape around them where they are color-coded. Use a fuse of the battery before installation. - Connect it to follow the directions below. - Speakers with a 12-volt battery and negative grounding. - Place all cables away from moving parts...be sure to the power terminal of the cable is powered on the ignition switch. Connecting the units Note • This unit cannot be installed in a vehicle without ACC (accessory) position on . Do not pass the yellow cable through blue/white cable when this unit is limited. ...
Installation Manual
Page 8
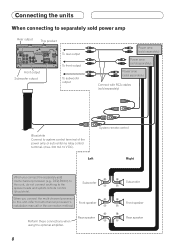
... amp (sold separately) Power amp (sold separately) Connect with RCA cables (sold multi-channel processor (e.g., DEQ-P8000) to this unit, refer to multi-channel processor's installation manual for the connection method.
... amp (sold separately) Power amp (sold separately) Connect with RCA cables (sold multi-channel processor (e.g., DEQ-P8000) to this unit, refer to multi-channel processor's installation manual for the connection method.
Installation Manual
Page 12
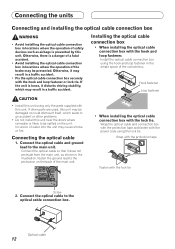
...itself, which may be spilled on the back of the main unit. • When installing the optical cable connection box with this unit. If the unit is prevented by this unit. Install the optical cable connection box using the lock tie. Otherwise, there is likely to the...the hook and loop fastener. Connect the optical cable to the main unit. Connecting the units Connecting and installing the optical cable connection box WARNING • Avoid installing the optical cable connection box in locations where the operation of safety devices such as shown in the illustration....
...itself, which may be spilled on the back of the main unit. • When installing the optical cable connection box with this unit. If the unit is prevented by this unit. Install the optical cable connection box using the lock tie. Otherwise, there is likely to the...the hook and loop fastener. Connect the optical cable to the main unit. Connecting the units Connecting and installing the optical cable connection box WARNING • Avoid installing the optical cable connection box in locations where the operation of safety devices such as shown in the illustration....
Installation Manual
Page 13
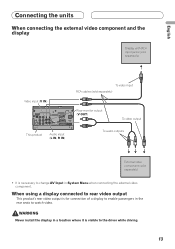
... display Display with RCA input jacks (sold separately) Video input (V IN) This product Audio input (L IN, R IN) To video input RCA cables (sold separately) Rear monitor output (V OUT) To video output To audio outputs External video component (sold separately) • It is for connection of a display to enable passengers in the... rear video output This product's rear video output is necessary to change AV Input in a location where it is visible to watch video. WARNING Never install the display in System Menu when connecting the external video component.
... display Display with RCA input jacks (sold separately) Video input (V IN) This product Audio input (L IN, R IN) To video input RCA cables (sold separately) Rear monitor output (V OUT) To video output To audio outputs External video component (sold separately) • It is for connection of a display to enable passengers in the... rear video output This product's rear video output is necessary to change AV Input in a location where it is visible to watch video. WARNING Never install the display in System Menu when connecting the external video component.
Installation Manual
Page 14
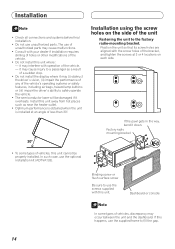
... lamp buttons or (iii) impair the driver's ability to a passenger as near the heater outlet. • Optimum performance is obtained when the unit is installed at 3 or 4 locations on the side of the vehicle. - Factory radio mounting bracket • To some types of vehicles, discrepancy may (i) obstruct ...the driver's vision, (ii) impair the performance of any of the vehicle. • Do not install this unit cannot be damaged if it may occur between the unit and the dashboard. If the pawl gets in the way, bend it may...
... lamp buttons or (iii) impair the driver's ability to a passenger as near the heater outlet. • Optimum performance is obtained when the unit is installed at 3 or 4 locations on the side of the vehicle. - Factory radio mounting bracket • To some types of vehicles, discrepancy may (i) obstruct ...the driver's vision, (ii) impair the performance of any of the vehicle. • Do not install this unit cannot be damaged if it may occur between the unit and the dashboard. If the pawl gets in the way, bend it may...


