Owner's Manual
Page 4
... 72 Adjusting the response positions of the touch panels (Touch Panel Calibration) 73 Using an AUX source 73 Using an external unit 74 Installation Connecting the units 75 Installation 85 Additional Information Troubleshooting 88 Error messages 90 Understanding auto EQ error messages 94 Understanding messages 94 Indicator list 95 Handling guidelines 97...
... 72 Adjusting the response positions of the touch panels (Touch Panel Calibration) 73 Using an AUX source 73 Using an external unit 74 Installation Connecting the units 75 Installation 85 Additional Information Troubleshooting 88 Error messages 90 Understanding auto EQ error messages 94 Understanding messages 94 Indicator list 95 Handling guidelines 97...
Owner's Manual
Page 5
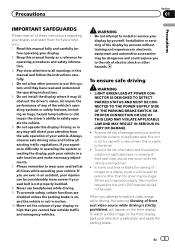
... safe place and apply the parking brake. Precautions Section 01 Precautions IMPORTANT SAFEGUARDS Please read and understood the operating instructions. 5 Do not install the display where it may (i) obstruct the driver's vision, (ii) impair the performance of any of the vehicle's operating systems or... operating the system or reading the display, park your vehicle in a safe location and make necessary adjustments. 7 Please remember to install or service your vehicle in electronic equipment and automotive accessories may be considerably more severe if your seat belt is not properly buckled...
... safe place and apply the parking brake. Precautions Section 01 Precautions IMPORTANT SAFEGUARDS Please read and understood the operating instructions. 5 Do not install the display where it may (i) obstruct the driver's vision, (ii) impair the performance of any of the vehicle's operating systems or... operating the system or reading the display, park your vehicle in a safe location and make necessary adjustments. 7 Please remember to install or service your vehicle in electronic equipment and automotive accessories may be considerably more severe if your seat belt is not properly buckled...
Owner's Manual
Page 6
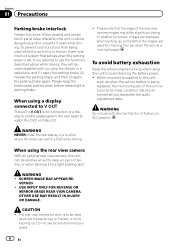
... parking spot. When no power is supplied to this unit, such as when the vehicle battery is being used for entertainment purposes. 6 En WARNING NEVER install the rear display in a safe place, and (1) apply the parking brake, (2) release the parking brake, and then (3) apply the parking brake again. USE INPUT ONLY...
... parking spot. When no power is supplied to this unit, such as when the vehicle battery is being used for entertainment purposes. 6 En WARNING NEVER install the rear display in a safe place, and (1) apply the parking brake, (2) release the parking brake, and then (3) apply the parking brake again. USE INPUT ONLY...
Owner's Manual
Page 7
... "comfort level" adapts to the following two conditions: (1) This device may not cause harmful interference, and (2) this device must not be installed and operated keeping the radiator at a low setting. ! Do not use in potentially hazardous situations. ! the use in North America. For...Your Hands Get the most importantly, without distortion. ! Before you start Section 02 Before you start FCC ID: AJDK028 MODEL NO.: AVH-P3300BT IC: 775E-K028 This equipment complies with any interference received, including interference that may create a traffic hazard and is illegal in many ...
... "comfort level" adapts to the following two conditions: (1) This device may not cause harmful interference, and (2) this device must not be installed and operated keeping the radiator at a low setting. ! Do not use in potentially hazardous situations. ! the use in North America. For...Your Hands Get the most importantly, without distortion. ! Before you start Section 02 Before you start FCC ID: AJDK028 MODEL NO.: AVH-P3300BT IC: 775E-K028 This equipment complies with any interference received, including interference that may create a traffic hazard and is illegal in many ...
Owner's Manual
Page 9
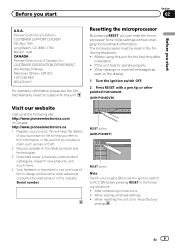
...Canada http://www.pioneerelectronics.ca 1 Register your engine ON or set the ignition switch to this unit for the first time after installation ! The microprocessor must be reset in the event of Canada, Inc. After completing connections ! When resetting the unit to design... much more. 4 Your feedback is important in the industry. When erasing all stored settings ! Before you start U.S.A. Pioneer Electronics (USA) Inc. Serial number RESET button (AVH-P3300BT) RESET button Note Switch your product. If the unit fails to its initial (factory) settings En 9 Resetting the ...
...Canada http://www.pioneerelectronics.ca 1 Register your engine ON or set the ignition switch to this unit for the first time after installation ! The microprocessor must be reset in the event of Canada, Inc. After completing connections ! When resetting the unit to design... much more. 4 Your feedback is important in the industry. When erasing all stored settings ! Before you start U.S.A. Pioneer Electronics (USA) Inc. Serial number RESET button (AVH-P3300BT) RESET button Note Switch your product. If the unit fails to its initial (factory) settings En 9 Resetting the ...
Owner's Manual
Page 10
...the battery with the plus (+) and minus (-) poles aligned properly. ! If the battery leaks, wipe the remote control completely clean and install a new battery. ! The remote control may become jammed under the brake or accelerator pedal. 10 En WARNING ! "Perchlorate Material - Important...out of the reach of explosion if the battery is turned off operations may drain the battery power. Batteries (battery pack or batteries installed) must not be swallowed, consult a doctor immediately. ! Use one CR2025 (3 V) lithium battery. ! special handling may not ...
...the battery with the plus (+) and minus (-) poles aligned properly. ! If the battery leaks, wipe the remote control completely clean and install a new battery. ! The remote control may become jammed under the brake or accelerator pedal. 10 En WARNING ! "Perchlorate Material - Important...out of the reach of explosion if the battery is turned off operations may drain the battery power. Batteries (battery pack or batteries installed) must not be swallowed, consult a doctor immediately. ! Use one CR2025 (3 V) lithium battery. ! special handling may not ...
Owner's Manual
Page 23
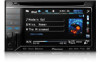
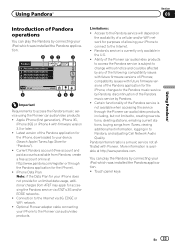
...iPhone 3G, iPhone 3GS or iPhone 4 with future firmware versions of iPhones; You can play the Pandora by connecting your iPod which was installed the Pandora application. 8 12 3 Pandora S.Rtrv Abcdeabcdeabcdeabcde Abcdeabcdeabcdeabcde Abcdeabcdeabcdeabcde Abcdeabcdeabcdeabcde Wed 28 May 12:45 PM 01:45 4 -02:45 ...567 Important Requirements to access the Pandora music service using the Pioneer car audio/video products: ! iPhone Data Plan. Pandora's service is subject to change without notice and could be affected by any...
...iPhone 3G, iPhone 3GS or iPhone 4 with future firmware versions of iPhones; You can play the Pandora by connecting your iPod which was installed the Pandora application. 8 12 3 Pandora S.Rtrv Abcdeabcdeabcdeabcde Abcdeabcdeabcdeabcde Abcdeabcdeabcdeabcde Abcdeabcdeabcdeabcde Wed 28 May 12:45 PM 01:45 4 -02:45 ...567 Important Requirements to access the Pandora music service using the Pioneer car audio/video products: ! iPhone Data Plan. Pandora's service is subject to change without notice and could be affected by any...
Owner's Manual
Page 24
...; Switching the advanced sound retriever function setting while playing 1 Pandora. Refer to the USB cable using an iPod Dock Connector. 3 Start up the Pandora application installed on page 42. Displaying the QuickMix/ station list to Selecting and playing the Quick Mix/sta- Giving a "Thumbs Down" 6 for 7 the song currently play- ing...
...; Switching the advanced sound retriever function setting while playing 1 Pandora. Refer to the USB cable using an iPod Dock Connector. 3 Start up the Pandora application installed on page 42. Displaying the QuickMix/ station list to Selecting and playing the Quick Mix/sta- Giving a "Thumbs Down" 6 for 7 the song currently play- ing...
Owner's Manual
Page 67
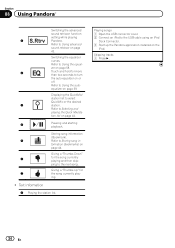
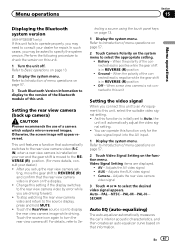
... switches to the rear view camera video by error while you set up camera) CAUTION Pioneer recommends the use of the connected lead is positive while the gear shift is initially set... items are driving forward. ! Menu operations Section 15 Menu operations Displaying the Bluetooth system version (AVH-P3300BT only) If this unit fails to operate properly, you may be asked to specify the system ... move the gear shift to the rear view camera video (R.C IN) when a rear view camera is installed on your car and the gear shift is shown on this unit. Touch the RearView source icon to...
... switches to the rear view camera video by error while you set up camera) CAUTION Pioneer recommends the use of the connected lead is positive while the gear shift is initially set... items are driving forward. ! Menu operations Section 15 Menu operations Displaying the Bluetooth system version (AVH-P3300BT only) If this unit fails to operate properly, you may be asked to specify the system ... move the gear shift to the rear view camera video (R.C IN) when a rear view camera is installed on your car and the gear shift is shown on this unit. Touch the RearView source icon to...
Owner's Manual
Page 74
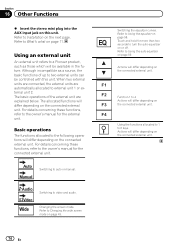
...functions, refer to Using the equalizer on page 43. 74 En Refer to the owner's manual for the external unit. Refer to Installation on page 59. Refer to Changing the wide screen mode on page 58. For details concerning these functions, refer to Using the auto... Auto Switching to video and audio. The allocated functions will differ depending on or off. Using an external unit An external unit refers to a Pioneer product, such as a source, the basic functions of the external unit are automatically allocated to external unit 1 or external unit 2. Refer to ...
...functions, refer to Using the equalizer on page 43. 74 En Refer to the owner's manual for the external unit. Refer to Installation on page 59. Refer to Changing the wide screen mode on page 58. For details concerning these functions, refer to Using the auto... Auto Switching to video and audio. The allocated functions will differ depending on or off. Using an external unit An external unit refers to a Pioneer product, such as a source, the basic functions of the external unit are automatically allocated to external unit 1 or external unit 2. Refer to ...
Owner's Manual
Page 75
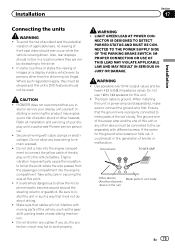
... where the wire passes from the passenger compartment into the engine compartment to become wound around the steering column or gearstick. Installation Section 17 Installation Connecting the units WARNING ! To avoid the risk of accident and the potential violation of applicable laws, no viewing of...exposed. ! In some countries or states the viewing of the vehicle, such as the gearshift, parking brake or seat sliding mechanism. ! PIONEER does not recommend that cables will not obstruct driving. ! Refer all wiring with moving parts of images on a display inside a vehicle even...
... where the wire passes from the passenger compartment into the engine compartment to become wound around the steering column or gearstick. Installation Section 17 Installation Connecting the units WARNING ! To avoid the risk of accident and the potential violation of applicable laws, no viewing of...exposed. ! In some countries or states the viewing of the vehicle, such as the gearshift, parking brake or seat sliding mechanism. ! PIONEER does not recommend that cables will not obstruct driving. ! Refer all wiring with moving parts of images on a display inside a vehicle even...
Owner's Manual
Page 76
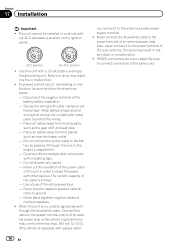
...metal parts to ground. - Place all cables away from moving parts, such as near the heater outlet. - Use a fuse of the battery before installation. - Never band together negative cables of an external power amp. Doing so may result in battery drain or a malfunction. ! IP-BUS connectors ...as the gear shift and seat rails. - Connect this unit with a glass anten- To prevent a short-circuit, overheating or malfunction, be installed in order to the system remote control of the same color. 76 En Do not shorten any disconnected cable connectors with other devices. Use this...
...metal parts to ground. - Place all cables away from moving parts, such as near the heater outlet. - Use a fuse of the battery before installation. - Never band together negative cables of an external power amp. Doing so may result in battery drain or a malfunction. ! IP-BUS connectors ...as the gear shift and seat rails. - Connect this unit with a glass anten- To prevent a short-circuit, overheating or malfunction, be installed in order to the system remote control of the same color. 76 En Do not shorten any disconnected cable connectors with other devices. Use this...

Owner's Manual
Page 77
Installation Section 17 Installation En 77
Installation Section 17 Installation En 77
Owner's Manual
Page 78
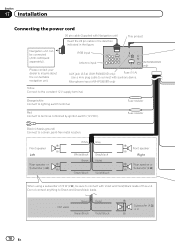
...; 2 78 En Section 17 Installation Connecting the power cord 26 pin cable (Supplied with auxiliary device. RGB input Antenna input AUX jack (3.5 ø) (AVH-P4300DVD only) Fuse (10 A) Use a mini plug cable to connect with Violet and Violet/black leads of this unit. Microphone input (AVH-P3300BT only) (AVH-P4300DVD only) Yellow Connect to...
...; 2 78 En Section 17 Installation Connecting the power cord 26 pin cable (Supplied with auxiliary device. RGB input Antenna input AUX jack (3.5 ø) (AVH-P4300DVD only) Fuse (10 A) Use a mini plug cable to connect with Violet and Violet/black leads of this unit. Microphone input (AVH-P3300BT only) (AVH-P4300DVD only) Yellow Connect to...
Owner's Manual
Page 79
... not connect anything to the back lamp, connect the one in which the voltage changes when the gear shift is in .) Microphone (AVH-P3300BT only) Wired remote input Hard-wired remote control adaptor can be connected to system control terminal of the power amp or auto-antenna relay...For details, consult the vehicle Owner's Manual or dealer. This connection enables the unit to detect the ON/OFF status of the parking brake. Installation Section 17 Installation 4 m (13 ft. 1 in the REVERSE (R) position. Fuse resistor Violet/white Of the two lead wires connected to the speaker leads...
... not connect anything to the back lamp, connect the one in which the voltage changes when the gear shift is in .) Microphone (AVH-P3300BT only) Wired remote input Hard-wired remote control adaptor can be connected to system control terminal of the power amp or auto-antenna relay...For details, consult the vehicle Owner's Manual or dealer. This connection enables the unit to detect the ON/OFF status of the parking brake. Installation Section 17 Installation 4 m (13 ft. 1 in the REVERSE (R) position. Fuse resistor Violet/white Of the two lead wires connected to the speaker leads...
Owner's Manual
Page 80
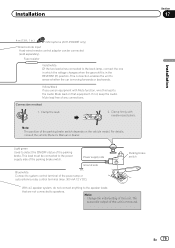
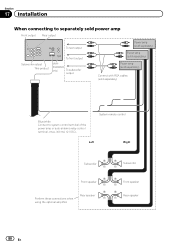
...(sold separately) Connect with RCA cables (sold power amp Front output Rear output To rear output Subwoofer output This product To front output (AVH- System remote control Left Right Subwoofer Subwoofer Front speaker Rear... when using the optional amplifier. Front speaker Rear speaker 80 En Section 17 Installation When connecting to separately sold separately) Blue/white Connect to system control terminal of the power amp or auto-antenna relay control terminal....
...(sold separately) Connect with RCA cables (sold power amp Front output Rear output To rear output Subwoofer output This product To front output (AVH- System remote control Left Right Subwoofer Subwoofer Front speaker Rear... when using the optional amplifier. Front speaker Rear speaker 80 En Section 17 Installation When connecting to separately sold separately) Blue/white Connect to system control terminal of the power amp or auto-antenna relay control terminal....
Owner's Manual
Page 81
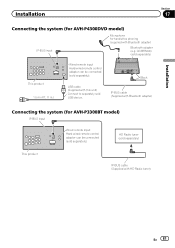
... remote input Hard-wired remote control adaptor can be connected (sold separately). HD Radio tuner (sold USB device. Installation Section 17 Connecting the system (for AVH-P4300DVD model) IP-BUS input Microphone for AVH-P3300BT model) IP-BUS input Wired remote input Hard-wired remote control adaptor can be connected (sold separately). USB cable...
... remote input Hard-wired remote control adaptor can be connected (sold separately). HD Radio tuner (sold USB device. Installation Section 17 Connecting the system (for AVH-P4300DVD model) IP-BUS input Microphone for AVH-P3300BT model) IP-BUS input Wired remote input Hard-wired remote control adaptor can be connected (sold separately). USB cable...
Owner's Manual
Page 82
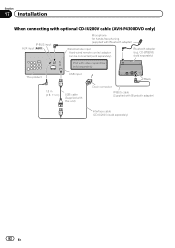
Bluetooth adapter (e.g. Section 17 Installation When connecting with optional CD-IU200V cable (AVH-P4300DVD only) IP-BUS input AUX input (AUX) Microphone for hands-free phoning (supplied with Bluetooth adapter) Interface cable (CD-IU200V) (sold separately). CD-BTB200) (sold separately) iPod with video capabilities (sold separately) This product USB input Black 1.5 m (4 ft. 11 in.) USB cable (Supplied with this unit) Dock connector IP-BUS cable (Supplied with Bluetooth adapter) Wired remote input Hard-wired remote control adaptor can be connected (sold separately) 82 En
Bluetooth adapter (e.g. Section 17 Installation When connecting with optional CD-IU200V cable (AVH-P4300DVD only) IP-BUS input AUX input (AUX) Microphone for hands-free phoning (supplied with Bluetooth adapter) Interface cable (CD-IU200V) (sold separately). CD-BTB200) (sold separately) iPod with video capabilities (sold separately) This product USB input Black 1.5 m (4 ft. 11 in.) USB cable (Supplied with this unit) Dock connector IP-BUS cable (Supplied with Bluetooth adapter) Wired remote input Hard-wired remote control adaptor can be connected (sold separately) 82 En
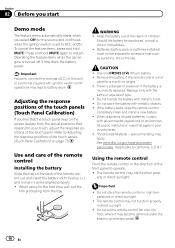
Owner's Manual
Page 83
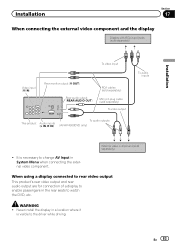
...External video component (sold separately) To video output To audio outputs This product Audio inputs (L IN, R IN) (AVH-P4300DVD only) To audio inputs ! WARNING ! Never install the display in a location where it is necessary to change AV Input in the rear seats to the driver while ...driving. En 83 It is visible to watch the DVD, etc. Installation Section 17 When connecting the external video component and the display Display with RCA input jacks (sold separately) Installation To video input Video input (V IN) Rear monitor output (V OUT) Rear audio output...
...External video component (sold separately) To video output To audio outputs This product Audio inputs (L IN, R IN) (AVH-P4300DVD only) To audio inputs ! WARNING ! Never install the display in a location where it is necessary to change AV Input in the rear seats to the driver while ...driving. En 83 It is visible to watch the DVD, etc. Installation Section 17 When connecting the external video component and the display Display with RCA input jacks (sold separately) Installation To video input Video input (V IN) Rear monitor output (V OUT) Rear audio output...
Owner's Manual
Page 84
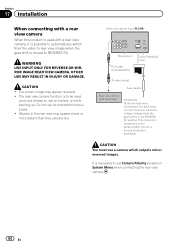
Rear view camera input (R.C IN) This product RCA cable (sold separately) (AVH-P4300DVD only) To video output Fuse resistor Rear view camera (sold separately) Violet/white Of the two lead wires connected to the back lamp, connect .... OTHER USE MAY RESULT IN INJURY OR DAMAGE. This connection enables the unit to sense whether the car is moving forwards or backwards. Section 17 Installation When connecting with a rear view camera, it is possible to automatically switch from the video to rear view image when the gear shift is moved...
Rear view camera input (R.C IN) This product RCA cable (sold separately) (AVH-P4300DVD only) To video output Fuse resistor Rear view camera (sold separately) Violet/white Of the two lead wires connected to the back lamp, connect .... OTHER USE MAY RESULT IN INJURY OR DAMAGE. This connection enables the unit to sense whether the car is moving forwards or backwards. Section 17 Installation When connecting with a rear view camera, it is possible to automatically switch from the video to rear view image when the gear shift is moved...


