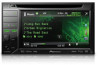
Owner's Manual
Page 3
... 57 Adjusting the response positions of the touch panels (Touch Panel Calibration) 57 Using an AUX source 58 Using an external unit 58 Installation Connecting the units 60 Installation 68 Additional Information Troubleshooting 69 Error messages 71 Understanding messages 74 Indicator list 75 Handling guidelines 76 Compressed audio compatibility (disc, USB) 78...
... 57 Adjusting the response positions of the touch panels (Touch Panel Calibration) 57 Using an AUX source 58 Using an external unit 58 Installation Connecting the units 60 Installation 68 Additional Information Troubleshooting 69 Error messages 71 Understanding messages 74 Indicator list 75 Handling guidelines 76 Compressed audio compatibility (disc, USB) 78...
Owner's Manual
Page 4
...'s ability to wear your seat belt at all warnings in electronic equipment and automotive accessories may be dangerous and could expose you to install or service your display by persons other than the driver may (i) obstruct the driver's vision, (ii) impair the performance of any... you cannot hear outside traffic and emergency vehicles. Section 01 Precautions IMPORTANT SAFEGUARDS Please read and understood the operating instructions. 5 Do not install the display where it may be illegal. If you experience difficulty in operating the system or reading the display, park your vehicle in ...
...'s ability to wear your seat belt at all warnings in electronic equipment and automotive accessories may be dangerous and could expose you to install or service your display by persons other than the driver may (i) obstruct the driver's vision, (ii) impair the performance of any... you cannot hear outside traffic and emergency vehicles. Section 01 Precautions IMPORTANT SAFEGUARDS Please read and understood the operating instructions. 5 Do not install the display where it may be illegal. If you experience difficulty in operating the system or reading the display, park your vehicle in ...
Owner's Manual
Page 5
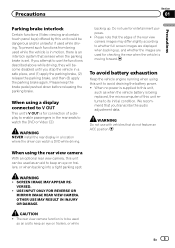
...'s V OUT is for connection of a display to enable passengers in the rear seats to whether full screen images are displayed when backing up . WARNING NEVER install the rear display in a location where the driver can be used as an aid to avoid draining the battery power. ! backing up , and whether the...
...'s V OUT is for connection of a display to enable passengers in the rear seats to whether full screen images are displayed when backing up . WARNING NEVER install the rear display in a location where the driver can be used as an aid to avoid draining the battery power. ! backing up , and whether the...
Owner's Manual
Page 8
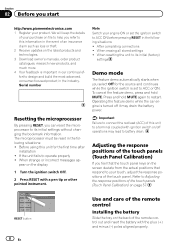
...ON before pressing RESET in the event of an insurance claim such as loss or theft. 2 Receive updates on the back of the remote control Installing the battery Slide the tray on the latest products and technologies. 3 Download owner's manuals, order product catalogues, research new products, and much more...4 Your feedback is turned off operations may drain the battery power. If the unit fails to help you select Off for the first time after installation ! After completing connections ! RESET button 8 En Use and care of the remote control out and insert the battery with a pen tip or...
...ON before pressing RESET in the event of an insurance claim such as loss or theft. 2 Receive updates on the back of the remote control Installing the battery Slide the tray on the latest products and technologies. 3 Download owner's manuals, order product catalogues, research new products, and much more...4 Your feedback is turned off operations may drain the battery power. If the unit fails to help you select Off for the first time after installation ! After completing connections ! RESET button 8 En Use and care of the remote control out and insert the battery with a pen tip or...
Owner's Manual
Page 9
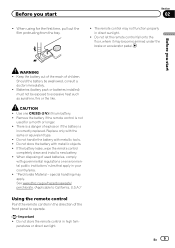
...accelerator pedal. There is not used batteries, comply with metallic objects. ! If the battery leaks, wipe the remote control completely clean and install a new battery. ! Do not let the remote control fall onto the floor, where it may not function properly in the direction ... the remote control Point the remote control in direct sunlight. ! Important ! When using for a month or longer. ! Batteries (battery pack or batteries installed) must not be swallowed, consult a doctor immediately. ! Do not handle the battery with the same or equivalent type. ! When disposing of the front...
...accelerator pedal. There is not used batteries, comply with metallic objects. ! If the battery leaks, wipe the remote control completely clean and install a new battery. ! Do not let the remote control fall onto the floor, where it may not function properly in the direction ... the remote control Point the remote control in direct sunlight. ! Important ! When using for a month or longer. ! Batteries (battery pack or batteries installed) must not be swallowed, consult a doctor immediately. ! Do not handle the battery with the same or equivalent type. ! When disposing of the front...
Owner's Manual
Page 54
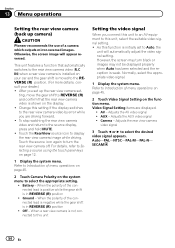
.... Camera - Adjusts the rear view camera video signal 3 Touch c or d to the source display, press and hold MUTE. ! Change this function is installed on the display. ! Ground - Adjusts the AUX video signal ! Auto-PAL-NTSC-PAL-M-PAL-N- To stop watching the rear view camera video and return to... connected lead is negative while the gear shift is not connected to this unit Setting the video signal When you set up camera) CAUTION Pioneer recommends the use of menu operations on page 45. 2 Touch Camera Polarity on the system menu to this unit, select the suitable video...
.... Camera - Adjusts the rear view camera video signal 3 Touch c or d to the source display, press and hold MUTE. ! Change this function is installed on the display. ! Ground - Adjusts the AUX video signal ! Auto-PAL-NTSC-PAL-M-PAL-N- To stop watching the rear view camera video and return to... connected lead is negative while the gear shift is not connected to this unit Setting the video signal When you set up camera) CAUTION Pioneer recommends the use of menu operations on page 45. 2 Touch Camera Polarity on the system menu to this unit, select the suitable video...
Owner's Manual
Page 60
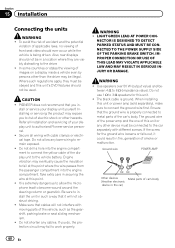
... device must be connected to authorized Pioneer service personnel. ! WARNING ! When installing this unit or power amp (sold separately), make sure to the vehicle battery. CAUTION ! Installing or servicing the product may fail to 8 W (impedance value). Section 15 Installation Connecting the units WARNING ! To... avoid the risk of accident and the potential violation of applicable laws, no viewing of your display unit yourself. Secure all installation and servicing of front seat video should not be used. WARNING ! Use speakers over 50 W (output value) and between 4 ...
... device must be connected to authorized Pioneer service personnel. ! WARNING ! When installing this unit or power amp (sold separately), make sure to the vehicle battery. CAUTION ! Installing or servicing the product may fail to 8 W (impedance value). Section 15 Installation Connecting the units WARNING ! To... avoid the risk of accident and the potential violation of applicable laws, no viewing of your display unit yourself. Secure all installation and servicing of front seat video should not be used. WARNING ! Use speakers over 50 W (output value) and between 4 ...

Owner's Manual
Page 61
Disconnect the negative terminal of the rating prescribed. - Secure the wiring with insulating tape. - Cover any cables. - Use a fuse of the battery before installation. - Never band together negative cables of an external power amp or the vehicle's auto-antenna relay control terminal (max. 300 mA 12 V DC). Connect ... from hot places, such as the gear shift and seat rails. - Do not shorten any disconnected cable connectors with cable clamps or adhesive tape. Installation Section 15 Installation N STAR Important ! To prevent a short-circuit, overheating or malfunction, be...
Disconnect the negative terminal of the rating prescribed. - Secure the wiring with insulating tape. - Cover any cables. - Use a fuse of the battery before installation. - Never band together negative cables of an external power amp or the vehicle's auto-antenna relay control terminal (max. 300 mA 12 V DC). Connect ... from hot places, such as the gear shift and seat rails. - Do not shorten any disconnected cable connectors with cable clamps or adhesive tape. Installation Section 15 Installation N STAR Important ! To prevent a short-circuit, overheating or malfunction, be...
Owner's Manual
Page 62
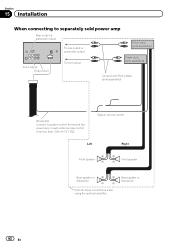
...; Front speaker Front speaker Rear speaker or Subwoofer Perform these connections when using the optional amplifier. Section 15 Installation When connecting to separately sold power amp Rear output or subwoofer output To rear output or subwoofer output Power amp (sold separately) Front output This...
...; Front speaker Front speaker Rear speaker or Subwoofer Perform these connections when using the optional amplifier. Section 15 Installation When connecting to separately sold power amp Rear output or subwoofer output To rear output or subwoofer output Power amp (sold separately) Front output This...
Owner's Manual
Page 63
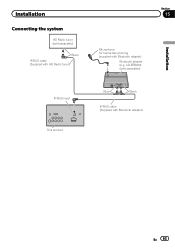
CD-BTB200) (sold separately) Black IP-BUS cable (Supplied with HD Radio tuner) Section 15 Microphone for hands-free phoning (supplied with Bluetooth adapter) En 63 Installation Connecting the system HD Radio tuner (sold separately) Installation IP-BUS input This product Blue Black IP-BUS cable (Supplied with Bluetooth adapter) Bluetooth adapter (e.g.
CD-BTB200) (sold separately) Black IP-BUS cable (Supplied with HD Radio tuner) Section 15 Microphone for hands-free phoning (supplied with Bluetooth adapter) En 63 Installation Connecting the system HD Radio tuner (sold separately) Installation IP-BUS input This product Blue Black IP-BUS cable (Supplied with Bluetooth adapter) Bluetooth adapter (e.g.
Owner's Manual
Page 64
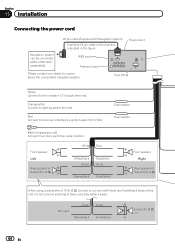
... speaker or Subwoofer (4 Ω) When using a subwoofer of this unit. Not used. Red Connect to terminal controlled by ignition switch (12 V DC). Section 15 Installation Connecting the power cord Navigation system can be sure to connect with Violet and Violet/black leads of 70 W (2 Ω), be connected (AVIC-U220 (sold...
... speaker or Subwoofer (4 Ω) When using a subwoofer of this unit. Not used. Red Connect to terminal controlled by ignition switch (12 V DC). Section 15 Installation Connecting the power cord Navigation system can be sure to connect with Violet and Violet/black leads of 70 W (2 Ω), be connected (AVIC-U220 (sold...
Owner's Manual
Page 65
... the one in which the voltage changes when the gear shift is moving forwards or backwards. The subwoofer output of the parking brake switch. Installation Section 15 Installation Wired remote input Hard-wired remote control adaptor can be connected to speakers. For details, consult the vehicle Owner's Manual or dealer. Parking brake...
... the one in which the voltage changes when the gear shift is moving forwards or backwards. The subwoofer output of the parking brake switch. Installation Section 15 Installation Wired remote input Hard-wired remote control adaptor can be connected to speakers. For details, consult the vehicle Owner's Manual or dealer. Parking brake...
Owner's Manual
Page 66
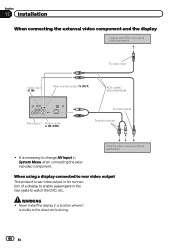
External video component (sold separately) This product Audio inputs (L IN, R IN) To video output To audio outputs ! Never install the display in System Menu when connecting the external video component. WARNING ! Section 15 Installation When connecting the external video component and the display Display with RCA input jacks (sold separately) To video input...
External video component (sold separately) This product Audio inputs (L IN, R IN) To video output To audio outputs ! Never install the display in System Menu when connecting the external video component. WARNING ! Section 15 Installation When connecting the external video component and the display Display with RCA input jacks (sold separately) To video input...

Owner's Manual
Page 67
... Of the two lead wires connected to the back lamp, connect the one in which outputs mirror reversed images. It is moved to REVERSE (R). Installation Section 15 Installation When connecting with a rear view camera When this product is used as an aid to keep an eye on trailers, or while backing up...
... Of the two lead wires connected to the back lamp, connect the one in which outputs mirror reversed images. It is moved to REVERSE (R). Installation Section 15 Installation When connecting with a rear view camera When this product is used as an aid to keep an eye on trailers, or while backing up...
Owner's Manual
Page 68
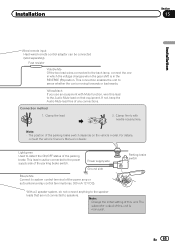
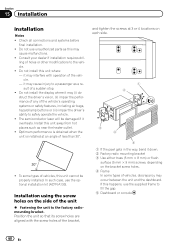
... unit so that its screw holes are aligned with operation of vehicles, discrepancy may (i) ob- Check all connections and systems before final installation. ! To some types of vehicles, this unit cannot be damaged if it down. 2 Factory radio mounting bracket 3 Use either truss... struct the driver's vision, (ii) impair the performance of any of a sudden stop. ! Consult your dealer if installation requires dril- cle. - Section 15 Installation Installation Notes ! sult of the vehicle's operating systems or safety features, including air bags, hazard lamp buttons or (iii) impair...
... unit so that its screw holes are aligned with operation of vehicles, discrepancy may (i) ob- Check all connections and systems before final installation. ! To some types of vehicles, this unit cannot be damaged if it down. 2 Factory radio mounting bracket 3 Use either truss... struct the driver's vision, (ii) impair the performance of any of a sudden stop. ! Consult your dealer if installation requires dril- cle. - Section 15 Installation Installation Notes ! sult of the vehicle's operating systems or safety features, including air bags, hazard lamp buttons or (iii) impair...
Owner's Manual
Page 69
... once more nectors are 10) causing the built- The fuse is dirty. Noise and/or Press RESET. (Page other factors are incor- in - sor to install a fuse with this unit. correctly. Operation with the config- Some operations are prohibited with another disc. Try operating with certain discs. Playback is not The...
... once more nectors are 10) causing the built- The fuse is dirty. Noise and/or Press RESET. (Page other factors are incor- in - sor to install a fuse with this unit. correctly. Operation with the config- Some operations are prohibited with another disc. Try operating with certain discs. Playback is not The...


