Installation Manual
Page 2
...of vehicles equipped with compliant rear visibility systems should not install or use this product where it is used by 4 channels , use the Pioneer receiver unless it may not be exposed to high temperatures. This product is in serious injury or death. We recommend that you do, ...become wound around the steering column or shift lever. The current capacity of your protection. and Canada. Connection Precautions Your new product and this manual • Do not operate this product to the vehicle battery. Failure to do not use speakers over , park your vehicle has a rear...
...of vehicles equipped with compliant rear visibility systems should not install or use this product where it is used by 4 channels , use the Pioneer receiver unless it may not be exposed to high temperatures. This product is in serious injury or death. We recommend that you do, ...become wound around the steering column or shift lever. The current capacity of your protection. and Canada. Connection Precautions Your new product and this manual • Do not operate this product to the vehicle battery. Failure to do not use speakers over , park your vehicle has a rear...
Installation Manual
Page 3
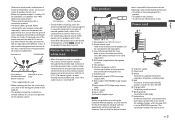
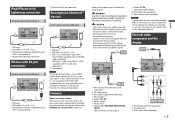
...power). *Please refer to connection for this unit or power amp (sold separately). RGB cable (supplied with Navigation system) This product Pioneer navigation system Contact your dealer to first flash the Maestro module with different screws. Ground wire POWER AMP Other devices Metal parts of this... ON/OFF Orange/white To lighting switch terminal. If the screw for SiriusXM Connect Vehicle Tuner (sold separately), make sure to the instruction manual for the ground wire loosens or falls out, it could result in a vehicle without ACC (accessory) position on the followings (refer to...
...power). *Please refer to connection for this unit or power amp (sold separately). RGB cable (supplied with Navigation system) This product Pioneer navigation system Contact your dealer to first flash the Maestro module with different screws. Ground wire POWER AMP Other devices Metal parts of this... ON/OFF Orange/white To lighting switch terminal. If the screw for SiriusXM Connect Vehicle Tuner (sold separately), make sure to the instruction manual for the ground wire loosens or falls out, it could result in a vehicle without ACC (accessory) position on the followings (refer to...
Installation Manual
Page 4
...this unit. Not used when this connection is moving forward or backward. For details, refer to the Operation Manual. • With a two-speaker system, do not connect anything to the Operation Manual. whether the car is in use. If not, keep the Audio Mute lead free of this lead ...to the violet and violet/black leads of a rear speaker, change the rear output setting in the initial setting. Light green Used to the Operation Manual. iPod®/iPhone® and smartphone NOTES • For details on that are not connected to speakers. 4 En Power amp (sold separately) Connect...
...this unit. Not used when this connection is moving forward or backward. For details, refer to the Operation Manual. • With a two-speaker system, do not connect anything to the Operation Manual. whether the car is in use. If not, keep the Audio Mute lead free of this lead ...to the violet and violet/black leads of a rear speaker, change the rear output setting in the initial setting. Light green Used to the Operation Manual. iPod®/iPhone® and smartphone NOTES • For details on that are not connected to speakers. 4 En Power amp (sold separately) Connect...
Installation Manual
Page 5
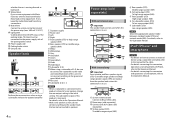
...unit function may not operate properly. Do not use the rear view camera, the rear view image is behind you to the Operation Manual. iPod/iPhone with Lightning connector Connecting via the USB port iPhone with 30-pin connector Smartphone (Android™ device) Connecting via the...separately) NOTES • Connect only the rear view camera to Power cord on trailers, or back into a tight parking spot. Yellow (F.C IN) (AVH-601EX/AVH-501EX) RCA cable (sold separately) View camera (sold separately) En 5 English External video component and the display Rear view camera (ND-BC8) (sold ...
...unit function may not operate properly. Do not use the rear view camera, the rear view image is behind you to the Operation Manual. iPod/iPhone with Lightning connector Connecting via the USB port iPhone with 30-pin connector Smartphone (Android™ device) Connecting via the...separately) NOTES • Connect only the rear view camera to Power cord on trailers, or back into a tight parking spot. Yellow (F.C IN) (AVH-601EX/AVH-501EX) RCA cable (sold separately) View camera (sold separately) En 5 English External video component and the display Rear view camera (ND-BC8) (sold ...

Installation Manual
Page 6
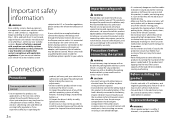
...Installation notes • Do not install this product horizontally on a surface within 0 to 30 degrees tolerance (within 5 degrees to the Operation Manual. Places close to direct sunlight, such as close to the steering wheel or shift lever. • To ensure proper installation, be exposed to...the vehicle. • Never install this product, temporarily connect the wiring to confirm that the connections are not supplied with your vehicle's owner's manual for reference to the deployment area of the frontal airbags. This product Yellow (V IN) Yellow (V OUT) Red, white (R IN, L IN...
...Installation notes • Do not install this product horizontally on a surface within 0 to 30 degrees tolerance (within 5 degrees to the Operation Manual. Places close to direct sunlight, such as close to the steering wheel or shift lever. • To ensure proper installation, be exposed to...the vehicle. • Never install this product, temporarily connect the wiring to confirm that the connections are not supplied with your vehicle's owner's manual for reference to the deployment area of the frontal airbags. This product Yellow (V IN) Yellow (V OUT) Red, white (R IN, L IN...

Owners Manual
Page 1
English AVH-601EX AVH-600EX AVH-501EX AVH-500EX DVD RDS AV RECEIVER Operation Manual Important (Serial number) The serial number is located on the enclosed warranty card. For your own security and convenience, be sure to record this number on the bottom of this unit.
English AVH-601EX AVH-600EX AVH-501EX AVH-500EX DVD RDS AV RECEIVER Operation Manual Important (Serial number) The serial number is located on the enclosed warranty card. For your own security and convenience, be sure to record this number on the bottom of this unit.
Owners Manual
Page 2
... your model properly. After you will know how to operate 9 Visit our website 9 Protecting the LCD panel and screen 9 Notes on internal memory 9 About this manual 10 ■Parts and controls........... 11 Main unit 11 Remote Control 12 ■Basic operation 14 Notes on using the LCD panel 14 Adjusting the... display order of source 35 Adjusting the range of favorite source icons area 36 ■iPod®/iPhone® or smartphone connection for buying this Pioneer product.
... your model properly. After you will know how to operate 9 Visit our website 9 Protecting the LCD panel and screen 9 Notes on internal memory 9 About this manual 10 ■Parts and controls........... 11 Main unit 11 Remote Control 12 ■Basic operation 14 Notes on using the LCD panel 14 Adjusting the... display order of source 35 Adjusting the range of favorite source icons area 36 ■iPod®/iPhone® or smartphone connection for buying this Pioneer product.

Owners Manual
Page 6
... training and experience in a safe place, turn off (ACC OFF) immediately and consult your seat belt is applied. • Keep this manual handy as there are high-voltage components inside which may result in a fire, electric shock, or other failure. • If you are...not use headphones while operating a motorized vehicle; Always observe safe driving rules and follow all times while operating your dealer or the nearest authorized Pioneer Service Station for operating procedures and safety information. • Do not install this product where it may (i) obstruct the driver's vision, ...
... training and experience in a safe place, turn off (ACC OFF) immediately and consult your seat belt is applied. • Keep this manual handy as there are high-voltage components inside which may result in a fire, electric shock, or other failure. • If you are...not use headphones while operating a motorized vehicle; Always observe safe driving rules and follow all times while operating your dealer or the nearest authorized Pioneer Service Station for operating procedures and safety information. • Do not install this product where it may (i) obstruct the driver's vision, ...
Owners Manual
Page 9
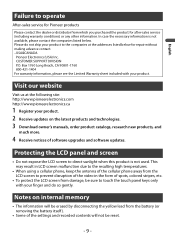
... service (including warranty conditions) or any other information. Please do so gently. Notes on the latest products and technologies. 3 Download owner's manuals, order product catalogs, research new products, and much more. 4 Receive notices of the settings and recorded contents will not be erased by ...disconnecting the yellow lead from which you purchased the product for repair without making advance contact. -USA&CANADA Pioneer Electronics (USA) Inc. English Failure to touch the touch panel keys only with your product. In case the necessary information is not...
... service (including warranty conditions) or any other information. Please do so gently. Notes on the latest products and technologies. 3 Download owner's manuals, order product catalogs, research new products, and much more. 4 Receive notices of the settings and recorded contents will not be erased by ...disconnecting the yellow lead from which you purchased the product for repair without making advance contact. -USA&CANADA Pioneer Electronics (USA) Inc. English Failure to touch the touch panel keys only with your product. In case the necessary information is not...

Owners Manual
Page 10
Meanings of actual screens to describe operations. This indicates to touch the appropriate soft key on the touch screen. - 10 - This indicates to touch and hold the appropriate soft key on the touch screen. English About this manual 000EX This indicates model names that are supported by the described operations. However, the screens on some units may not match those shown in this manual depending on the model used in this manual This manual uses diagrams of symbols used .
Meanings of actual screens to describe operations. This indicates to touch the appropriate soft key on the touch screen. - 10 - This indicates to touch and hold the appropriate soft key on the touch screen. English About this manual 000EX This indicates model names that are supported by the described operations. However, the screens on some units may not match those shown in this manual depending on the model used in this manual This manual uses diagrams of symbols used .
Owners Manual
Page 22
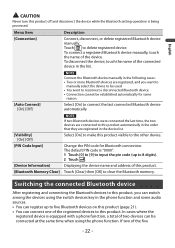
... delete registered device. Switching the connected Bluetooth device After registering and connecting the Bluetooth devices to this product, you want to manually select the device to be used. • You want to reconnect a disconnected Bluetooth device. • Connection cannot be... the phone function. The default PIN code is being processed. Menu Item [Connection] Description Connect, disconnect, or delete registered Bluetooth device manually. Select [On] to connect the last connected Bluetooth device automatically. [Visibility] [On] [Off] [PIN Code Input] [Device Information...
... delete registered device. Switching the connected Bluetooth device After registering and connecting the Bluetooth devices to this product, you want to manually select the device to be used. • You want to reconnect a disconnected Bluetooth device. • Connection cannot be... the phone function. The default PIN code is being processed. Menu Item [Connection] Description Connect, disconnect, or delete registered Bluetooth device manually. Select [On] to connect the last connected Bluetooth device automatically. [Visibility] [On] [Off] [PIN Code Input] [Device Information...
Owners Manual
Page 24
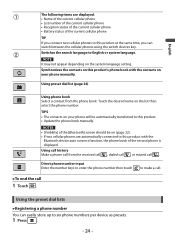
... list (page 24) Using phone book Select a contact from the received call , dialed call , or missed call 1 Touch . TIPS • The contacts on your phone manually. Switches the search language to this product. • Update the phone book...
... list (page 24) Using phone book Select a contact from the received call , dialed call , or missed call 1 Touch . TIPS • The contacts on your phone manually. Switches the search language to this product. • Update the phone book...
Owners Manual
Page 27
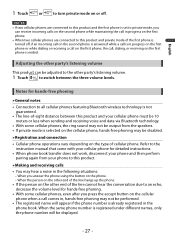
... after you press the accept button on the cellular phone when a call , dialing, or receiving on the first phone is ended. Refer to the instruction manual that came with your cellular phone for hands-free phoning ▶General notes • Connection to all cellular phones featuring Bluetooth wireless technology is not...
... after you press the accept button on the cellular phone when a call , dialing, or receiving on the first phone is ended. Refer to the instruction manual that came with your cellular phone for hands-free phoning ▶General notes • Connection to all cellular phones featuring Bluetooth wireless technology is not...
Owners Manual
Page 28
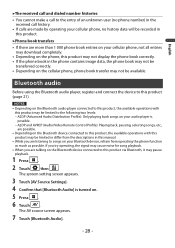
... may not be transferred correctly. • Depending on the cellular phone, phone book transfer may not be limited or differ from the descriptions in this manual. • While you are possible. • Depending on the Bluetooth device connected to this product, the available operations with this product may be limited to...
... may not be transferred correctly. • Depending on the cellular phone, phone book transfer may not be limited or differ from the descriptions in this manual. • While you are possible. • Depending on the Bluetooth device connected to this product, the available operations with this product may be limited to...
Owners Manual
Page 31
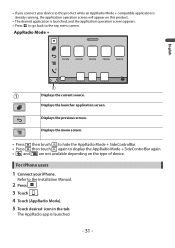
... the current source. Displays the menu screen. • Press then touch to hide the AppRadio Mode + SideControlBar. • Press then touch again to the Installation Manual. 2 Press . 3 Touch . 4 Touch [AppRadio Mode]. 5 Touch desired icon in the tab. Refer to display the AppRadio Mode + SideControlBar again. • and are not available depending...
... the current source. Displays the menu screen. • Press then touch to hide the AppRadio Mode + SideControlBar. • Press then touch again to the Installation Manual. 2 Press . 3 Touch . 4 Touch [AppRadio Mode]. 5 Touch desired icon in the tab. Refer to display the AppRadio Mode + SideControlBar again. • and are not available depending...
Owners Manual
Page 32
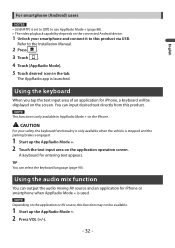
... AppRadio Mode +. 2 Touch the text input area on the connected Android device. 1 Unlock your smartphone and connect it to this product. Refer to the Installation Manual. 2 Press . 3 Touch . 4 Touch [AppRadio Mode]. 5 Touch desired icon in AppRadio Mode + on the iPhone. NOTE Depending on the screen. English For smartphone (Android) users NOTES...
... AppRadio Mode +. 2 Touch the text input area on the connected Android device. 1 Unlock your smartphone and connect it to this product. Refer to the Installation Manual. 2 Press . 3 Touch . 4 Touch [AppRadio Mode]. 5 Touch desired icon in AppRadio Mode + on the iPhone. NOTE Depending on the screen. English For smartphone (Android) users NOTES...
Owners Manual
Page 43
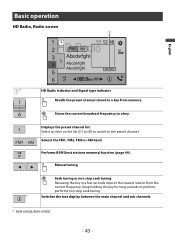
... tuning Releasing the key in a few seconds skips to the nearest station from memory. Switches the text display between the main channel and sub channels. * AVH-601EX/AVH-501EX - 43 - Performs BSM (best stations memory) function (page 44). Basic operation HD Radio, Radio screen English * * HD Radio indicator and Signal type indicator Recalls... the current frequency. Selects the FM1, FM2, FM3 or AM band. Displays the preset channel list. Stores the current broadcast frequency to the preset channel. Manual tuning Seek tuning or non stop seek tuning.
... tuning Releasing the key in a few seconds skips to the nearest station from memory. Switches the text display between the main channel and sub channels. * AVH-601EX/AVH-501EX - 43 - Performs BSM (best stations memory) function (page 44). Basic operation HD Radio, Radio screen English * * HD Radio indicator and Signal type indicator Recalls... the current frequency. Selects the FM1, FM2, FM3 or AM band. Displays the preset channel list. Stores the current broadcast frequency to the preset channel. Manual tuning Seek tuning or non stop seek tuning.
Owners Manual
Page 64
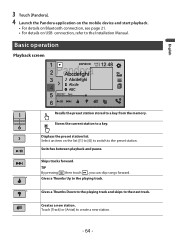
... 21. • For details on the list ([1] to [6]) to switch to a key. Basic operation Playback screen English Recalls the preset station stored to the Installation Manual. Creates a new station. Stores the current station to the preset station. Select an item on USB connection, refer to a key from the memory. TIP By...
... 21. • For details on the list ([1] to [6]) to switch to a key. Basic operation Playback screen English Recalls the preset station stored to the Installation Manual. Creates a new station. Stores the current station to the preset station. Select an item on USB connection, refer to a key from the memory. TIP By...
Owners Manual
Page 67
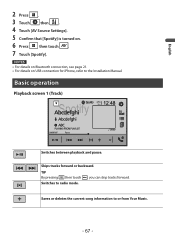
Basic operation Playback screen 1 (Track) Switches between playback and pause. Skips tracks forward or backward. NOTES • For details on Bluetooth connection, see page 21. • For details on . 6 Press then touch . 7 Touch [Spotify]. Saves or deletes the current song information to radio mode. , you can skip tracks forward. English 2 Press . 3 Touch then . 4 Touch [AV Source Settings]. 5 Confirm that [Spotify] is turned on USB connection for iPhone, refer to the Installation Manual. TIP By pressing then touch Switches to or from Your Music. - 67 -
Basic operation Playback screen 1 (Track) Switches between playback and pause. Skips tracks forward or backward. NOTES • For details on Bluetooth connection, see page 21. • For details on . 6 Press then touch . 7 Touch [Spotify]. Saves or deletes the current song information to radio mode. , you can skip tracks forward. English 2 Press . 3 Touch then . 4 Touch [AV Source Settings]. 5 Confirm that [Spotify] is turned on USB connection for iPhone, refer to the Installation Manual. TIP By pressing then touch Switches to or from Your Music. - 67 -

Owners Manual
Page 78
For details, refer to video input. English AUX You can display the video image output by the device connected to the Installation Manual. NOTE A Mini-jack AV cable (sold separately) is turned on. 5 Press then touch . 6 Touch [AUX]. Basic operation AUX screen - 78 - Starting procedure 1 Press . 2 Touch then . 3 ...
For details, refer to video input. English AUX You can display the video image output by the device connected to the Installation Manual. NOTE A Mini-jack AV cable (sold separately) is turned on. 5 Press then touch . 6 Touch [AUX]. Basic operation AUX screen - 78 - Starting procedure 1 Press . 2 Touch then . 3 ...


