Owner's Manual
Page 26
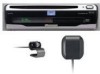
...referring to "Dipswitch settings for AVIC-9DVD Set the dipswitches as you can use "AVIC-9DVD", some button names of the Remote Control may be the following changes in the case. ■For "AVIC-9DVD" users This manual describes the operation based on "AVIC-90DVD". ■Terminology Before moving ...on, take a few minutes to read the following . Familiarity with the AVIC-9DVD. If you cannot turn the DVD power On/Off. Starting voice operation Press ...
...referring to "Dipswitch settings for AVIC-9DVD Set the dipswitches as you can use "AVIC-9DVD", some button names of the Remote Control may be the following changes in the case. ■For "AVIC-9DVD" users This manual describes the operation based on "AVIC-90DVD". ■Terminology Before moving ...on, take a few minutes to read the following . Familiarity with the AVIC-9DVD. If you cannot turn the DVD power On/Off. Starting voice operation Press ...
Owner's Manual
Page 31
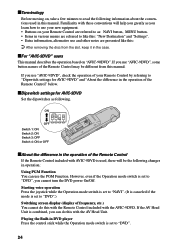
... and select "OK", and click the OK button. (You cannot enter your password using the Remote Control. Switching Off When you turn the power to your Navigation System off . ➲ If you have not arrived at the vicinity of your destination, the route set will not be deleted even if you ... the power of the main unit of setting the password, see "Auto Voice Recognition" on page 103) is set "On", the automatic voice recognition is engaged each time the car is started. ➲ When "Auto Voice Recognition" is set to "On", you turn your car's engine off, your Navigation System is also...
... and select "OK", and click the OK button. (You cannot enter your password using the Remote Control. Switching Off When you turn the power to your Navigation System off . ➲ If you have not arrived at the vicinity of your destination, the route set will not be deleted even if you ... the power of the main unit of setting the password, see "Auto Voice Recognition" on page 103) is set "On", the automatic voice recognition is engaged each time the car is started. ➲ When "Auto Voice Recognition" is set to "On", you turn your car's engine off, your Navigation System is also...
Owner's Manual
Page 98
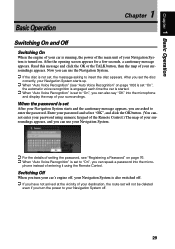
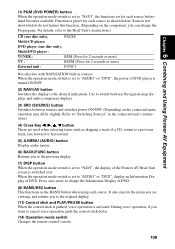
...stationary. 2. To clear the memory... If "No good" is displayed, check the connection status of each cable is correct. 6. Power Voltage The power supply (reference value) provided from the car battery to "Installation Manual" for the installation position. 4. The previous screen appears. The ...the memorised learning contents of "Distance", "Speed", or "Learning Status", perform the following procedure: 1 Select the item you want to 15V, check that power cable connection is shown. 1 2 3 4 5 6 7 8 1. When the parking brake is released, "Off" is shown. Illumination When the ...
...stationary. 2. To clear the memory... If "No good" is displayed, check the connection status of each cable is correct. 6. Power Voltage The power supply (reference value) provided from the car battery to "Installation Manual" for the installation position. 4. The previous screen appears. The ...the memorised learning contents of "Distance", "Speed", or "Learning Status", perform the following procedure: 1 Select the item you want to 15V, check that power cable connection is shown. 1 2 3 4 5 6 7 8 1. When the parking brake is released, "Off" is shown. Illumination When the ...
Owner's Manual
Page 111
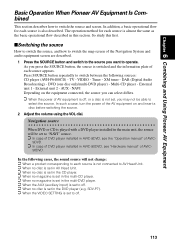
...operation mode switch is switched over. During voice operation, if you can change the Information Display of the Pioneer AV Head Unit screen is set to "AUDIO" or "DVD", the power of DVD. When the operation mode switch is set to change the Preprogram. Press once more to "... of DVD player is set for each source. Sources not shown below . Use to switch between Navigation map displays and audio component displays. (3) SRC (SOURCE) button Switches between sources and switches power ON/OFF. (Depending on the component, you want to the desired indications. For details, refer ...
...operation mode switch is switched over. During voice operation, if you can change the Information Display of the Pioneer AV Head Unit screen is set to "AUDIO" or "DVD", the power of DVD. When the operation mode switch is set to change the Preprogram. Press once more to "... of DVD player is set for each source. Sources not shown below . Use to switch between Navigation map displays and audio component displays. (3) SRC (SOURCE) button Switches between sources and switches power ON/OFF. (Depending on the component, you want to the desired indications. For details, refer ...
Owner's Manual
Page 115
...AVIC-9DVD, see the "Operation manual" of AVIC- 9DVD. ➲ In case of DVD player installed in this first. ■Switching the source How to switch the source, and how to switch the map screen of the Navigation System...one disc only/multi-DVD player) - External unit 1 - In such a case, turn the power of AVIC- 90DVD. In the following sources: CD player (AVH-P6400CD) - DAB (Digital Audio Broadcasting) - ...the source and screen. Chapter 6 Combining and Using Pioneer AV Equipment Basic Operation When Pioneer AV Equipment Is Combined This section describes how to ...
...AVIC-9DVD, see the "Operation manual" of AVIC- 9DVD. ➲ In case of DVD player installed in this first. ■Switching the source How to switch the source, and how to switch the map screen of the Navigation System...one disc only/multi-DVD player) - External unit 1 - In such a case, turn the power of AVIC- 90DVD. In the following sources: CD player (AVH-P6400CD) - DAB (Digital Audio Broadcasting) - ...the source and screen. Chapter 6 Combining and Using Pioneer AV Equipment Basic Operation When Pioneer AV Equipment Is Combined This section describes how to ...
Owner's Manual
Page 155
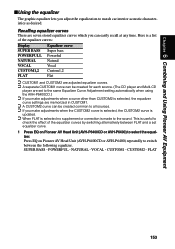
... This is useful to check the effect of the equalizer curves: Display SUPER BASS POWERFULL NATURAL VOCAL CUSTOM1,2 FLAT Equalizer curve Super bass Powerful Natural Vocal Custom1,2 Flat ➲ CUSTOM1 and CUSTOM2 are adjusted equalizer curves. ➲ A separate CUSTOM1 curve can be created common to...CUSTOM2 is selected, the equalizer curve settings are memorized in CUSTOM1. ➲ A CUSTOM2 curve can easily recall at any time. POWERFUL - Press EQ on Pioneer AV Head Unit (AVH-P6400CD or AVH-P6400) to the sound. VOCAL - FLAT 153 Recalling equalizer curves There are seven ...
... This is useful to check the effect of the equalizer curves: Display SUPER BASS POWERFULL NATURAL VOCAL CUSTOM1,2 FLAT Equalizer curve Super bass Powerful Natural Vocal Custom1,2 Flat ➲ CUSTOM1 and CUSTOM2 are adjusted equalizer curves. ➲ A separate CUSTOM1 curve can be created common to...CUSTOM2 is selected, the equalizer curve settings are memorized in CUSTOM1. ➲ A CUSTOM2 curve can easily recall at any time. POWERFUL - Press EQ on Pioneer AV Head Unit (AVH-P6400CD or AVH-P6400) to the sound. VOCAL - FLAT 153 Recalling equalizer curves There are seven ...
Owner's Manual
Page 163
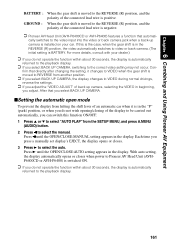
... MENU, and press A.MENU (AUDIO) button. 2 Press 2 to select the manual. With auto setting, the display automatically opens or closes when power to Pioneer AV Head Unit (AVHP6400CD or AVH-P6400) is switched ON. ➲ If you do not wish opening/closing of the connected lead wire is ...normal drivings, reverse the settings. ➲ If you adjust the "VIDEO ADJUST" of the connected lead wire is positive. Chapter 6 Combining and Using Pioneer AV Equipment BATTERY : GROUND : When the gear shift is moved to the REVERSE (R) position, and the polarity of back up camera is installed on...
... MENU, and press A.MENU (AUDIO) button. 2 Press 2 to select the manual. With auto setting, the display automatically opens or closes when power to Pioneer AV Head Unit (AVHP6400CD or AVH-P6400) is switched ON. ➲ If you do not wish opening/closing of the connected lead wire is ...normal drivings, reverse the settings. ➲ If you adjust the "VIDEO ADJUST" of the connected lead wire is positive. Chapter 6 Combining and Using Pioneer AV Equipment BATTERY : GROUND : When the gear shift is moved to the REVERSE (R) position, and the polarity of back up camera is installed on...
Owner's Manual
Page 179
... reception improves. (2) Check that installed the system. (4) Connect the speed signal input (pink lead wire) of the power wire correctly, and reset the 3D Hybrid Sensor. (5) Check the attachment position of the main unit of your Navigation System and the setting of the Installation direction lever... car is bad. • Signals from the GPS satellites have problems operating your Navigation System, refer to this list is not comprehensive, it should answer your dealer or the nearest authorized Pioneer service facility. Possible causes: The display is set to greater positioning errors.) (2)...
... reception improves. (2) Check that installed the system. (4) Connect the speed signal input (pink lead wire) of the power wire correctly, and reset the 3D Hybrid Sensor. (5) Check the attachment position of the main unit of your Navigation System and the setting of the Installation direction lever... car is bad. • Signals from the GPS satellites have problems operating your Navigation System, refer to this list is not comprehensive, it should answer your dealer or the nearest authorized Pioneer service facility. Possible causes: The display is set to greater positioning errors.) (2)...
Owner's Manual
Page 181
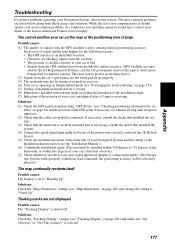
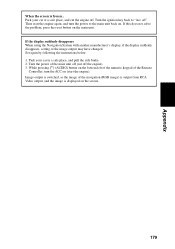
...1. While pressing [ • ] (AUDIO) button on . If this does not solve the problem, press the reset button on (start the engine again, and turn the power to "Acc off". Park your car at a safe place, and cut off . Image output is frozen... Turn the ignition key back to the main unit... is switched, as the image of the main unit off (cut the engine off the engine). 3. If the display suddenly disappears When using the Navigation System with another manufacturer's display, if the display suddenly disappears, setting of the Remote Controller, turn the ACC on the main unit.
...1. While pressing [ • ] (AUDIO) button on . If this does not solve the problem, press the reset button on (start the engine again, and turn the power to "Acc off". Park your car at a safe place, and cut off . Image output is frozen... Turn the ignition key back to the main unit... is switched, as the image of the main unit off (cut the engine off the engine). 3. If the display suddenly disappears When using the Navigation System with another manufacturer's display, if the display suddenly disappears, setting of the Remote Controller, turn the ACC on the main unit.
Owner's Manual
Page 182
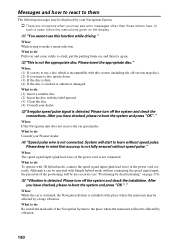
...your dealer. (3)"Irregular speed pulse signal is not the appropriate disc. What to do : Re-install the main unit of the power cord is not connected. When: If the Navigation unit does not receive the car speed pulse. What to do : Pull over and come safely to a halt, put the ... error messages other than those shown here. Please turn off the system and check the installation. What to do : Consult your Pioneer dealer. (4) "Speed pulse wire is not connected. When: The speed signal input (pink lead wire) of the Navigation System to the place where the main unit will not be affected by...
...your dealer. (3)"Irregular speed pulse signal is not the appropriate disc. What to do : Re-install the main unit of the power cord is not connected. When: If the Navigation unit does not receive the car speed pulse. What to do : Pull over and come safely to a halt, put the ... error messages other than those shown here. Please turn off the system and check the installation. What to do : Consult your Pioneer dealer. (4) "Speed pulse wire is not connected. When: The speed signal input (pink lead wire) of the Navigation System to the place where the main unit will not be affected by...
Owner's Manual
Page 183
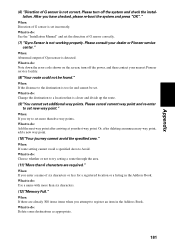
... What to try to Avoid. What to do : See the "Installation Manual" and set new way point." turn off the power, and then contact your dealer or Pioneer service center." What to do : Delete some destinations as appropriate. 181 After you attempt to do : Add the next way point...If you try setting a route through the area. (11)"More than 6 characters are already 300 items items when you have checked, please re-boot the system and press "OK"." Appendix (6) "Direction of G sensor is detected. When: Direction of G sensor is closer and divide up the route. (9)"You cannot ...
... What to try to Avoid. What to do : See the "Installation Manual" and set new way point." turn off the power, and then contact your dealer or Pioneer service center." What to do : Delete some destinations as appropriate. 181 After you attempt to do : Add the next way point...If you try setting a route through the area. (11)"More than 6 characters are already 300 items items when you have checked, please re-boot the system and press "OK"." Appendix (6) "Direction of G sensor is detected. When: Direction of G sensor is closer and divide up the route. (9)"You cannot ...
Owner's Manual
Page 184
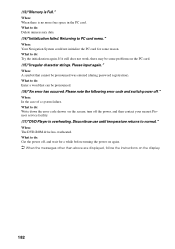
... input again." (13)"Memory is overheating. If it still does not work, there may be some reason. turn off the power, and then contact your nearest Pioneer service facility. (17)"DVD Player is Full." Discontinue use until temperature returns to PC card menu." When: A symbol that can...a word that cannot be pronounced. (16)"An error has occurred. What to do : Cut the power off ." When: Your Navigation System could not initialize the PC card for a while before turning the power on again. ➲ When the messages other than above are displayed, follow the instructions on the PC...
... input again." (13)"Memory is overheating. If it still does not work, there may be some reason. turn off the power, and then contact your nearest Pioneer service facility. (17)"DVD Player is Full." Discontinue use until temperature returns to PC card menu." When: A symbol that can...a word that cannot be pronounced. (16)"An error has occurred. What to do : Cut the power off ." When: Your Navigation System could not initialize the PC card for a while before turning the power on again. ➲ When the messages other than above are displayed, follow the instructions on the PC...
Other Manual
Page 3
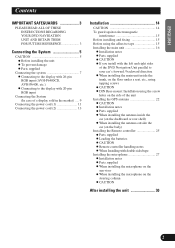
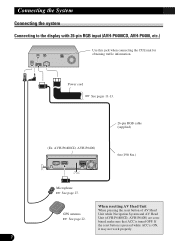
... NEDERLANDS 2 ENGLISH ESPAÑOL DEUTSCH Contents IMPORTANT SAFEGUARDS 3 PLEASE READ ALL OF THESE INSTRUCTIONS REGARDING YOUR DVD NAVIGATION UNIT AND RETAIN THEM FOR FUTURE REFERENCE 3 Connecting the System 5 CAUTION 5 - Connecting to the display with 26-pin RGB input (AVH-P6400CD, AVH-P6400, etc.) ...25 - When installing the microphone on the side of a display sold in the market) .... 9 Connecting the power cord (1 11 Connecting the power cord (2 13 Installation 14 CAUTION 14 To guard against electromagnetic interference 15 Before installing and fixing 15 Before using the...
... NEDERLANDS 2 ENGLISH ESPAÑOL DEUTSCH Contents IMPORTANT SAFEGUARDS 3 PLEASE READ ALL OF THESE INSTRUCTIONS REGARDING YOUR DVD NAVIGATION UNIT AND RETAIN THEM FOR FUTURE REFERENCE 3 Connecting the System 5 CAUTION 5 - Connecting to the display with 26-pin RGB input (AVH-P6400CD, AVH-P6400, etc.) ...25 - When installing the microphone on the side of a display sold in the market) .... 9 Connecting the power cord (1 11 Connecting the power cord (2 13 Installation 14 CAUTION 14 To guard against electromagnetic interference 15 Before installing and fixing 15 Before using the...
Other Manual
Page 6
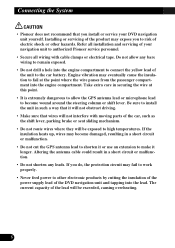
..., the protection circuit may eventually cause the insulation to risk of electric shock or other electronic products by cutting the insulation of the power supply lead of the product may become wound around the steering column or shift lever. Engine vibration may fail to work properly. &#...microphone lead to make it will not obstruct driving. • Make sure that you install or service your navigation unit to the car battery. Connecting the System CAUTION • Pioneer does not recommend that wires will not interfere with cable clamps or electrical tape. Be sure to install the...
..., the protection circuit may eventually cause the insulation to risk of electric shock or other electronic products by cutting the insulation of the power supply lead of the product may become wound around the steering column or shift lever. Engine vibration may fail to work properly. &#...microphone lead to make it will not obstruct driving. • Make sure that you install or service your navigation unit to the car battery. Connecting the System CAUTION • Pioneer does not recommend that wires will not interfere with cable clamps or electrical tape. Be sure to install the...
Other Manual
Page 7
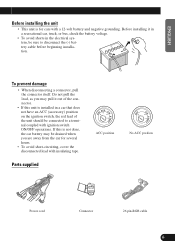
If this unit is installed in the electrical system, be sure to a terminal coupled with ignition switch ON/OFF operations. Do not pull the lead, as you may pull it in a recreational car, truck, ...; When disconnecting a connector, pull the connector itself. Parts supplied OF OF F ACC O ACC position T N STAR F O N STAR T No ACC position DEUTSCH FRANÇAIS ITALIANO NEDERLANDS Power cord Connector 26 pin-RGB cable 6 ENGLISH ESPAÑOL Before installing the unit • This unit is for several hours. • To avoid short...
If this unit is installed in the electrical system, be sure to a terminal coupled with ignition switch ON/OFF operations. Do not pull the lead, as you may pull it in a recreational car, truck, ...; When disconnecting a connector, pull the connector itself. Parts supplied OF OF F ACC O ACC position T N STAR F O N STAR T No ACC position DEUTSCH FRANÇAIS ITALIANO NEDERLANDS Power cord Connector 26 pin-RGB cable 6 ENGLISH ESPAÑOL Before installing the unit • This unit is for several hours. • To avoid short...
Other Manual
Page 8
If the reset button is pressed while ACC is tuned OFF. Power cord ☞ See pages 11-13. (Ex. When resetting AV Head Unit When pressing the reset button of AV Head Unit while Navigation System and AV Head Unit (AVH-P6400CD, AVH-P6400) are combined, make sure that ACC is ON, it may...
If the reset button is pressed while ACC is tuned OFF. Power cord ☞ See pages 11-13. (Ex. When resetting AV Head Unit When pressing the reset button of AV Head Unit while Navigation System and AV Head Unit (AVH-P6400CD, AVH-P6400) are combined, make sure that ACC is ON, it may...
Other Manual
Page 9
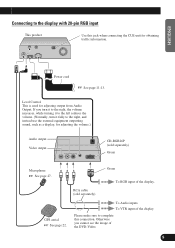
... this jack when connecting the CUE unit for obtaining traffic information. Green To RGB input of the display. ESPAÑOL DEUTSCH FRANÇAIS Power cord ☞ See page 11-13. ENGLISH Connecting to the display with 20-pin RGB input This product Use this connection. To VTR input of...
... this jack when connecting the CUE unit for obtaining traffic information. Green To RGB input of the display. ESPAÑOL DEUTSCH FRANÇAIS Power cord ☞ See page 11-13. ENGLISH Connecting to the display with 20-pin RGB input This product Use this connection. To VTR input of...
Other Manual
Page 10
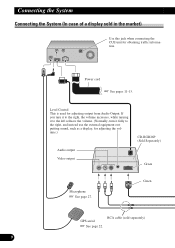
... the right, and instead use the external equipment outputting sound, such as a display, for adjusting output from Audio Output. Connecting the System Connecting the System (In case of a display sold separately) 9 Power cord ☞ See pages 11-13. Level Control This is used for adjusting the volume.) Audio output Video output CD-RGB26P...
... the right, and instead use the external equipment outputting sound, such as a display, for adjusting output from Audio Output. Connecting the System Connecting the System (In case of a display sold separately) 9 Power cord ☞ See pages 11-13. Level Control This is used for adjusting the volume.) Audio output Video output CD-RGB26P...
Other Manual
Page 11
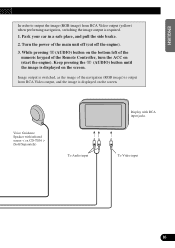
... the (AUDIO) button until the image is displayed on the screen. Image output is switched, as the image of the navigation (RGB image) is output from RCA Video output (yellow) when performing navigation, switching the image output is required. 1. Voice Guidance Speaker with infrared sensor < ex.CD-TS36 > (Sold Separately) To Audio... ESPAÑOL In order to output the image (RGB image) from RCA Video output, and the image is displayed on the screen. Turn the power of the Remote Controller, turn the ACC on (start the engine).
... the (AUDIO) button until the image is displayed on the screen. Image output is switched, as the image of the navigation (RGB image) is output from RCA Video output (yellow) when performing navigation, switching the image output is required. 1. Voice Guidance Speaker with infrared sensor < ex.CD-TS36 > (Sold Separately) To Audio... ESPAÑOL In order to output the image (RGB image) from RCA Video output, and the image is displayed on the screen. Turn the power of the Remote Controller, turn the ACC on (start the engine).
Other Manual
Page 12
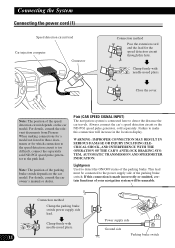
... the car model. Connection method Clamp the parking brake switch power supply side lead. Close the cover. Note: The position of the parking brake switch. Pink (CAR SPEED SIGNAL INPUT) The navigation system is made incorrectly or omitted, certain functions of the parking ...separately. Clamp firmly with needle-nosed pliers. Clamp firmly with needle-nosed pliers. Power supply side Ground side 11 Parking brake switch For details, consult the relevant documents from Pioneer. WARNING: IMPROPER CONNECTION MAY RESULT IN SERIOUS DAMAGE OR INJURY INCLUDING ELECRICAL SHOCK,...
... the car model. Connection method Clamp the parking brake switch power supply side lead. Close the cover. Note: The position of the parking brake switch. Pink (CAR SPEED SIGNAL INPUT) The navigation system is made incorrectly or omitted, certain functions of the parking ...separately. Clamp firmly with needle-nosed pliers. Clamp firmly with needle-nosed pliers. Power supply side Ground side 11 Parking brake switch For details, consult the relevant documents from Pioneer. WARNING: IMPROPER CONNECTION MAY RESULT IN SERIOUS DAMAGE OR INJURY INCLUDING ELECRICAL SHOCK,...


