
Owner's Manual
Page 2
... future reference. Adjusting source levels 11 Other Functions 12 - Example of the remote control 5 - Before You Start Information to the radio 7 - Pausing disc playback 10 - Please read through this unit What's what 6 - After reading, please keep the manual in...curves 11 - Storing and recalling broadcast frequencies 8 - Using the equalizer 11 - Setting the clock 12 - Display indication 7 Basic Operations 7 - Contents Thank you for purchasing this unit 3 After-sales service for Pioneer products 4 Visit our website 4 Protecting your unit from theft 4 - DIN Rear...
... future reference. Adjusting source levels 11 Other Functions 12 - Example of the remote control 5 - Before You Start Information to the radio 7 - Pausing disc playback 10 - Please read through this unit What's what 6 - After reading, please keep the manual in...curves 11 - Storing and recalling broadcast frequencies 8 - Using the equalizer 11 - Setting the clock 12 - Display indication 7 Basic Operations 7 - Contents Thank you for purchasing this unit 3 After-sales service for Pioneer products 4 Visit our website 4 Protecting your unit from theft 4 - DIN Rear...
Owner's Manual
Page 6
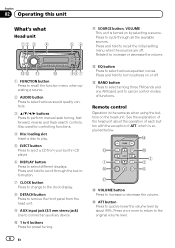
... This unit is turned on by about the operation of each button with the exception of functions. Press and hold to recall the initial setting menu when the sources are off . Press and hold to turn loudness on the head unit. Press to cycle through the text information... to change to the clock display. 8 DETACH button Press to remove the front panel from the head unit. 9 AUX input jack (3.5 mm stereo jack) Use to 6 buttons Press for controlling functions. 4 Disc loading slot Insert a disc to play. 5 EJECT button Press to eject a CD from your built-in CD player. 6 DISPLAY button...
... This unit is turned on by about the operation of each button with the exception of functions. Press and hold to recall the initial setting menu when the sources are off . Press and hold to turn loudness on the head unit. Press to cycle through the text information... to change to the clock display. 8 DETACH button Press to remove the front panel from the head unit. 9 AUX input jack (3.5 mm stereo jack) Use to 6 buttons Press for controlling functions. 4 Disc loading slot Insert a disc to play. 5 EJECT button Press to eject a CD from your built-in CD player. 6 DISPLAY button...
Owner's Manual
Page 12
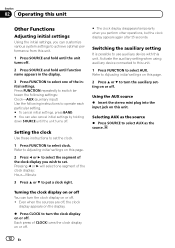
... as the source % Press SOURCE to select AUX as the source. Each press of the initial settings. Setting the clock Use these instructions to set . Activate the auxiliary setting when using auxiliary device connected to this unit. 1 Press SOURCE and hold until the unit turns off... . ! Press FUNCTION repeatedly to switch between the following settings: Clock-AUX (auxiliary input) Use the following instructions to operate each particular setting. # To cancel initial settings, press BAND. # You can turn the clock display on or off . Section 02 Operating this unit Other Functions...
... as the source % Press SOURCE to select AUX as the source. Each press of the initial settings. Setting the clock Use these instructions to set . Activate the auxiliary setting when using auxiliary device connected to this unit. 1 Press SOURCE and hold until the unit turns off... . ! Press FUNCTION repeatedly to switch between the following settings: Clock-AUX (auxiliary input) Use the following instructions to operate each particular setting. # To cancel initial settings, press BAND. # You can turn the clock display on or off . Section 02 Operating this unit Other Functions...


